
Intro
In affiliate marketing, innovation is the key to success, and to be a successful affiliate, you need to be constantly looking at new ways to improve your performance.
So while it may be tempting to take a uniform approach to your business, getting too comfy with one way of doing things can lead to diminishing returns.
The reason?
There’s no guarantee that what worked yesterday will still work today. Plus, even if you stay the same, your competitors won’t standstill. Sooner or later, you start to lose your edge.
This same law also applies to the other links in the affiliate chain, and the ad networks you buy traffic from are no exception. Ad networks that don’t move with the times are far more likely to get left behind.
So when I found out that TrafficJunky had completely remodeled their DSP to include enhanced pricing models, plus added a whole bunch of new and amazing features to their self-serve platform, I decided to check them out.
The results were impressive, to say the least!
So if you wanna master the art of using the new TrafficJunky interface and find out how to quickly create winning campaigns in competitive niches with TrafficJunky – read on!
Use the code TJMOBIDEA21 to get an $50 bonus on the first top up.
TrafficJunky Overview
If you’ve used TrafficJunky before, it’s best to start with a blank slate and forget everything you thought you knew. It’s time to join the dark side of affiliate marketing, where the money flows like a river and the chicks are hot!
TrafficJunky is a CPM-based self-serve demand-side platform (DSP) that focuses on high-value traffic from some of the world’s largest adult publishers.
The platform has been fully rebuilt to include programmatic advertising and real-time reporting, which is reflected in the new interface.
These changes also make a world of change in how you run your campaigns and their eventual performance.
TrafficJunky is largely focused on traffic from Tube sites, and up to 75% of all global traffic is from Tier 1 Geos.
This is fantastic news for affiliates who run offers for North America, Europe, and even Asian traffic is well represented.
As far as volume goes, TrafficJunky network has over 4.6B daily ad impressions from over 150M daily visitors.
The Montreal-based ad platform was launched in 2008, and offers various targeting options, reporting features, and auto-optimization tools.
They’re also one of the few ad networks that gives you targeting data based on user demographics. This is super helpful for affiliates buying adult traffic, as advertisers can target age, gender, and sexual orientation etc. for improved results.
Creating Your Account
Before we get to the good stuff, you’ll first need to create a TrafficJunky account.
TrafficJunky has changed just about every aspect of their ad platform, and the registration process is no exception.
Go ahead and click the Signup button to start. Next, pop your details into the registration form and click Continue. You can also use LinkedIn, Google, or Paypal to register your account.

Now click the email verification link sent to your email and login to your account. If you used one of your social media accounts to sign up in step 2, use this to login.
If you’ve previously registered with TrafficJunky, now’s a good time to login to your account and see what’s new. Your account should have been fully upgraded to the new platform. If not, contact your account manager about getting moved across. You’re gonna love what you see!
Ready to get started?
Use the code TJMOBIDEA21 to get an extra $50 added to your account when you make your first deposit.
The TrafficJunky Dashboard
It takes only a single glance to see that the TrafficJunky Dashboard has had a serious makeover. Everything you need to run a successful ad campaign can be accessed from this screen.
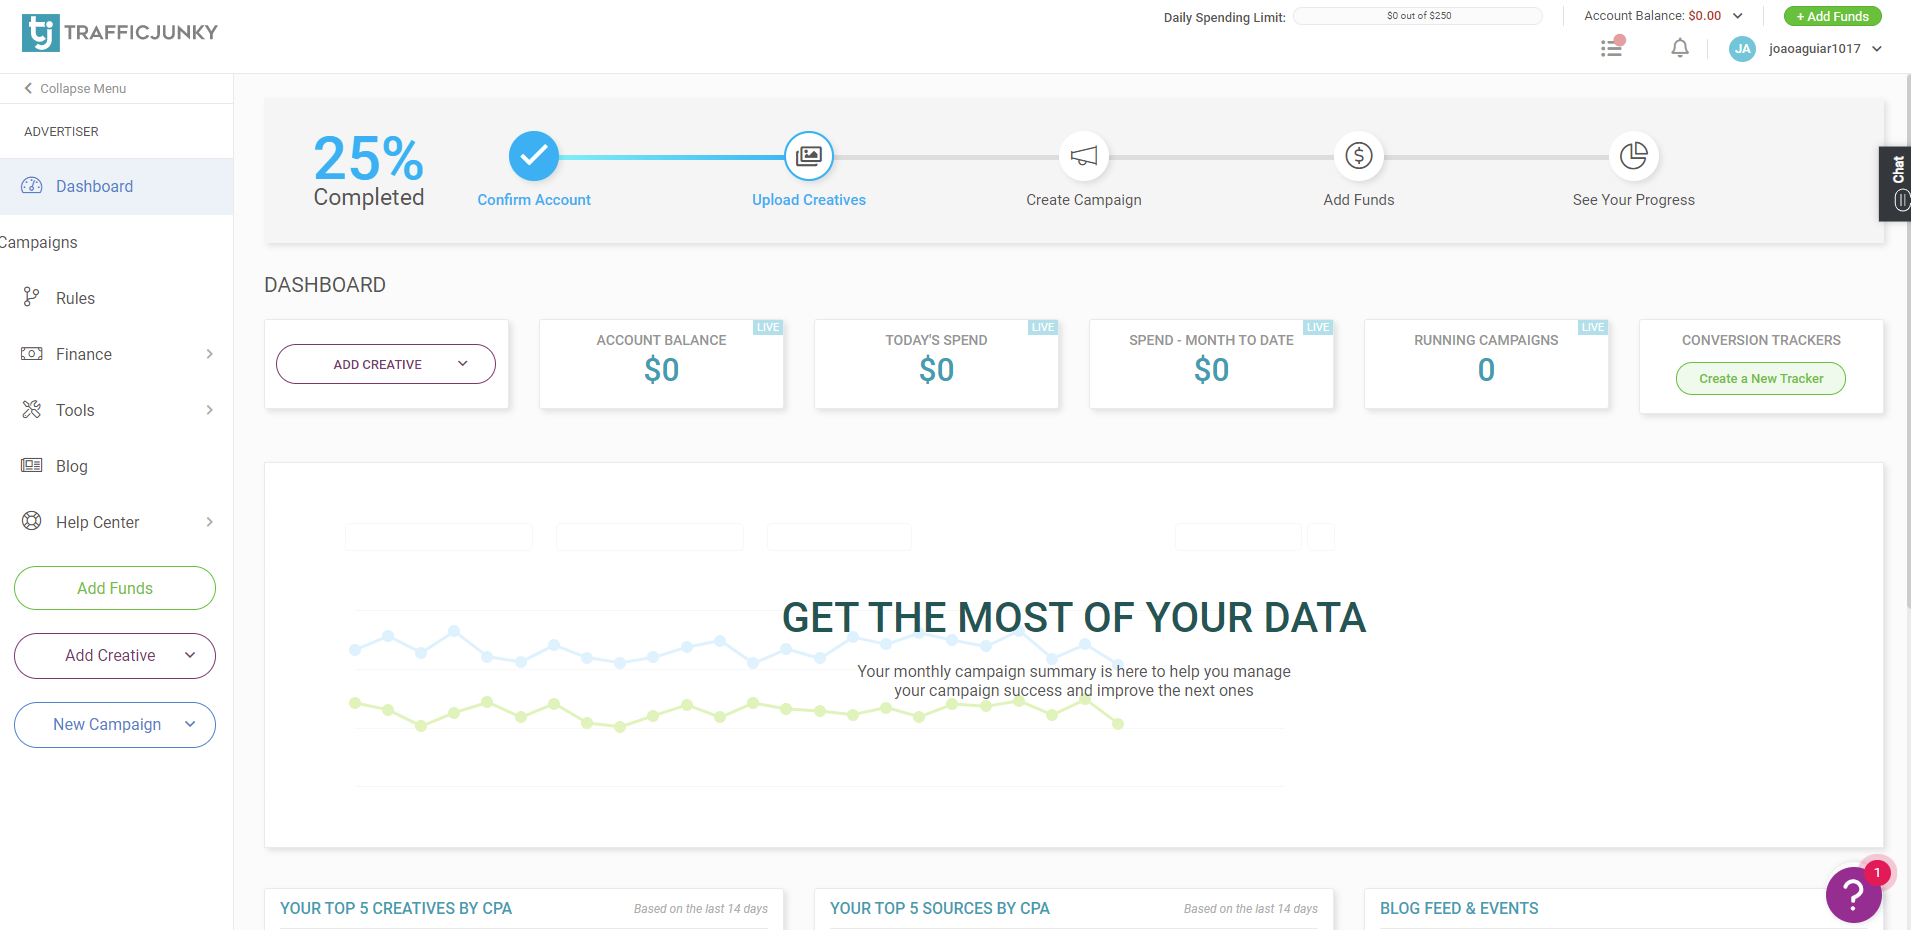
There are links to each section of the platform, along with a well-presented monthly campaign summary.
You’ll also be able to see your top 5 creatives and sources without having to delve deeper into your stats.
If you’re new to the platform, the simplest way to get started is to follow the completion checkboxes at the top of the page. I’m gonna look at this process in two shakes.

You can also navigate your way through the platform using the left-hand menu column links. Use these links to find your way around the Dashboard, Campaigns, Rules, Finance, Tools, Blog, and Help Center.
The dash function is every bit as good as it looks, and gives new users a clear indication of how to get the most out of TrafficJunky, so take some time to familiarize yourself with it.
Adding Creatives in TrafficJunky
The new TrafficJunky platform lets you create high converting campaigns of pure profit potential in record time.
However, there are a few things you need to be aware of before you get started.
First of all, TrafficJunky has a different flow from what you might expect. You’ll need to set up your creatives first, before creating a campaign.
While this may seem counterintuitive at first, it actually makes a lot of sense. Having an approved pool of creatives saves you time when creating campaigns and speeds up the approval process.
Since the ad creatives need some time (from about 10 minutes up to 1 hour) to get approved, it’s a wise idea to upload all the creatives and then set up your campaign while waiting for them to get through. This way, when you reach the next stage, you’ll be able to see the creatives and select them for the campaign.
You can choose between four types of images to upload, using the Add Creative button:
- Static Banner
- Video Banner
- Overlay Logo (the logo image to be added as a top layer of video banners)
- In-Stream Video
It’s worth noting that not every banner type can be used with all targeting options, so make sure the banner type is available for your chosen ad location prior to uploading.
Let’s say you wanna choose a static banner.
First, click on Add Creative and select Static Banner. You’ll be instantly transported to the Media Library. You can also access this section under Tools in the left-hand menu.

What I like about this is that it offers a super convenient way to see all your creatives and filter them by type. There’s also a rejected column, so you’ll always know which creatives are approved before pairing them with your campaigns. With TrafficJunky you can even add labels to your creatives to help find them later.
It’s a good system and saves you from having to scurry around blindly trying to find which creatives you uploaded and when.
Pick a creative you wanna use for your ad, using a suitable ad format for your chosen banner type. Available ad dimensions are 950×250, 315×300, 300×250, 468×60, 305×99, 635×150 and 30 x150 and advertisers can upload in JPG, GIF, or PNG format. There are even options to add an animation flag or choose the target group for your creative.
Feeling lost?
Here’s a quick breakdown of which ad dimensions to start with:
- 300×250 has good volumes but it may fail to have a quality that as high as that of 305×99.
Why?
- Because 305×99 is the size of Header spots and 300×250 is the size of Mobile Footer spots.
Inside the 305×99, you have Headers, Underplayers, and Embeds. The latter has the lowest traffic available. In addition, the Underplayer showcases the poorest performance inside the 305×99 spot.
Now, what?
The approval process usually takes between 10 minutes to 1 hour. If you carried out this step before creating your campaign your creatives should be good to go by the time you are done. Approved creatives can be used and reused with any campaign.
Now that you’ve uploaded at least one usable creative, it’s time to move on to creating your first campaign.
Creating Your First Campaign on TrafficJunky
Congrats, you’ve made it! Now it’s time to set up your first campaign.
Click ‘Create Campaign’ from the dash to get started and give your campaign a name. You can also add groups and labels to make it easier to find your campaign later.
Then select your preferred device targeting: All, Desktop, or Mobile.
Conversion Tracking
Next, choose your conversion tracker. If you haven’t already created a conversion tracker you can do so here.
While you can run campaigns without a conversion tracker, you won’t be able to use some of the advanced features without it. This applies to Autopilot and other advanced features that use a data flow, so it’s best to set this up now.
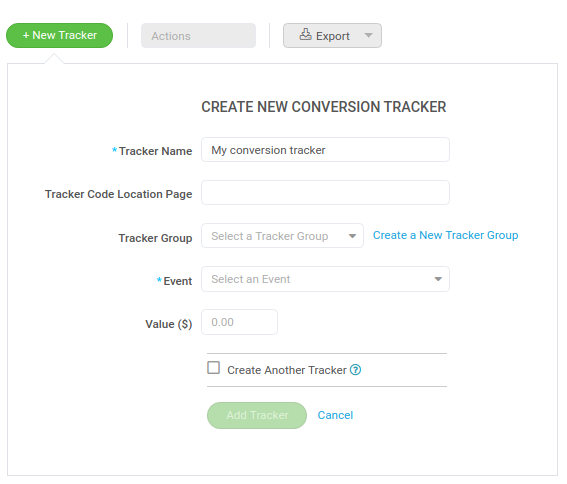
The conversion tracker is placed on your landing page and is associated with an event. This can be Lead, Purchase, or Page View. Choose the one which is best suited to your goals and assign a value (how much it is worth).
This code can be used with postback and will send back data to TrafficJunky. You can use more than one conversion tracker for each campaign.
You can then visit the Conversion Tracker section in Tools to see your conversion stats.
Now choose your ad dimensions for the campaign.
Tip: Check the TrafficJunky blog to see trending ad placements.
Next, set your schedule and target audience. Use the demographic filter here to narrow down your selection.
You can also use exclusion pixel targeting or opt to retarget people who have previously visited your page.
To fine-tune your targeting options, toggle the Keyword Tool to On. You can select up to 30 target keywords and 20 excluded keywords to target specific content on the publisher’s page.

Now add GEO, ZIP, ISP, and IP targeting as needed. Use this in lieu of carrier targeting.
Your ad placement will be on the TrafficJunky Exchange. This includes some of the world’s largest adult sites.
Here are the available ad positions:
- Above the fold
- Below the fold
- Footer
- Fullscreen
- Header
- Sidebar
- Unknown
Tip: Try not to target too many spots at once as you will be limiting your impressions for your budget.
Finally, select browser and mobile connection targeting.
Autopilot
Before saving the campaign you have the option to turn on Autopilot. This tool uses an algorithm to automatically adjust the creatives shown on your campaign based on the ad performance.
It works by adjusting the weights of the ads and automates rotation to make sure that your best converting ads will be shown more frequently. You need to have a conversion tracker selected to use this tool.
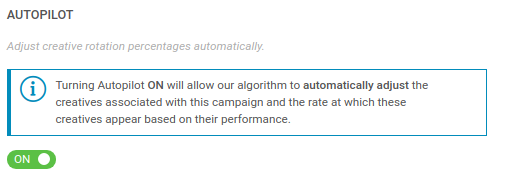
This can save you a lot of time!
A word of advice: You will need to set aside a test budget when using Autopilot.
This is to feed the algorithm sufficient data so that it can calculate your top-performing ads.
It’s recommended to set your test budget 4 times your Target CPA. More details will be covered in the Optimization section.
Creating Your Ads
Next, choose your ad type and ad name (creative name also works), and specify your target URL. Add dynamic tags to your target URL to improve tracking as needed.
Now copy this snippet of code into your lander to link your tracker with the TrafficJunky platform.
Remember when we uploaded our creative earlier? Select the creative you want to use with and click to use the image with the campaign.
Tip: Make sure the intended creative matches the dimensions for the ad placement. Your banners should match the type of traffic you wanna target!
Next, click to confirm ads, save and continue.
Setting Your Budget
This part’s easy! Simply select your daily limit along with your max bid for any source and click to confirm the campaign.
Try not to set too low a budget or you may not see any impressions for your ad placements, and make sure you add funds to start receiving impressions.
Use the Daily Impressions Estimator under the max daily budget to get an accurate idea of the volume of impressions you will receive for your selected budget.

Optimizing Your Campaigns
With TrafficJunky you have two options – use automatic bidding or choose manual source selection. Automatic bidding will automatically adjust your bids so you can stay competitive. This tool will adjust your CPM values so cannot be used in conjunction with manual bids.
The optimization tools will match your ads to the right audiences and can be used in conjunction with real-time reporting.
You can even adjust your campaigns in real-time, including creatives and sources by clicking edit on the campaign tab.
The bidding tool will allow you to set your maximum target CPA in dollars. You will also need to enter a test budget of at least 4 times the value of your target CPA to gather enough data.
Calculating your target CPA is outside the scope of this article but check the links below for some good resources on finding out the true cost of conversion.
Related Content: How to Choose High Paying CPA Offers on Mobidea
With a conversion tracker selected you simply set your target CPA and let the algorithm optimize your ads for you.
The Autopilot makes your campaigns easy to scale and rules can be set cross-campaign to help with larger budgets.
If you choose to go down the manual route you can search by Site or SourceID to include or exclude sources. This includes RON sources. As these are all excluded by default you must select at least one source here to continue.
You can also define custom rules to set conditions for your ads. Use these to exclude low-performing sources based on the condition frequency over time.

For example, you can choose to exclude sources with low ad impressions over a set time period.
Once you have set your rule, it will be available to be used as a template for any future campaigns.
This is a very handy tool and can save you a lot of time wading through spreadsheets!
Click save to start your campaign.
You’re done!
You can edit sources and other campaign settings later from the Campaigns tab.
Bidding
The TrafficJunky algorithm evaluates the campaign parameters and sends impressions based on the highest potential revenue for publishers – while trying to give impressions to as many advertisers as possible.
What does this mean in practical terms?
If you don’t have enough account balance, or if you’re bidding for too many spots and too many impressions at once, your campaign will get less traffic because you can’t afford it.
Imagine you have the minimum bid for a given ad spot.
That doesn’t mean you’ll get less traffic.
What it means is that – if you can afford the total impressions that you’re bidding on – you can get most of the traffic.
Let us media buying bros show you an example!
Now, let’s do the math!
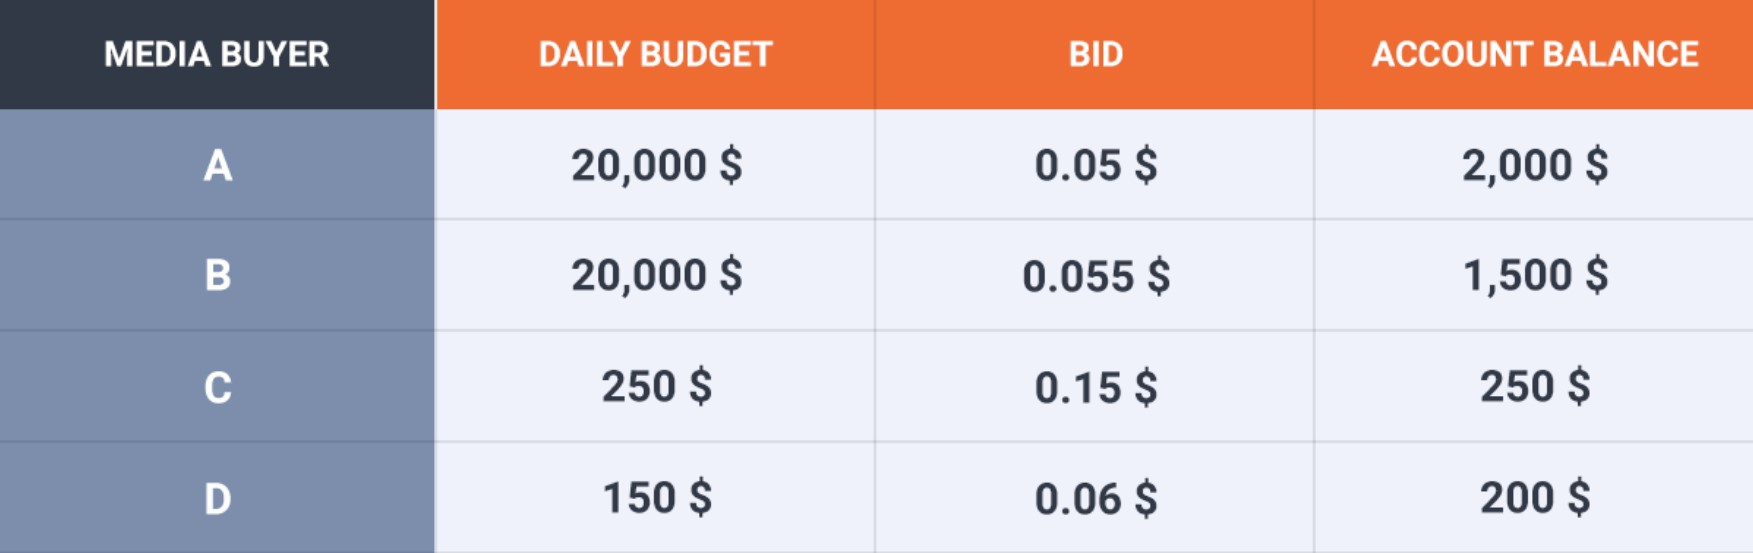
Let’s say that Media Buyer A aims to spend 20K per day with a 0.05$ bid.
Even so, he doesn’t have 20K in his account.
In fact, he only has 2K.
So he aims to buy = (2,000$ /0.05$) x 1000 = 40M impressions.
Following this logic, the Media Buyer aims to buy:
- Media Buyer A – 40M impressions
- Media Buyer B – 27M impressions
- Media Buyer C – 1.6M impressions
- Media Buyer D – 2.5M impressions
By looking at the campaigns of these Media Buyers, we know that the spot’s total daily volume is 2M impressions.
Media Buyer A, B, and D can cover/buy the total volume of this spot by themselves because they’re bidding for more than 2M impressions.
The next step?
Understanding how it’s possible for TrafficJunky’s publishers to receive the most money for their traffic.
Media Buyer D has the highest bid ($0.06) of all the Media Buyers that can cover the volume of the spot.
This means he’ll get the most traffic and the first position.
Media Buyer B comes in second, since he’s got the second-highest bid ($0.055) that can cover the spot’s daily traffic.
The third place goes to Media Buyer A, with the third highest bid ($0.05) that can afford the spot’s traffic.
In fourth place is Media Buyer C, who has the highest bid but can’t afford the total spot’s traffic.
This is the perfect example of how the Daily Budget, the Bid, and the Account Balance play into the calculation and the division of traffic on TrafficJunky.
Remember to take advantage of the Bid List (at the end of the campaign creation) before running the campaign and setting it live.
It’s pretty useful to have an idea of your bid compared to the volume of the target GEO/spot.
Funding Your Account
If you see the status of your campaign as NOT RUNNING, you probably need to add funds to your account. Hover over the tooltip to check.
You can also check the completion status from the dash. If its stuck at 75% this is a good indicator you need to top up your balance
If you’ve just signed up, you may also be asked to complete an ID verification check. This includes a photo ID and face liveness detection. This is necessary to prevent fraud and protect your funds.
Once this has been completed, you can then top up your balance with Credit Card, Paxum, Crypto, Wire Transfer, or Promo Code.
Want an exclusive TrafficJunky Promo Code?
Use the code TJMOBIDEA21 to get an extra $50 added to your account when you make your first deposit.
Reporting and Analytics
One of the interesting features of TrafficJunky is its specialized reporting and analytics platform.
You can access this from the Campaign tab and see Performance and Pricing stats for your campaigns.
These include:
- Impressions
- Clicks
- CTR
- Conversions
- Cost
- eCPM
- eCPC
- eCPA
This provides you with an overview of all your campaigns via multiple dimension breakdowns, graphs, tables, and filters.
It gives you useful data regarding your campaign stats. You can also export reports and track conversions.
Advertisers can also use the Dashboard overview to see their performance stats at a glance.
TrafficJunky will give you easy access to the performance stats for each of your campaigns. It will also save you the amount of time that you would spend evaluating stats in your tracker.
It updates every in real-time, like all other traffic source stats.
You can also see stats that will help you tweak your campaign strategy for the best results.
There are: Recommended Spots, Trending Keywords, and Top Campaigns.
TrafficJunky Review – Verdict
Pros
- Huge volume of traffic from the world’s top adult sites.
- Vastly improved self-serve platform.
- Optimization tools.
Cons
- CPM ads only.
- High CPMs for some ad spots.
TrafficJunky offers a huge amount of quality traffic on some of the industry’s largest websites and ad spots.
In fact, that’s their best selling point and what actually sets them apart from other adult ad networks.
You’ll be challenged while using TrafficJunky, and the ISP target will be tricky to get 100% right, because of the huge amount of ISPs available and because of the fact that you can target 20 at most.
Moreover, newbies may find the bidding system tricky at first.
You’ll need to spend some time analyzing how it all works to be able to understand how each variable counts towards the bid positioning.
Be certain of the spot you select and take a moment to understand whether or not the traffic available is relevant before launching your campaign!
In addition, remember that the competition for the spot matters.
This means you must pay attention and take advantage of all of this if you wanna master the platform.
Offers & Verticals
Ad Types: Mobile and desktop display banners and pops.
Cost Model: CPM.
Verticals: Online Dating, Gaming, Adult Entertainment, Adult Pay Sites, VOD & SVOD, Live Webcams, Gambling, Health & Wellness, and others!
Publishers: Internal Premium & Run of Network (RON).
Payment & Investment
Minimum Deposit: $100 via Visa and Master.
Payment Methods: Visa, Master, Paxum, Crypto and Wire Transfer.
Support
Personal Account Manager: Yes.
Support Response Speed: Fast. They have 24/7 year-round live support through phone and live chat.
Support Rating: Great. The answers were detailed and clarifying.
Contact Methods: Live chat, phone and via email/Skype with your account manager.
Help Center: FAQs, Ad Formats, Blog, Resource center, Contact, Rules & Regulations, Terms of Use.
Contact: support@trafficjunky.com
Wrapping Up
It’s not every day you find something to get excited about in the affiliate space, but this update from TrafficJunky definitely fits the bill.
Campaigns are fast to create and the quality of the traffic is high.
TrafficJunky is one of the top adult traffic sources in the industry and the recent updates will help advertisers to get even more value out of the platform.
We hope that this article has given you a better understanding of the dynamics and tools that TrafficJunky provides its advertisers.
What’s next?
Find your niche and start making money with TrafficJunky now!

ExoClick is one of the top adult ad networks where you can get awesome traffic! Read our ExoClick review and find out why!

A Zeropark review that's perfect for media buyers and affiliate marketers to learn how to launch a great campaign on Zeropark!

This PopCash Review will allow you to learn how to setup a campaign on PopCash like a true media buying master professional!