
What is Traffic Force?
Looking for a new traffic source to make money with Adult, Dating or Nutra offers?
This Traffic Force review is just for you then!
I’m going to walk you through every step involved in preparing, launching and optimizing campaigns on Traffic Force.
Traffic Force is a CPM ad network with display banners, popunder ads, pre-roll video ads and push notifications from large video tubes with over 15 billion ad impressions monthly.
Traffic Force is also a SSP so you can easily buy programmatically and with real-time bidding if you connect your DSP to it.
Traffic Force Overview
Let’s cover the main features quickly.
Geo reach:
Traffic Force offers WW traffic with the top sources being China, USA, Germany, France and The UK. After registering, you can see the available volume by countries, sites and types of traffic in the section “Ad Management → Country Impressions”:

[Click image to expand]
As obvious from the image, you can easily analyze what kind of traffic from which country in what volume you had available with a back date.
Bid Analytics:
There is also this super useful feature called Bid Information. It allows you to analyze the bids according to different parameters such as country, device type and traffic type.
Yeah! You heard that right.
You can literally see the rates for – let’s say – popunder mobile traffic in Canada:

[Click image to expand]
Types of traffic:
- Display
- Popunder
- Menu Tabs
- Pre-Roll Video
- Push
Targeting options:
No surprise here – you can create campaigns using the general targeting settings such as GEO (Country/Region), device type, OS, Browser, Carrier, IP range, connection speed.
Tracking:
With various ad channels and options for buying premium advertising, you can source the best traffic for your needs very easily through a user-friendly interface.
Traffic Force integrates with popular trackers and all you have to do to get plugged is to simply select them from the source list of your tracker.
Here’s how it looks like in Voluum:

[Click image to expand]
BTW, if you’re not using a tracker yet, here’s a Voluum discount coupon that Mobidea Academy has for you.
And this is how it looks in Binom:

[Click image to expand]
In case you want to give Binom a try, here’s the Mobidea Academy’s exclusive Binom coupon.
In case you need manual integration, use the following macros/tags:
Tags:
{site_id} – id of the site on which the ad is shown
{site_name} – name of the site on which the ad is shown
{channel_id} – id of the channel on which the ad is shown
{channel_name} – name of the channel on which the ad is shown
{campaign_id} – id of the campaign
{campaign_name} – name of the campaign
{group_id} – id of the group
{group_name} – name of the group
{ad_id} – id of the ad
{ad_name} – title of the ad
{keywords} – list of keywords by which the ad was found
{v_country} – visitor country
{v_language} – visitor language
{v_browser} – visitor browser
{v_os} – visitor operating system
{ad_name} – title of ad (except richmedia)
{v_device} – visitor device
{v_device type} – visitor device type
{v_carrier} – visitor carrier
How to Create a Campaign on Traffic Force Step-by-Step
First of all, create an account on Traffic Force.
There are a few steps to follow in order to create a campaign on Traffic Force.
In the beginning the approach may feel a bit unusual, but by your second or third campaign you will be as used to the logic as I am. I launched 3 campaigns in 3 different GEOs in literally five minutes. And this is while adding offers to my tracker.
Let’s proceed with the step-by-step campaign creation, shall we?
Step 1: Campaign Setup
Go to the Ad Managment section and click the “Create Campaign” button.

[Click image to expand]
- Specify the campaign name
- Then indicate the total budget
- Be sure to specify your vertical

[Click image to expand]
Then continue below with the “Targeting Setting”:

[Click image to expand]
You’ll see all the standard options:
- Country / Regions
- Languages
- Scheduled show
- Keywords
- Operating Systems
- Browsers
- Devices
- Carrier
- Gender
- Retargeting
- Connection speed
- ISP
Step 2: Ad Group Setup
My favorite part!
Traffic Force allows you to create several ad groups for a single campaign which lets you play around with the creative types, the frequency capping and so on. If you want to increase the traffic volume further, you can simply add another group with different type of ads to this same campaign.
Let’s say you start with popunder traffic. Then you go on to add banner ads, text ads, videos, push ads.
All this packed in the same campaign? Yes, totally possible with Traffic Force!
It’s hassle-free and boosts productivity, because you’ll longer have to create dozens of separate campaigns and spread your attention thin.
I’ve broken the process down to its elements. By the time you finish this part, you will have the knowledge to be the master of Ad Group setup on Traffic Force!
Let’s go!
Name, Budget and Frequency Capping

[Click image to expand]
You can control the frequency of display to determine how many times one user will see your ad. Keep in mind that the bid cost will depend on this parameter.
If the frequency capping status is disabled, the price will be the lowest, but the quality of users might not meet your expectations as you’ll get users who’ve seen many advertisements already.
Want more “fresh” clicks? Increase the frequency! We’ll go into more details on this in a bit.
Setup Conversion Postback
You absolutely must have a working postback in place before you continue so double and triple-check if you have to.
Enable Auto-Optimization
Once your postback is set and ready, you can enable auto optimization to display the banner with the best CTR or the banner with the most conversions (if you’re using conversion tracking).
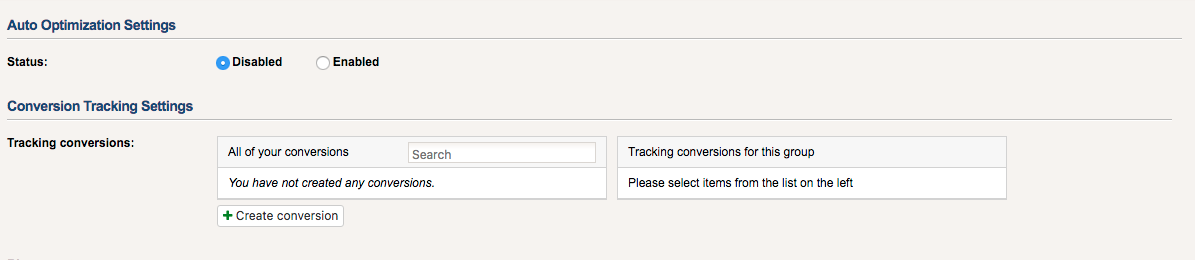
[Click image to expand]
Here is a detailed guide on how to do this: https://www.trafficforce.com/conversion-tracking.html
If you want to transfer information about your conversions and earnings to the source of traffic, you will need these parameters in the next steps.
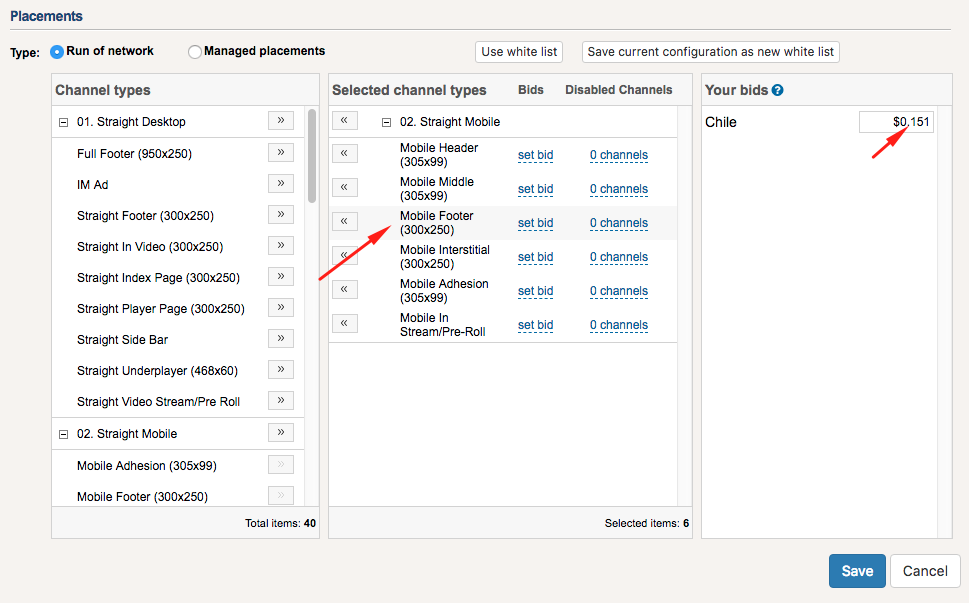
Chose Placements
You can choose RON (Run Of Network) or target specific Channels. I would suggest to start with RON and create a whitelist later when you will have statistics and know which sources are good for your offers.

[Click image to expand]
Set Bids
This will be lengthy, so bear with me.
When you select multiple channel types in a single group, you have to make sure to set the bid per channel type by clicking on “set bid”. It’s easier with an example:
Let’s suppose you want to create a campaign for mobile devices of heterosexual users from Chile, and you want to test 300×250 display banners and pop-up traffic.
From Placements Type chose Straight Mobile (where Straight indicates Heterosexual) and suitable Channel. Then proceed to set the bid.
Related content: Bidding Strategies in Media Buying

[Click image to expand]
A minimum bid loads by default – update it if it’s not the right amount.
If you select multiple placements in the same group, you have to make sure you’ve specified a valid bid for each placement. To do this, you need to click on a bid and see the hint (picture below):
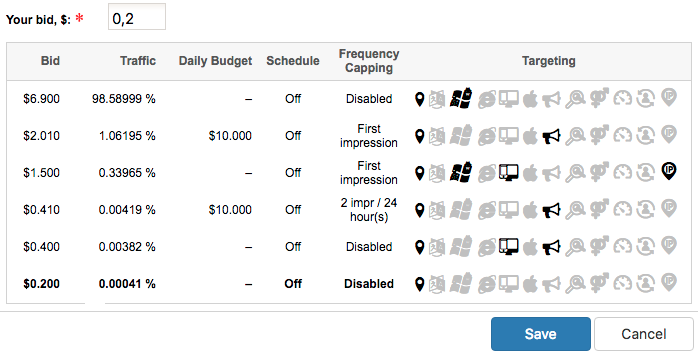
[Click image to expand]
It should be noted here that although we chose a Frequency Capping of 1/24 at the previous step, at this bid we won’t be able to buy traffic with this quality.
As you can see, when we set the price at $0.2 the Frequency Capping is disabled altogether. The traffic probably won’t be what you expect, so you’ll need to increase the bid.
Let’s suppose we increase the bid to $0.41 and set a daily budget of $10. This will drive much better traffic at a 2/24 Frequency Capping.
If you want to get the First Impressions you’ll have to increase bid to $1.5.
Increasing the bid further to its highest – $6.9 – will allow you to get 98% of the available traffic.
As we see from the explanation so far, the Bid Section is very important (and useful!), and you will come back to it repeatedly during your campaign optimization.
Hit the save button!
And you’re done! Time to move on!
Step 3: Create Ads
Banner regulations:
- No ads that contain a misleading x to close, cancel or skip ad button.
- No fake play buttons, buffering animation or the use of the word play as call to action, the words “play now” buttons are only allowed on game offers, where you actually play the game.
- No fake back/forward buttons.
- No ads that contain drop down menus or check boxes.
- No fast animation or bouncing ads.
- No ads that look like they are video thumbs on the website.
- No ads that break copyrights like; Facebook, Skype or Twitter style ads.
- No ads that suggest the banner is any type of message, call or dialog box or any
other type of fake notifications. - No ads or banners that imitate Microsoft Windows or Mac OS elements.
- No ads with poor content/quality.
- No ads without clear call to action.
- No ads that ask disclaimer questions, such as “are you 18+?”.
- No ads that contain the following words: BANNED, FORBIDDEN, ILLEGAL.
- No ads with a bouncing/moving/blinking call to action.
Mobile popunder rules:
- No direct linking to an app store of any kind.
- Absolutely no using entry or exit alerts or notifications on landing pages, this includes using vibration.
- No sound or auto-playing video.
- No misleading ads such as telling our users they have a virus or false advertising of apps etc.
- No hijacking focus from our sites, pops should run in the background and not take away from user experience.
- No advertisement from other traffic networks allowed on landing pages.
- No blocking of the back button on android devices is allowed.
- No auto APK downloads.
- Requesting the user to send push notifications is not allowed.
Web popunder rules:
- Absolutely no using entry or exit alerts or notifications on landing pages, this includes using vibration.
- No sound or auto-playing video.
- No misleading ads such as telling our users they have a virus or false advertising of apps etc.
- No advertisement from other traffic networks allowed on landing pages.
- Requesting the user to send push notifications is not allowed.
Be careful and try not to upload ads that do not comply with the rules. They don’t like it!
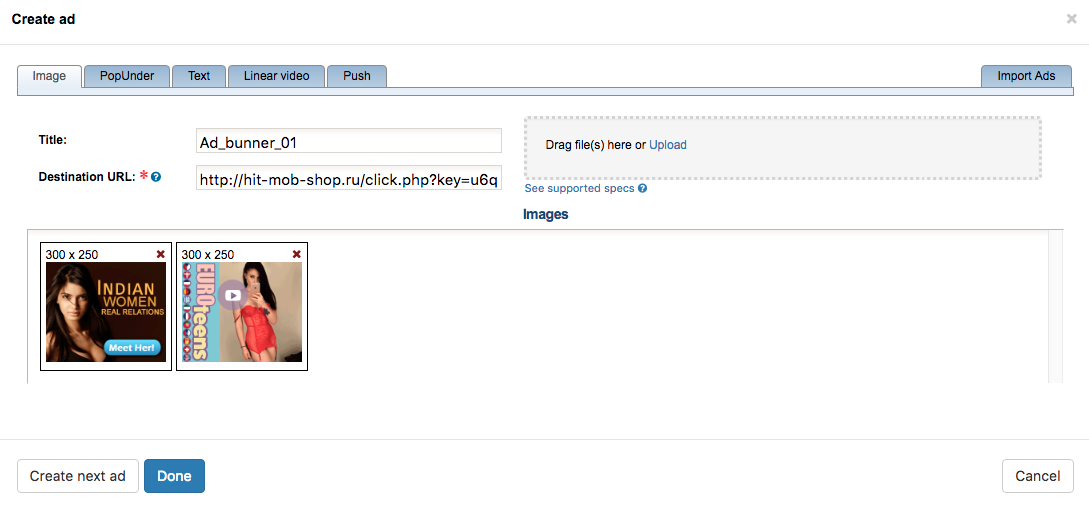
[Click image to expand]
In this example, the ad on the right (the girl in the red dress) will be rejected because it contains the Play button.
In any case – if your ads are disapproved – you can ask your manager about the reasons you got rejected.
Step 4: Campaign Optimization
So far, so good, you’ve launched your campaign!
With the first conversions comes the need to start optimizing.
Always keep in mind that your campaign consists of ad groups and the ads.
Optimizing Ad Placements
Ads are shown on sites (Site Name tag) through the so called Channels.
Channels are specific places on the sites where the placements show. For example “mobile footer 300×250” or “Site Wide Footer”. In fact, these concepts are interconnected as the Channel ID parameter transmits the number corresponding to the specific position on the site.
A list of all the macros, including which positions and on which sites they work, is available for you here: https://dashboard.trafficforce.com/advertiser/site_channel_macros
Take a look, and everything will become much clearer.
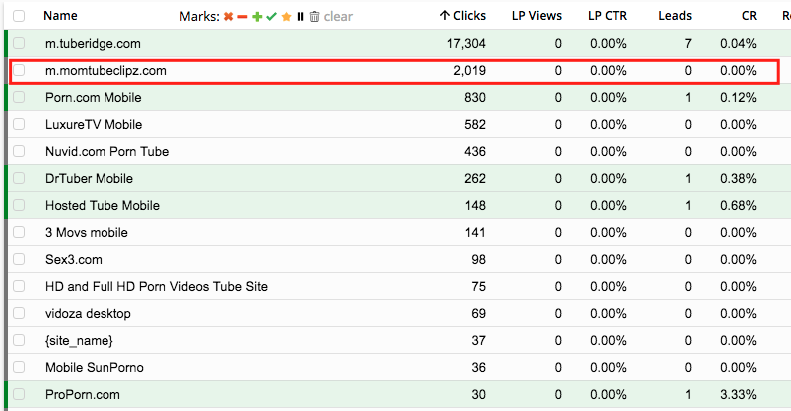
Let me show you an example of how I do optimization.
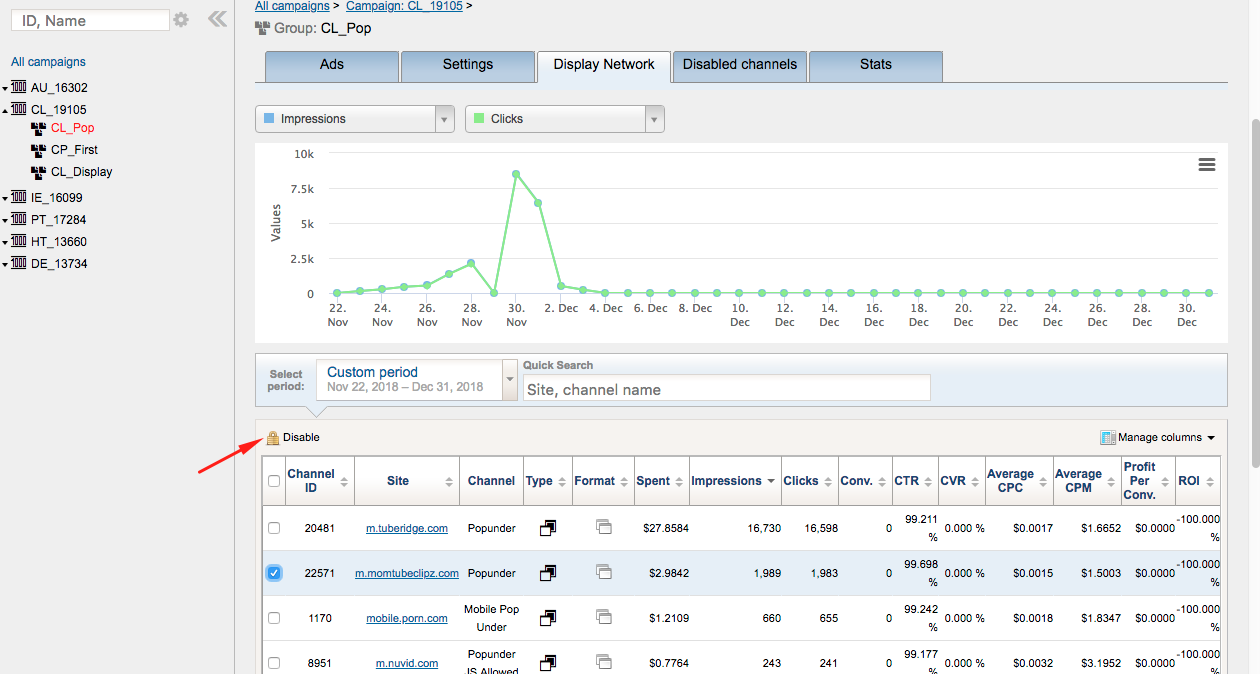
First of all, I look at all the parameters that I receive in the tracker, and I notice immediately the positions that didn’t generate conversions. These I turn off right away, no second guessing.
Here’s how my popunder traffic performed:
[Click image to expand]
It seems that my offer wasn’t a great match for the audience on the dedicated site at all, so what do I do – disable!
Doing that is super easy! I return to Traffic Force, open the Ad Management section and click on the company name or the “edit” button.

[Click image to expand]
In the ad group management section “Ad groups” I select the desired group, within which to disable the site.

[Click image to expand]
Here I also need to click on the name of the group or on the “Edit” button.
After the section “Display Network” opens, I select the sites that need to be disabled and click “Disable”.
Easy-peasy.
Everything that you switch off will be visible in the “Disabled-Channels” section. If you want to enable something, do it from here.
[Click image to expand]
Optimizing Ad Groups
Ad groups containing several ads, such as display or push – can be optimized by ads.
To do this, open the appropriate group, select the “Ads” section and stop ads that do not perform.
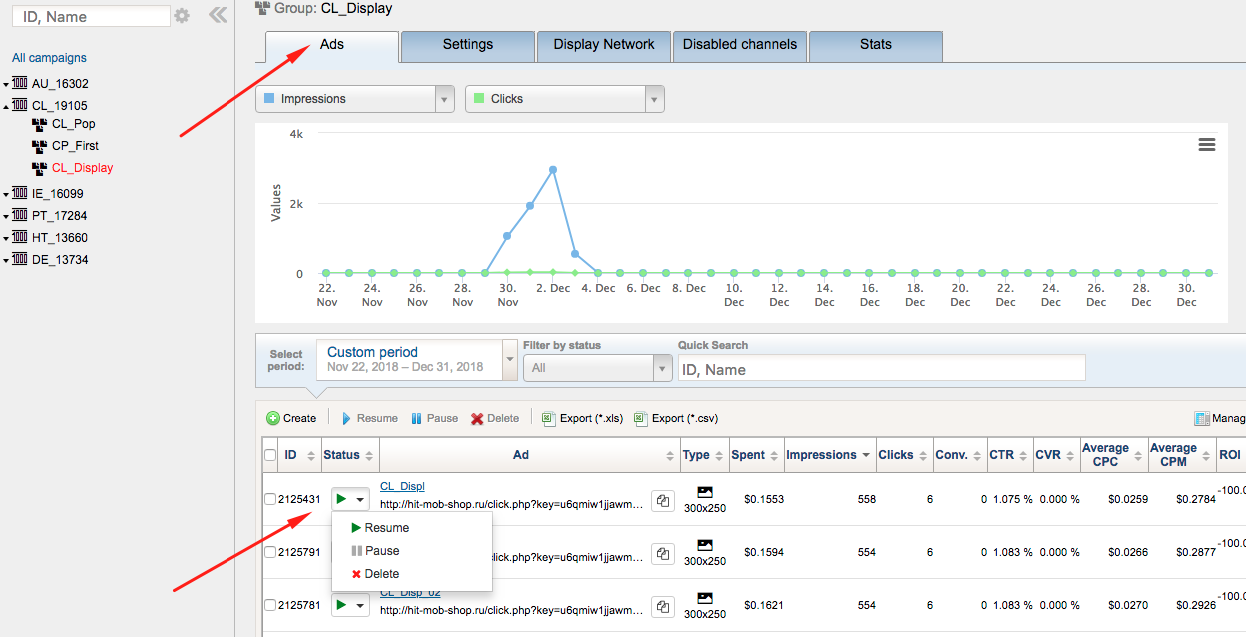
[Click image to expand]
Optimizing Bids
If you want to increase or decrease the traffic volume, it’s best to increase or decrease the bids.
This is done in “Placements” in the “Settings” section, where I select the channel and specify a bid for it ( similar to creating a campaign).
There’s a cool article helping you understand the correlation between bid, volume and CTR. Totally worth checking it out.
[Click image to expand]
All in all, the optimization process in Traffic Force is the common sense one:
- Creative
- Website/Channels
- Bids
As with other sources, you can create whitelists.
Whitelisting is similar to the choice of channels, which was described at the stage of creating ads.
Offers & Verticals
Traffic Force’s profile can be summarized easily:
Ad Types: Display, PopUnder, Text, Video, Push
Cost Model: CPM
Verticals: Adult, Dating, Nutra
Payments & Investment
Minimum Deposit: $100
Payment Methods: PayPal, Paxum, Wire, Credit card.
Support
Personal Account Manager: Yes
Support Response Speed: 15 min – 3 hours
Support Rating: Good
Contact Methods Available: E-mail, Skype
Traffic Force Verdict
Upsides:
- User-friendly structure of campaigns and ad groups
- User-friendly analytics and bid management tools
- Traffic source transparency
- Large and trusted sites
Downsides:
- Strict rules on creatives. Some elements which are forbidden here are allowed on other similar adult sources (such as “play buttons”, or landing pages with 18+ age confirmation)
- Although the sites are big, there aren’t many of them.
See Also:
- CPA Marketing: The Definitive Guide (No Website Needed)
- Ad Networks Reviews Series
- How to Choose High Paying CPA Offers
- Why Mobidea is the Best CPA Network for Beginners


This PopCash Review will allow you to learn how to setup a campaign on PopCash like a true media buying master professional!

This Adf.ly Review is gonna show you how to effectively earn money on this original and super awesome URL shortening tool!

This MGID review is definitely gonna allow you to earn real big bucks on this remarkably original native advertising ad network!