
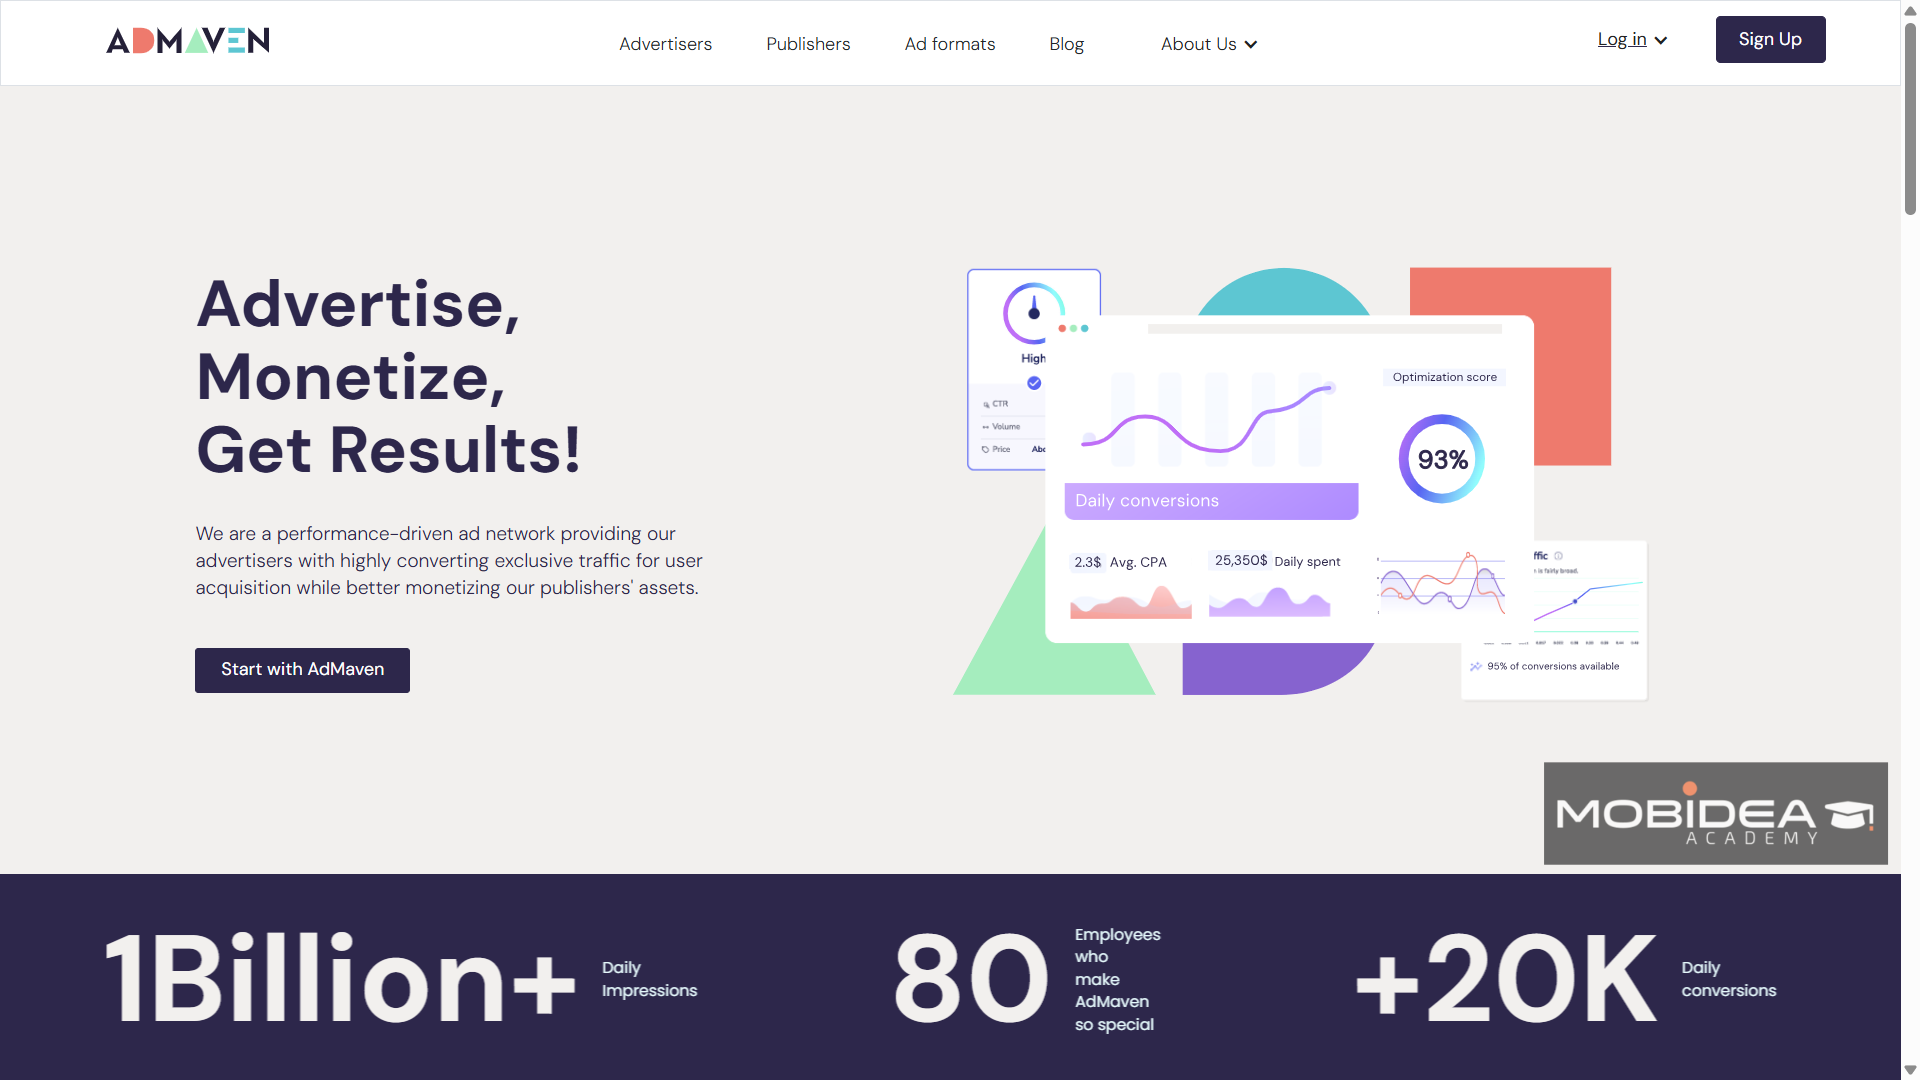
Picking a new ad network always feels like a gamble.
You fund your account, set up your campaigns, and wait.
Two weeks later, you find out that the majority of your budget went to sources that never convert.
By then, you have already lost the time and the money.
So you move on to the next network and start over.
That cycle is exactly what this AdMaven review is trying to help you break.
Does this network actually hold up under real campaign conditions, or is it just another popular online ad platform that looks good on paper?
We’re going to find out in this comprehensive AdMaven review.
What Is AdMaven?
Ad-Maven is an advertising network based in Tel Aviv, Israel.
It has been running since 2010, which gives it more than a decade of experience in advertising online.
The platform serves both advertisers and publishers.
It works as a direct traffic network, meaning it connects advertisers directly with a large pool of publisher inventory.
In 2024, AdMaven recently launched a full rebrand.
The company launched a new website, updated its look, and added new ad formats to its lineup.
The platform was also updated on both the advertiser and publisher sides, with a new dashboard design and improved tools.
Today, Ad Maven runs as a user-friendly self-serve platform with AI-powered tools for campaign management.
It is built for affiliates, media buyers, agencies, and brands.
It also supports programmatic connections through XML, RTB, and API feeds, which makes it useful for ad networks that want to add more traffic sources for their clients.
AdMaven Best Features for Advertisers
Traffic Volume and Reach
Ad Maven delivers over 5 billion daily impressions across 200+ countries.
That number covers two types of traffic, and the difference matters for advertisers.
The first type is direct publisher traffic.
Ad Maven works directly with more than 15,000 exclusive publishers.
The impressions from these direct sources add up to over 1 billion per day.
This traffic is more stable and consistent in quality because Ad Maven controls the relationship with these publishers.
The second type comes from third-party programmatic feeds connected through XML, RTB, and API.
This adds more volume and reach, but quality can vary more than with direct sources.
Ad Maven gives advertisers the option to run campaigns on direct sources only, which is worth doing when traffic quality matters more than scale.
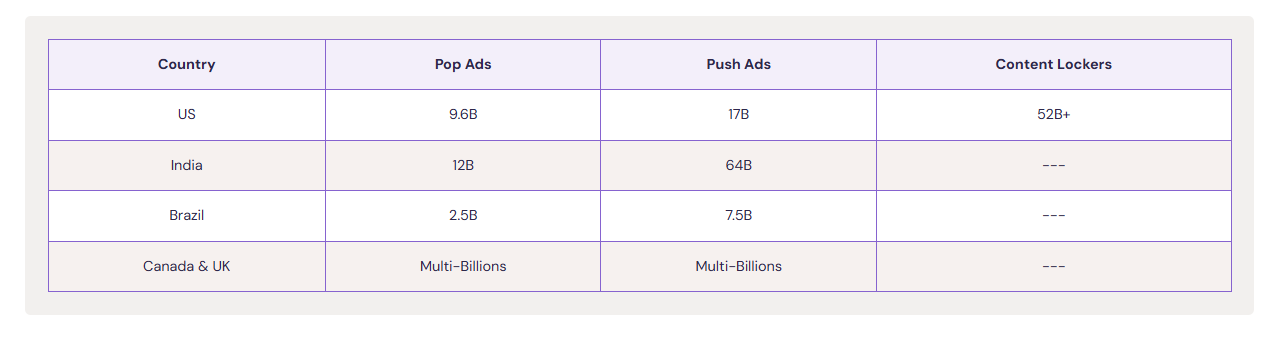
In 2024, pop ads in the US alone generated nearly 9.6 billion impressions over the year.
Push ads in India reached 64 billion impressions in the same period.
These figures come from Ad Maven’s own 2024 data report.
Mobile makes up 60% of all impressions on the platform, with desktop at 30%.
If your offers are built for mobile users, Ad Maven has the inventory to match.
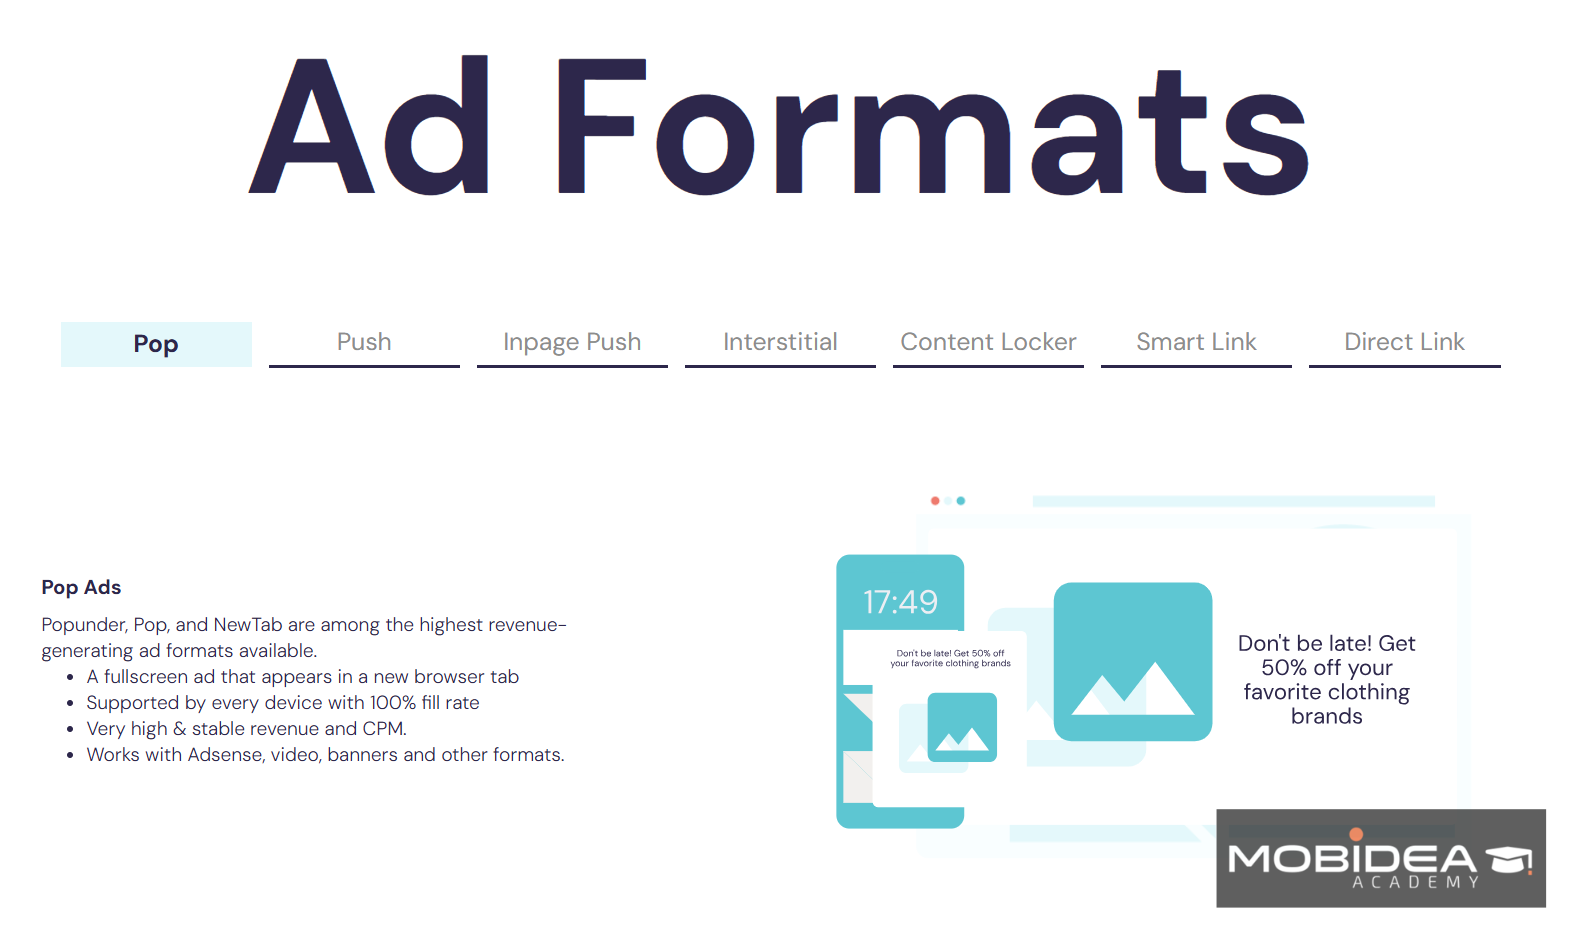
4 Ad Formats
Ad Maven gives advertisers five formats to choose from.
Each one works differently, and the right choice depends on your offer type.
Pop / New Tab
A pop under ad opens in a new page or browser tab when a user clicks anywhere on a publisher’s page.
Unlike traditional pop ups or pop up windows that interrupt the user mid-screen, pop under ads load quietly beneath the active window so the user sees them when they close or minimize the current tab.
Your landing page is the ad, so there are no banner sizes to prepare and no image review to wait for.
This format has high reach, lower CPM rates than most other ad formats, and is the easiest one to start with on Ad Maven.
It works well for campaigns where you need a large number of people to see your offer quickly.
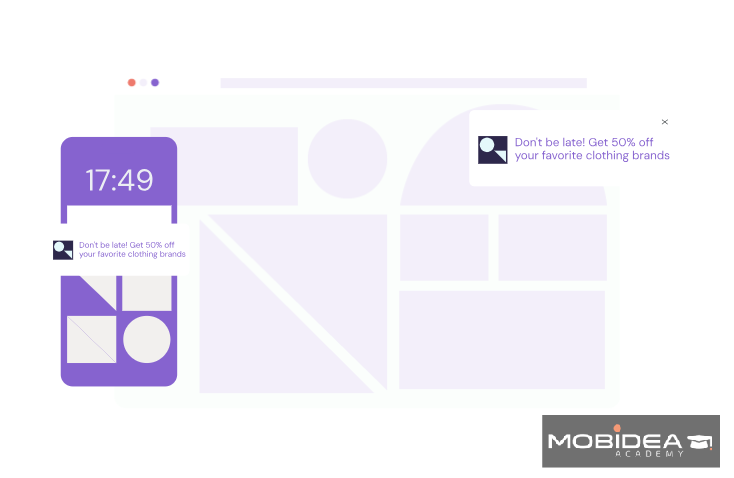
Push Notification
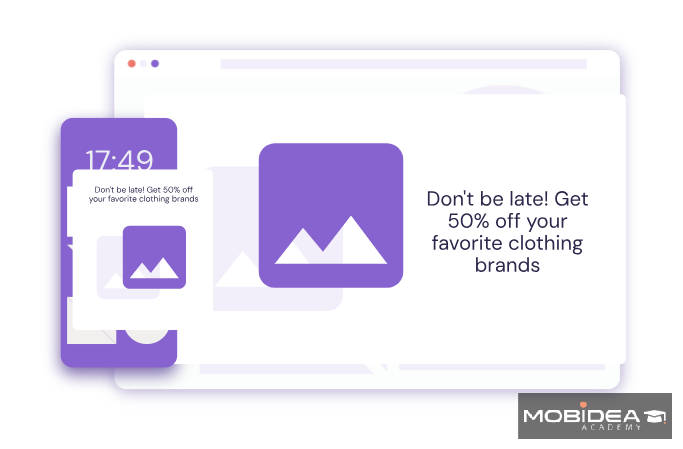
Native push notification ads appear as clickable alerts on a user’s device.
The user has already subscribed to receive them through their browser, so the audience has shown some level of interest.
Push notification ads appear even when the user is not on a website, and they include a title, description text, and images.
This format works well for Dating, Sweepstakes, Finance, and VPN offers.
In-page Push (Floating Banner)
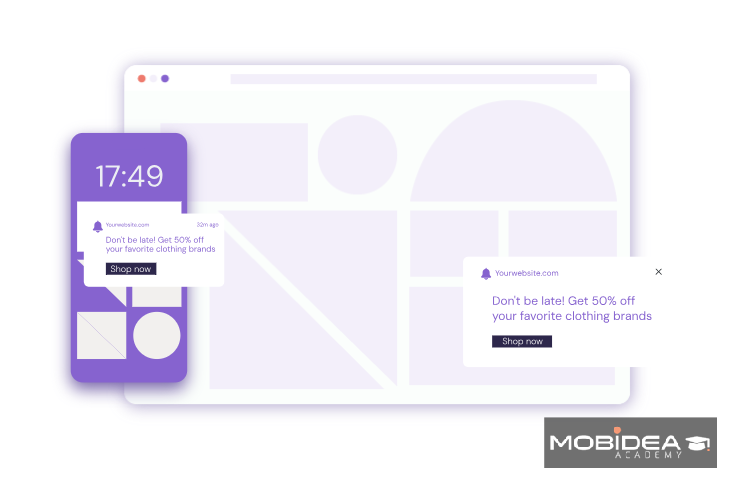
In-page push ads look like native push notifications but work like banner ads.
They appear as a floating element on the publisher’s page and do not need the user to subscribe to anything.
This means they reach more people, including iOS users who cannot receive standard web native push ads.
They work on all browsers and devices and support A/B testing of creatives inside the platform.
Content Locker
A Content Locker blocks access to publisher content until a user completes a task tied to an advertiser’s offer.
For advertisers, this means reaching users who are ready to take action because they want what is behind the lock.
It works best for offers that are quick to complete, such as sweepstakes, app installs, and content arbitrage pages.
In 2024, content lockers generated over 52 billion impressions in the US alone.
Verticals That Work on Ad Maven
Ad Maven’s traffic converts well across a wide range of affiliate verticals.
Based on what consistently performs on the network, the strongest ones include:
- Sweepstakes
- Dating
- App Installs
- Software Downloads
- Content Arbitrage
- Surveys
- Pin Submits
- Antivirus
- Browser Extensions
- E-Commerce
- Push Notification Subscriptions
Targeting Methods
Ad Maven’s targeting covers the key options that performance marketers need.
Here is what you can target:
- Geographic location (GEO): target by country
- Operating system and version: including specific OS versions for tighter mobile targeting
- Device type: desktop, mobile, or both
- Connection type: WiFi or carrier network
- Mobile carriers and ISPs: useful for carrier billing and mobile subscription offers
- Browser: target specific browsers where your offer converts better
- Day parting: set which hours and days your ads run, based on GMT platform time
- Frequency capping: limit how many times one user sees your ad in a set period
- Zone and source control: add or remove specific publisher sources from your campaign
For pop campaigns, you can also set a different bid for each country and each publisher feed.
This gives you more control over where your budget goes without needing to create separate campaigns.
CPA Goal Optimization
CPA Goal, or SMartCPA, lets you set a target cost per conversion.
Once you do, the platform adjusts bids automatically to try to reach that target without going over your budget.
You do not need to check and change bids manually across sources.
This is only available for pop campaigns.
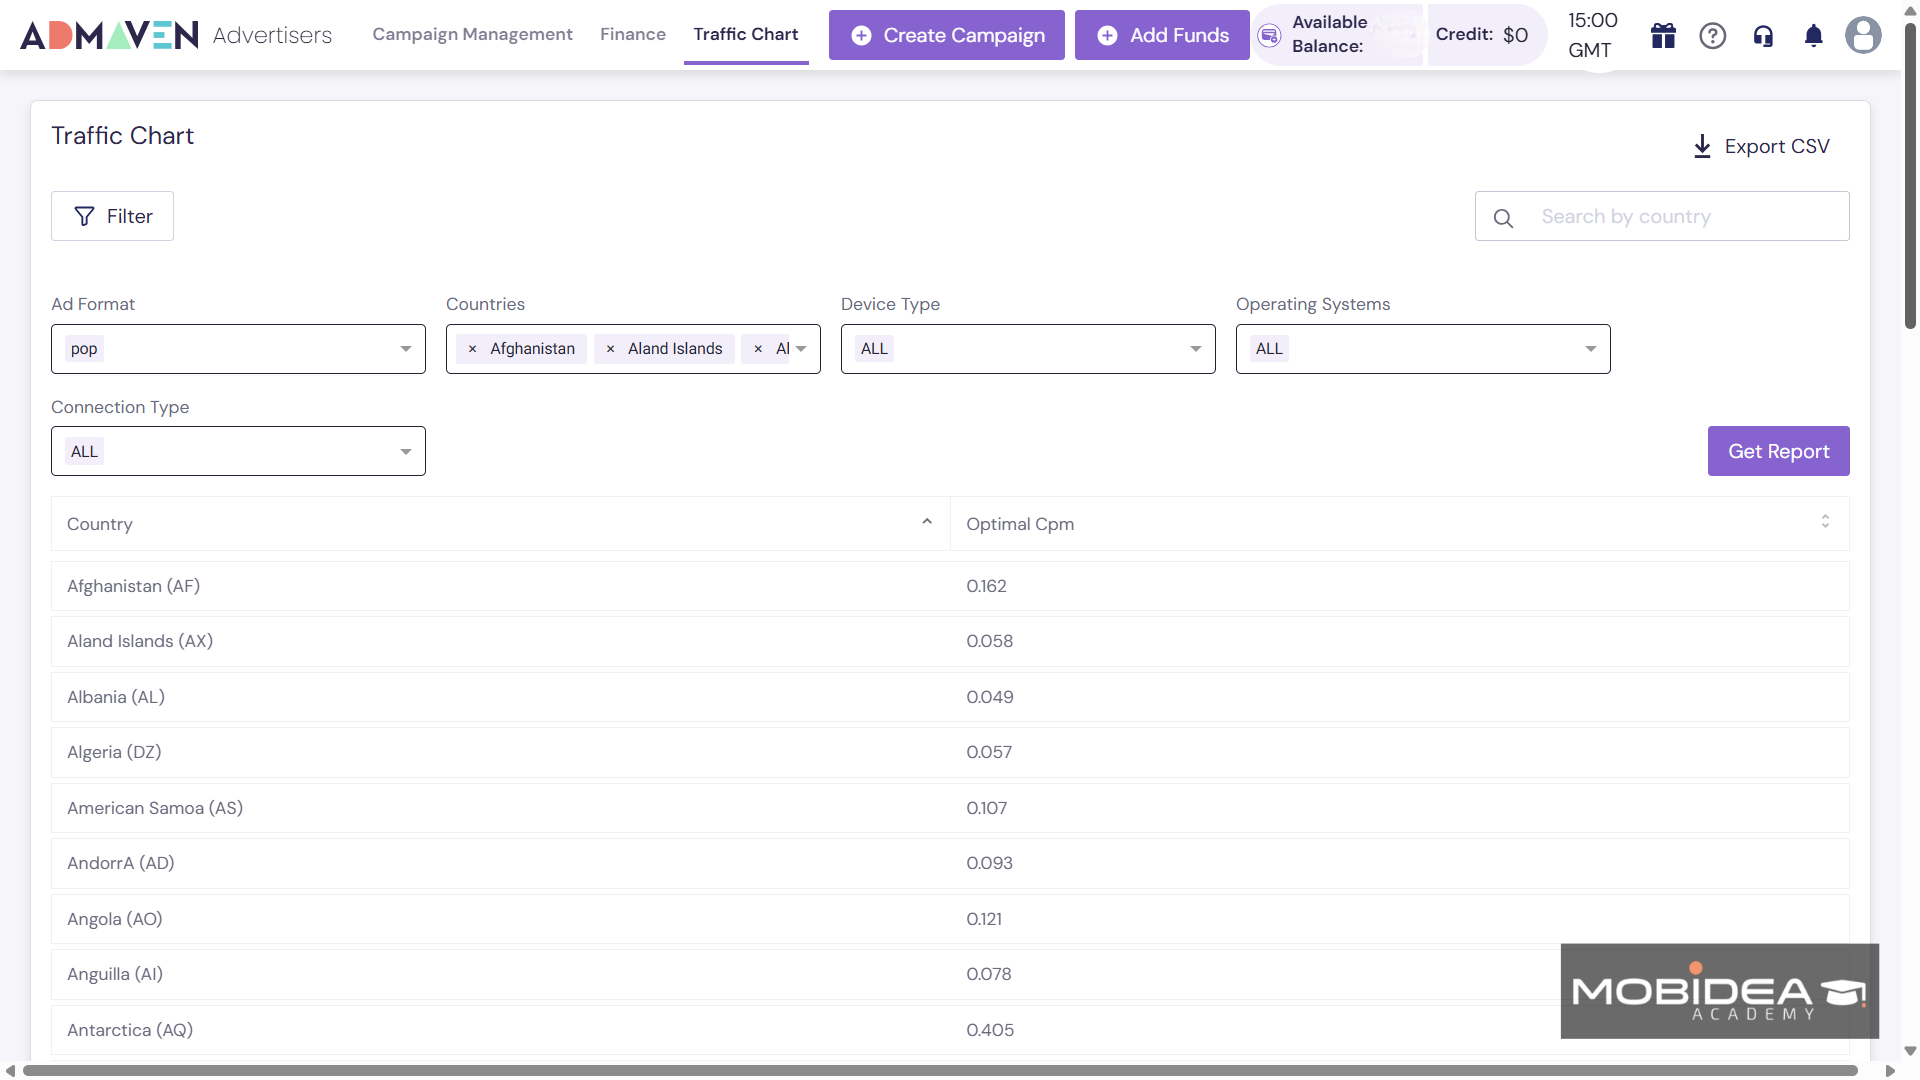
Traffic Chart
The Traffic Chart shows you the recommended CPM or CPC for your campaign based on the filters you set.
You can look up suggested bids by ad format, country, device type, operating system, and connection type.
This is useful when you are setting up a new campaign and are not sure what to bid for a specific GEO or device combination.
Instead of guessing or relying on the platform’s general suggested range, you can get a more precise reference point before you commit your budget.
It is also a good tool to revisit when you are scaling into new countries or testing a different ad format for the first time.
Conversion Tracking
Ad Maven supports S2S (server-to-server) conversion tracking through a postback URL.
You set this up in the Tracking section of your dashboard.
You can pick from a list of trackers that are already connected, which includes the top affiliate trackers such as:
- Voluum
- Bemob
- Binom
- CPVLab
- Keitaro
…and more.
You can also set up a custom postback for any other tool that’s not included in AdMaven’s list.
![]()
Tracking macros you can use include {campaign}, {pubfeed}, {subid}, {bid}, {country}, {device_type}, {os}, {browser}, {carrier}, {ip}, {city}, {state}, {timestamp}, {user_agent}, and more.
Add these to your destination URL to get full source-level data in your tracker.
If you use a third-party tracker like Voluum or Binom, you can paste Ad Maven’s postback URL directly into your tracker’s conversion settings.
No changes to the postback format are needed.
How to Start Advertising with AdMaven
Getting started with AdMaven is easy as pie.
Head over to their website and choose the Advertiser option when you sign up in Ad-Maven.
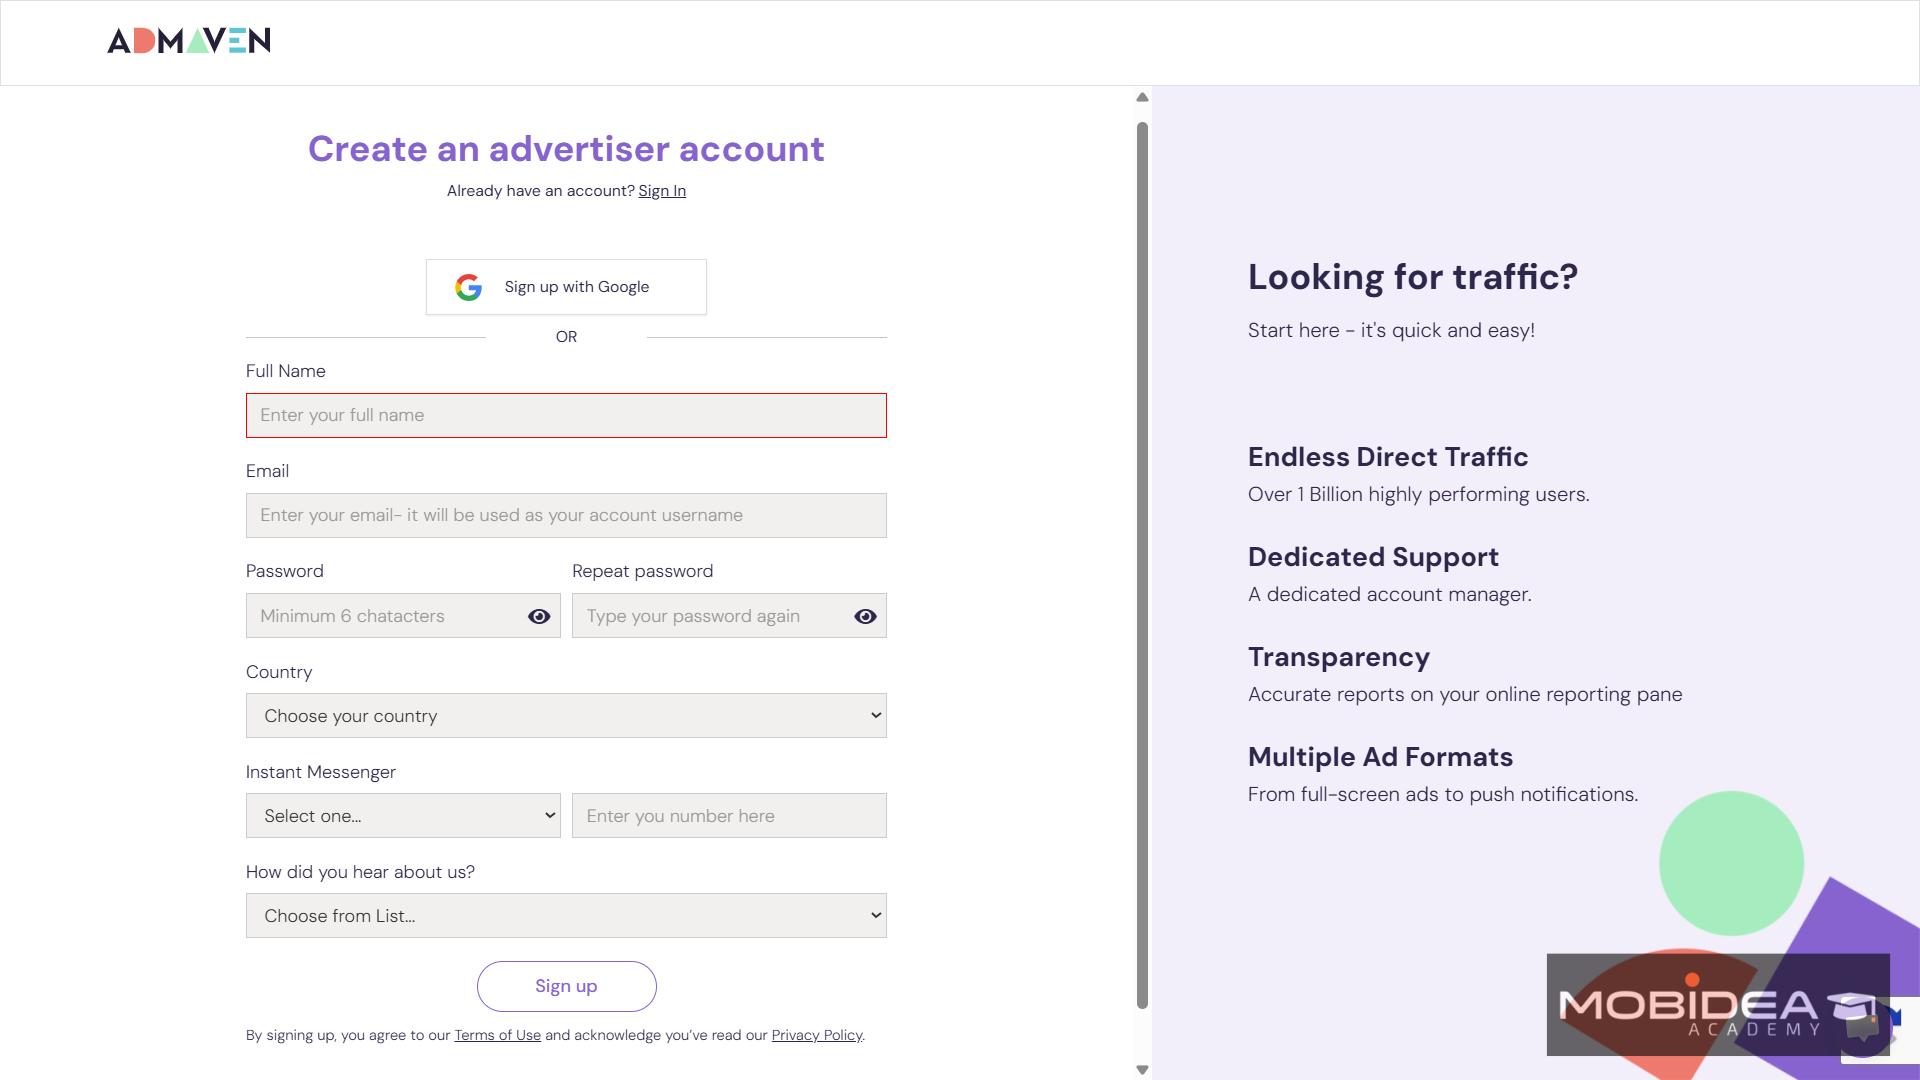
Fill in your name, email, password, country, and instant messenger details, then accept the terms and conditions.
Creating a new advertiser account does not require manual approval.
Once you confirm your email, you can access the dashboard right away.
Dashboard Overview
The advertiser dashboard is user-friendly and easy to follow.
The main navigation has three sections: Campaign Management, Finance, and Traffic Chart.
From the Campaign Management screen, you can see your analytics summary at the top, showing Redirects, Conversions, Cost, Revenue, and 2nd Conversions.
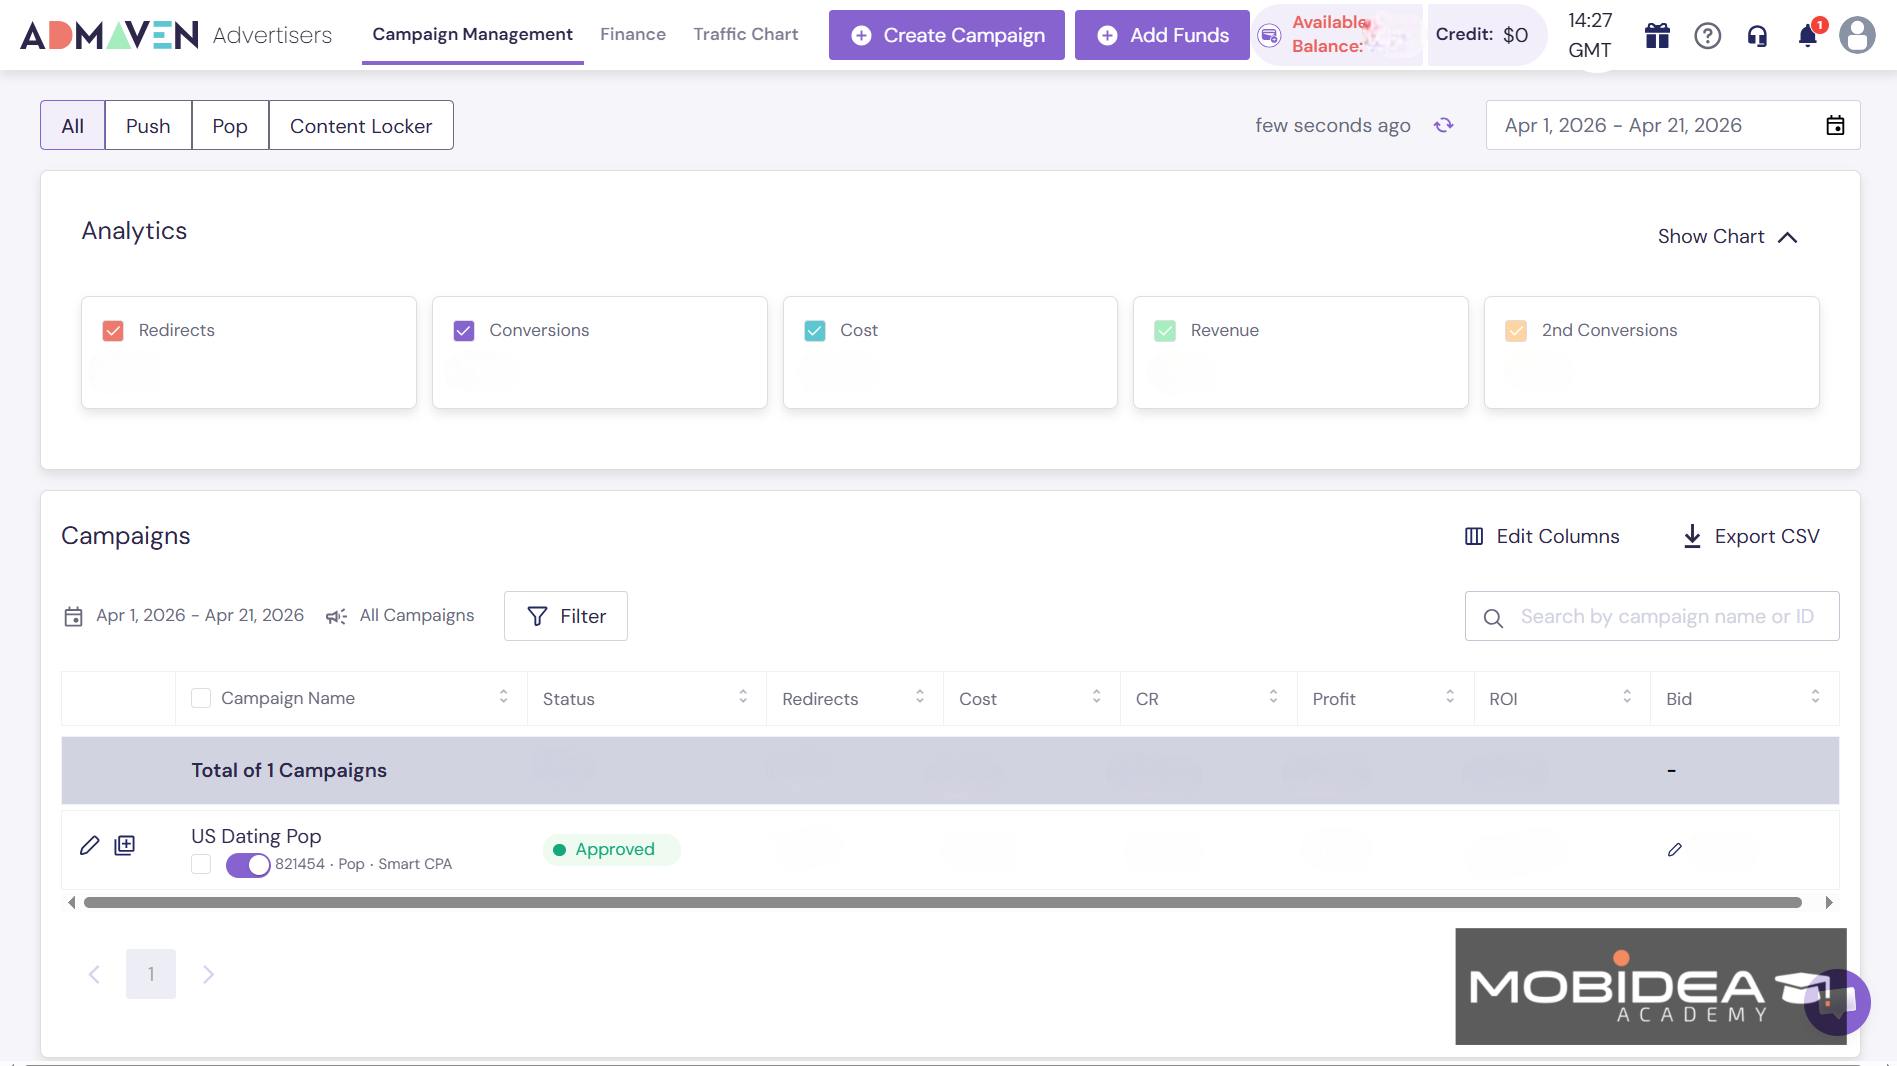
This is followed by a full list of your active and past campaigns below.
You can filter campaigns by date range, status, and name or ID using the search bar.
There is also an Export CSV option if you want to pull your data into an external tool.
Your available balance and any credits are visible in the top right corner of the screen at all times.
Funding the Account
You need to add money to your account before you can run a campaign, so click on the Add Funds button at the top.
You will then be asked to complete your profile details before you can top up.
This is part of the KYC process and is now required almost everywhere online.
Once done, you can continue with adding funds.
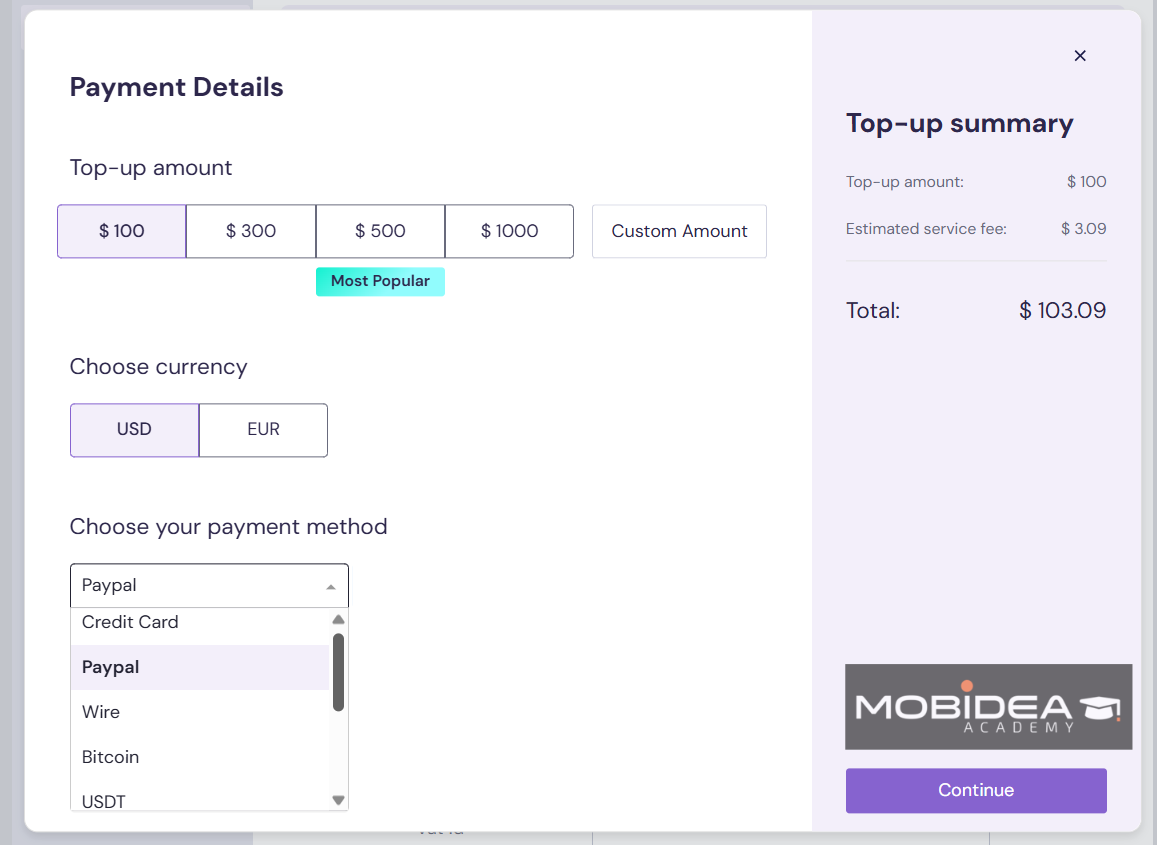
Here are the available deposit methods and their corresponding minimums:
| Payment Method | Minimum Deposit |
| Credit Card | $100 |
| PayPal | $100 |
| Paxum | $100 |
| Capitalist | $100 |
| Payoneer | $100 |
| Wire Transfer | $500 |
| USDT (ERC20) | $200 |
| Bitcoin | $200 |
Get an additional 10% on your first deposit when you use our exclusive coupon code MOBIDEA.
Getting Postback URL
To make sure your tracker properly monitors the traffic and costs, you’d have to get the correct postback URL.
Click on profile again, then head over to Tracking URL.
Select the tracking platform you use and copy the postback URL provided.
There’s also an option to monitor second conversions.
All you need to do is add a check next to “Add dimension parameter” so that the parameter “dimension=adp” will be added to the URL.
![]()
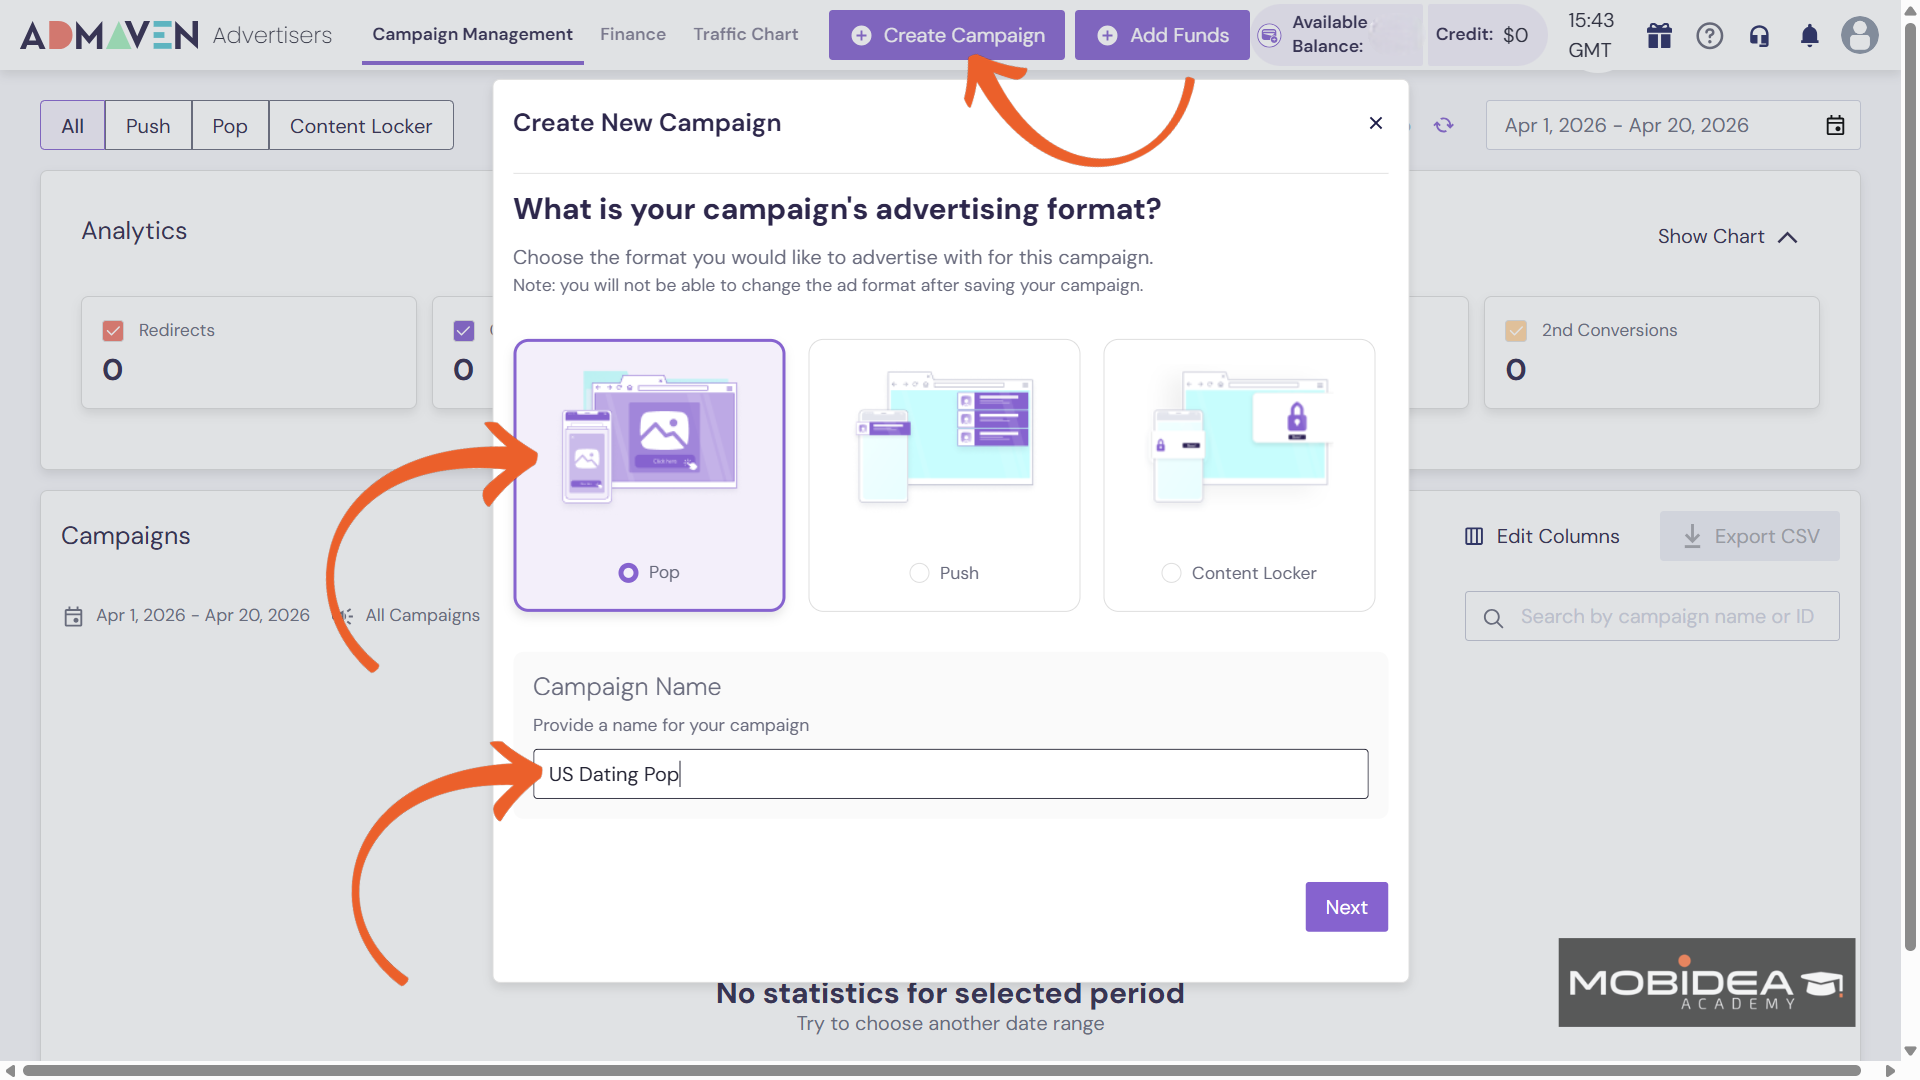
Creating a Campaign
Click Create Campaign from the dashboard.
A pop-up window will appear asking you to choose your ad format and give your campaign a name.
Ad Maven currently offers three formats for advertisers: Pop, Push, and Content Locker.
Select the one you want to run, enter a campaign name, and click Next.
Ad Details
The first thing you set here is your pricing model.
Keep in mind that once you choose your geo targeting and save the campaign, you cannot change the pricing model.
The options vary by format:
- Pop: CPM (cost per 1,000 impressions), Smart CPA (postback-based optimization where the charge is determined by an alternative CPM cost), or Smart CPM (cost per 1,000 impressions where the charge is also determined by an alternative CPM cost)
- Push: CPC only (cost per click)
- Content Locker: CPC only (cost per click on each task)
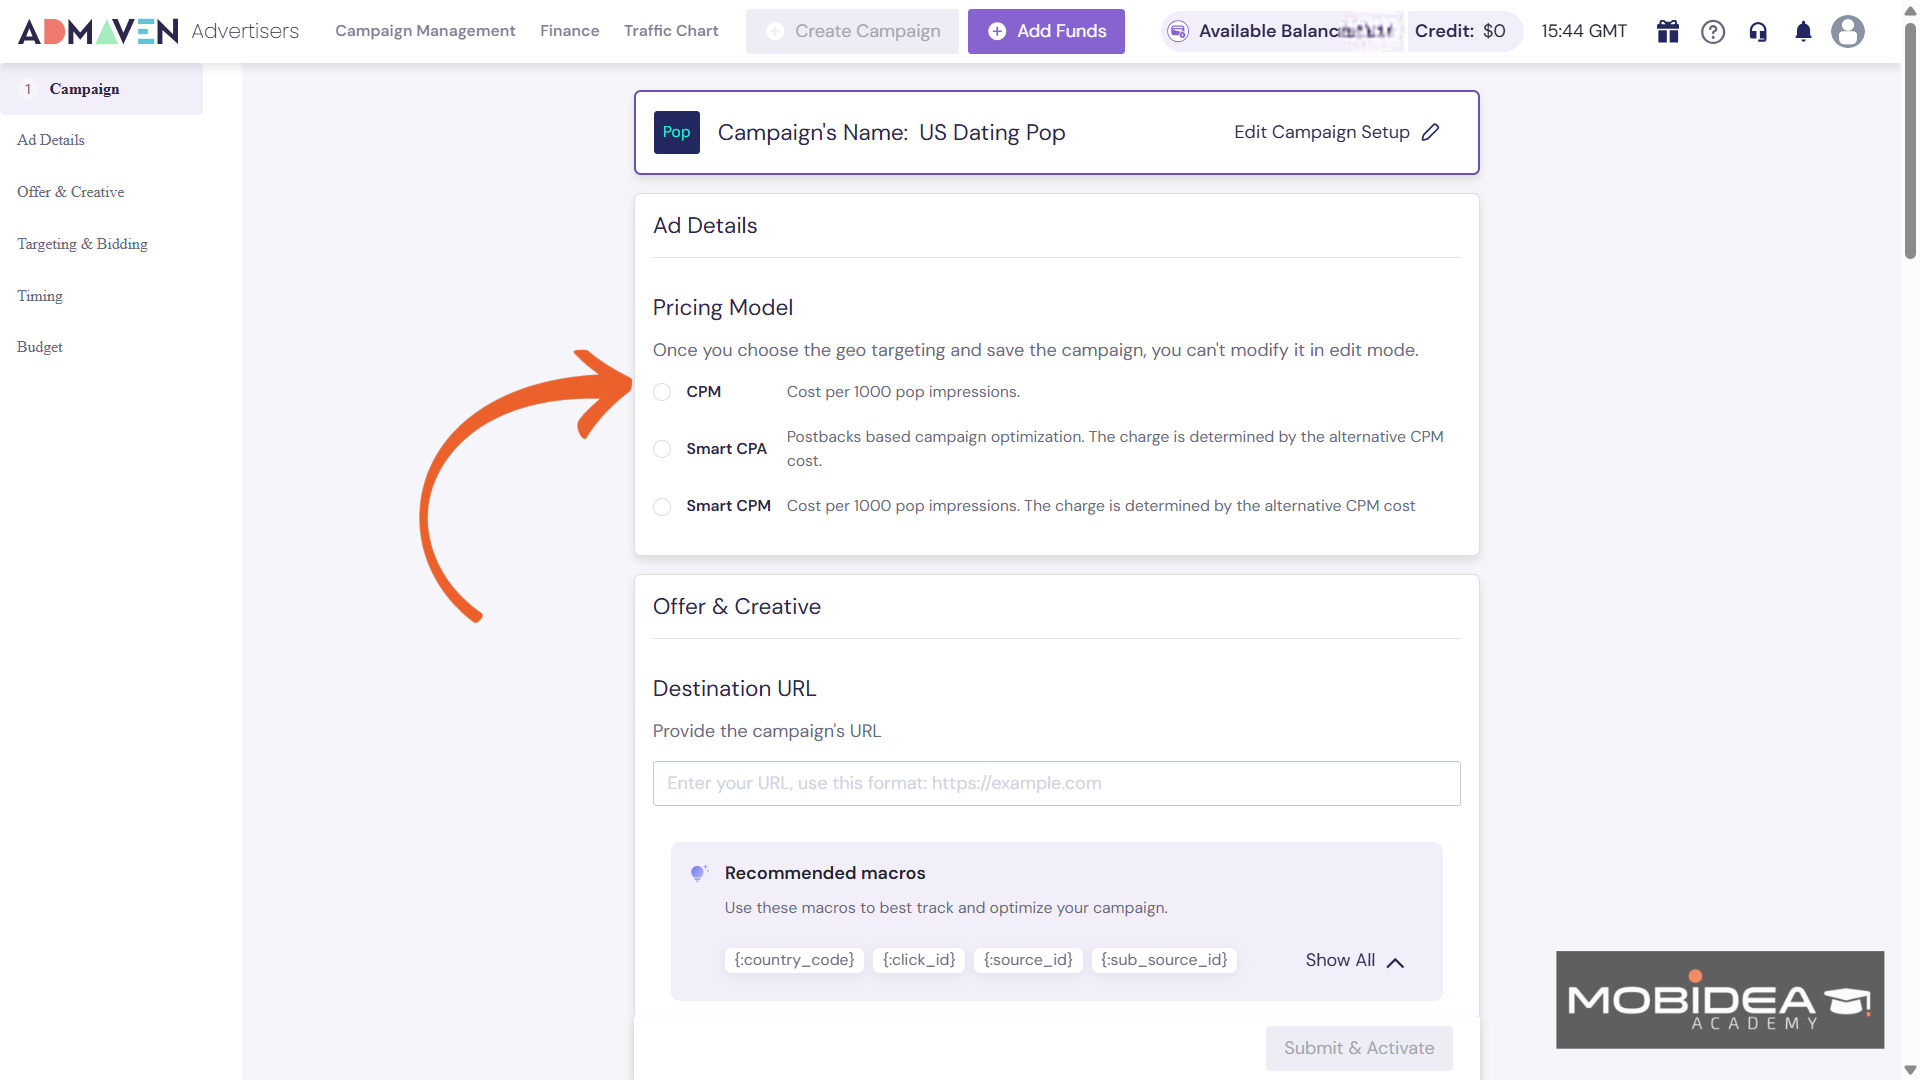
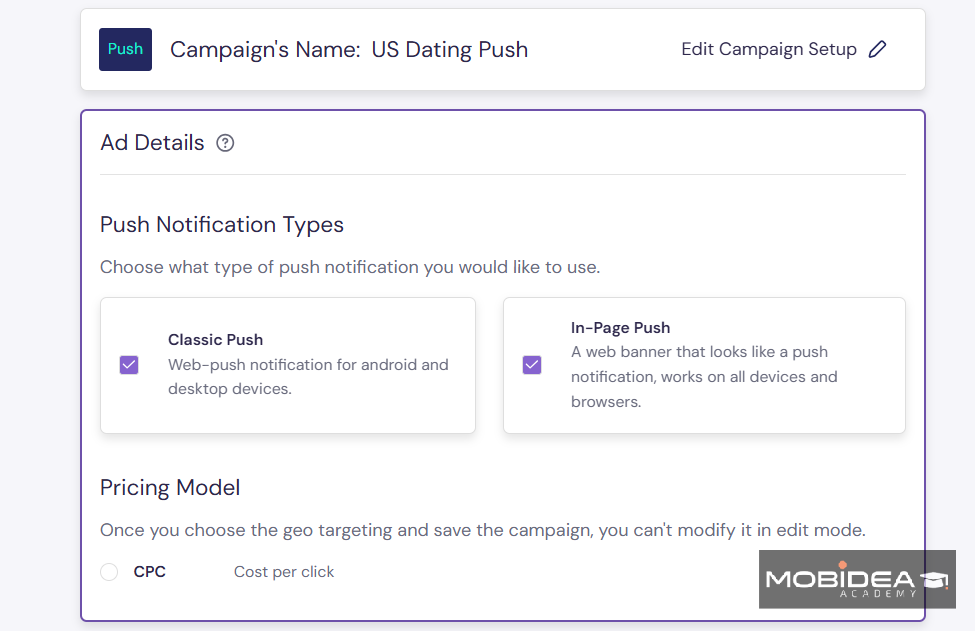
For push campaigns, you also choose your push notification type here.
You can select Classic Push, In-Page Push, or both at the same time.
Moving on to Offer & Creative, if you’re running pop ads, add the tracking URL you got from your tracker here.
Make sure you have Ad Maven set as the traffic source in your tracker.
Most trackers already have a template for Ad Maven, so the URL would have been prepopulated with the correct macros.
Pop ads don’t need ad creatives, but push and content lockers do.
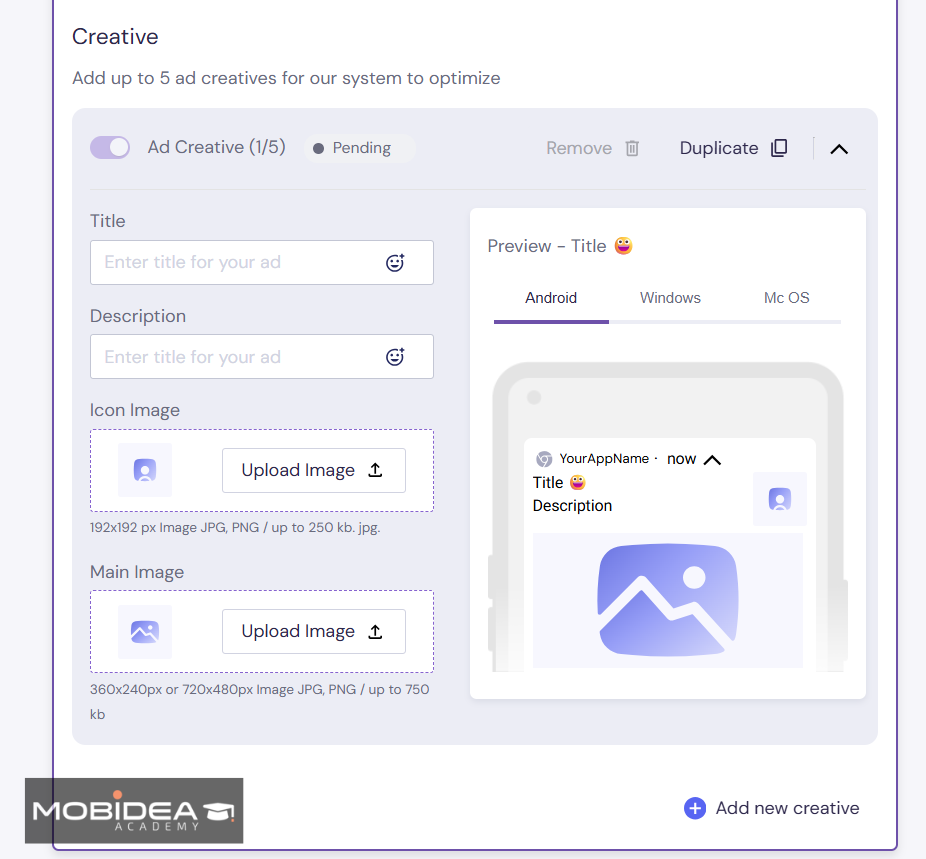
The image below shows the requirements for adding push ads and in-page push ads.
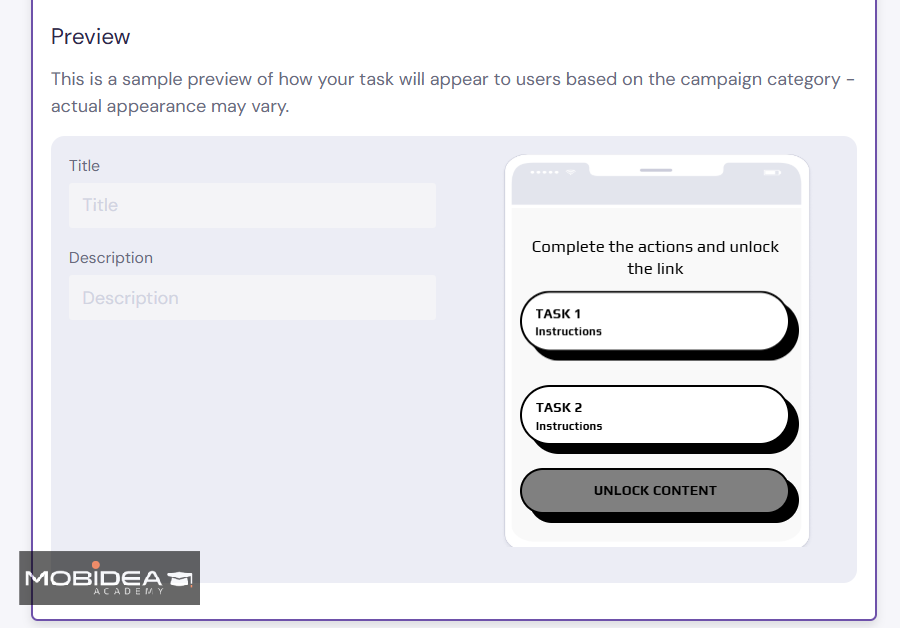
Here’s how adding content locker creatives look like:
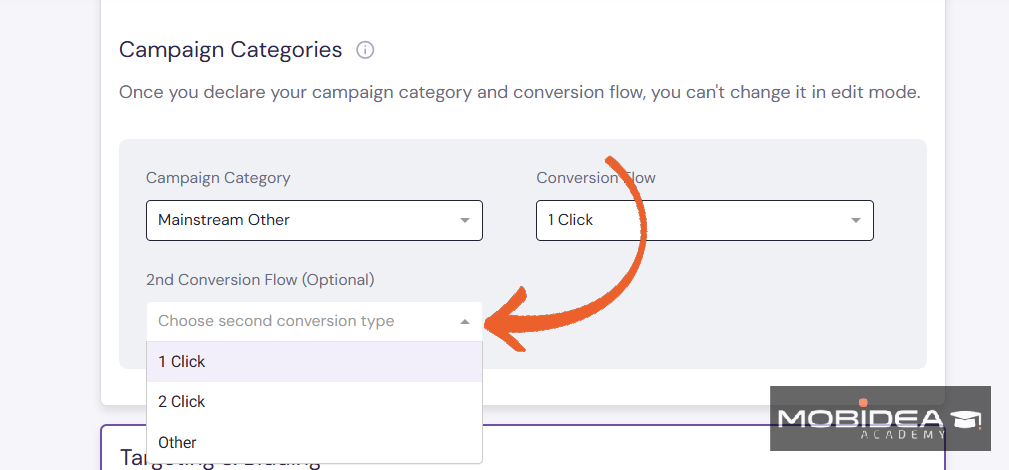
Below the URL and Creatives section, you set your Campaign Category and Conversion Flow.
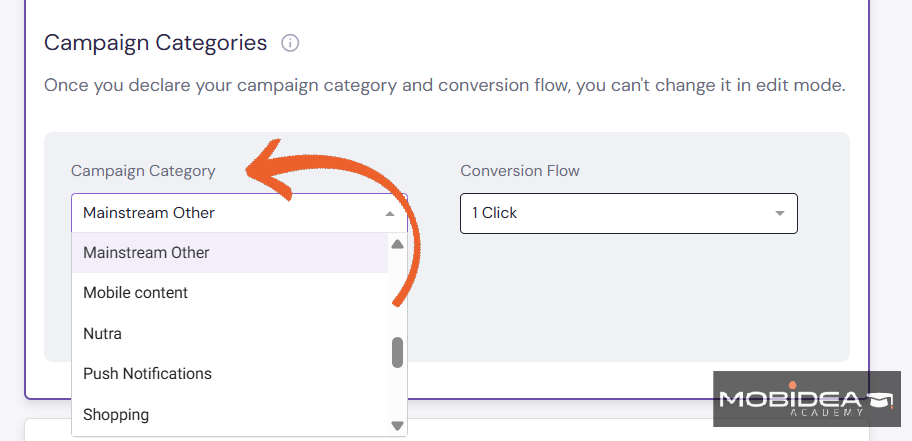
Choose the vertical that best matches your offer, then set whether conversions are tracked as 1 Click, 2 Click, or Other.
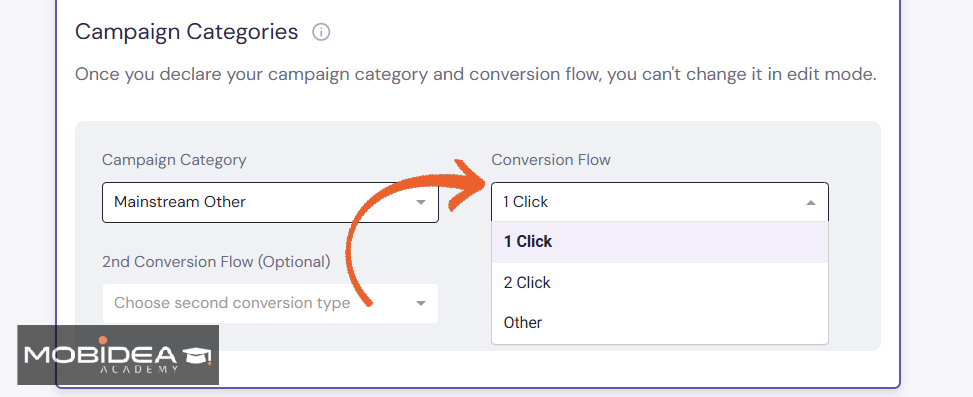
There is also an optional 2nd Conversion Flow if your offer has a secondary conversion event.
The creative requirements differ by format.
For pop, no creative is needed. Your landing page is the ad.
For push ads, you can add up to 5 ad creatives per campaign.
Each creative requires a Title, a Description, an Icon Image (192x192px, JPG or PNG, max 250kb), and a Main Image (360x240px or 720x480px, JPG or PNG, max 750kb).
A live preview shows how your ad will appear on Android, Windows, and Mac OS.
You can duplicate creatives to speed up variations and just make some edits.
For content locker ad creative, enter a Title and Description.
The preview on the right shows how the locker will appear to users, including the task slots and the Unlock Content button.
The actual appearance may vary based on your campaign category.
Next is Targeting & Bidding.
Start with your geo targeting—select specific countries or set your campaign to run Worldwide.
For each country you add, you set your bid.
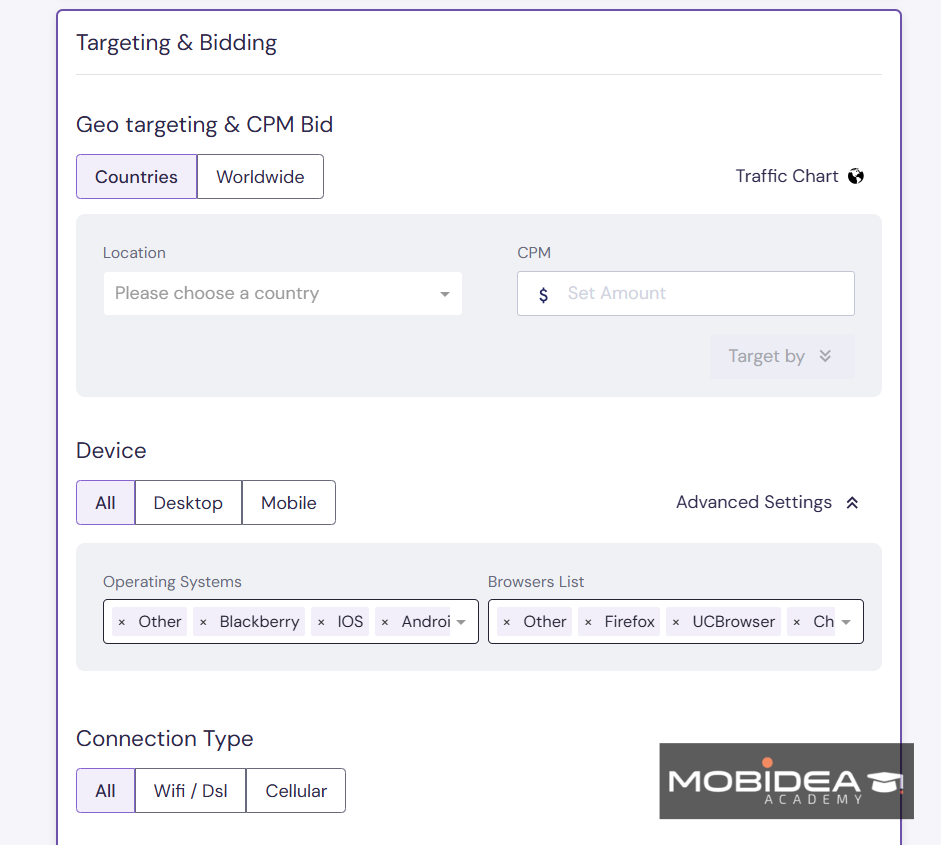
Use the Traffic Chart we talked about in the features section to find the recommended bid for your target country, format, device, and connection type.
This way you’ll know the optimum bid to gain enough traffic for your campaign.
From there, you can apply the following targeting filters:
- Device: Choose All, Desktop, or Mobile. Under Advanced Settings, you can also filter by specific operating systems and browsers.
- Connection Type: Target All traffic, WiFi/DSL only, or Cellular only.
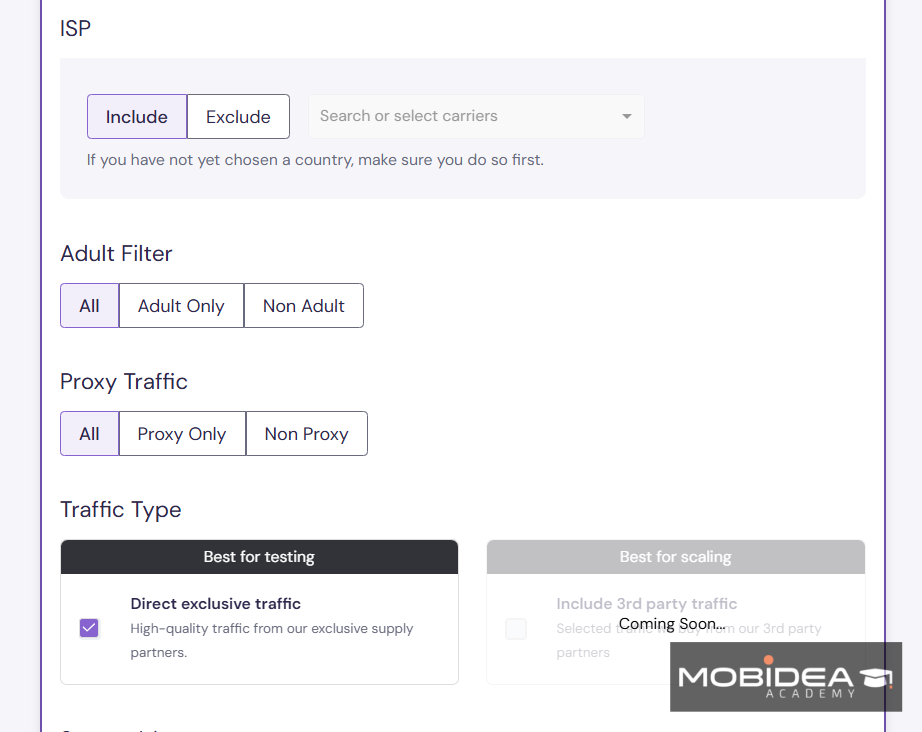
- ISP: Include or exclude specific carriers. Select your country first before applying this filter.
- Adult Filter: Choose between All traffic, Adult Only, or Non Adult.
If your offer is mainstream, set this to Non Adult to avoid wasting spend on irrelevant inventory.
- Proxy Traffic: Choose between All, Proxy Only, or Non Proxy.
- User Engagement Level (Push — Classic Push only): Target push subscribers by how active they are.
High gives you high CTR at a lower volume and above average price.
Medium is balanced across all three.
Low gives you the most volume at the lowest price but with lower CTR.
Starting with all three selected gives you the most data to work with early on, and you can narrow down once you see which tier performs best for your offer.
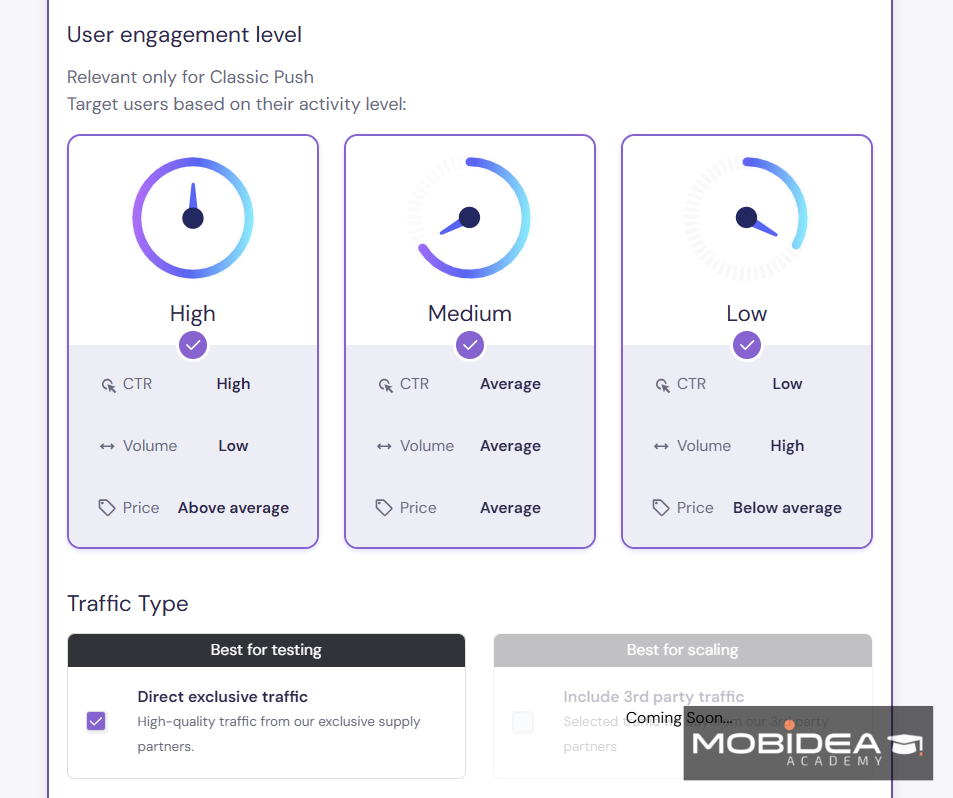
- Traffic Type: Direct exclusive traffic is the default and covers Ad Maven’s own exclusive publisher inventory.
The third-party traffic option is unavailable for now, which is fine anyway since Ad Maven’s best traffic comes from its direct publishers.
- Source ID and Sub Source ID: Include or exclude specific source IDs and sub source IDs to build whitelists or blacklists at the source level.
Then you have Timing.
Frequency Cap limits how many times your ad is shown (pop and content locker) or clicked (push) per IP.

It is best practice to set a limit here rather than leaving it on Maximum.
I personally set it to 3 times every 12 hours or 24 hours, but you should set it based on your own experience and offer type.
Day Parting is set to All Day by default, but you can always edit it if you have enough info on your campaigns best times of day.
Switch to Select Specific Time if you want your ads to run only during certain hours.
Ad delivery is based on the platform’s time zone, which is UTC.
Finally, we have the Budget section.
You can toggle between unlimited and limited settings for each of the following:
- Daily cap: Limits daily impressions (pop) or daily clicks (push and content locker)
- Campaign impressions: Total impression cap for the lifetime of the campaign
- Daily budget: Set a spending limit per day. The minimum daily budget is $10.
- Campaign budget: Total spending cap for the lifetime of the campaign
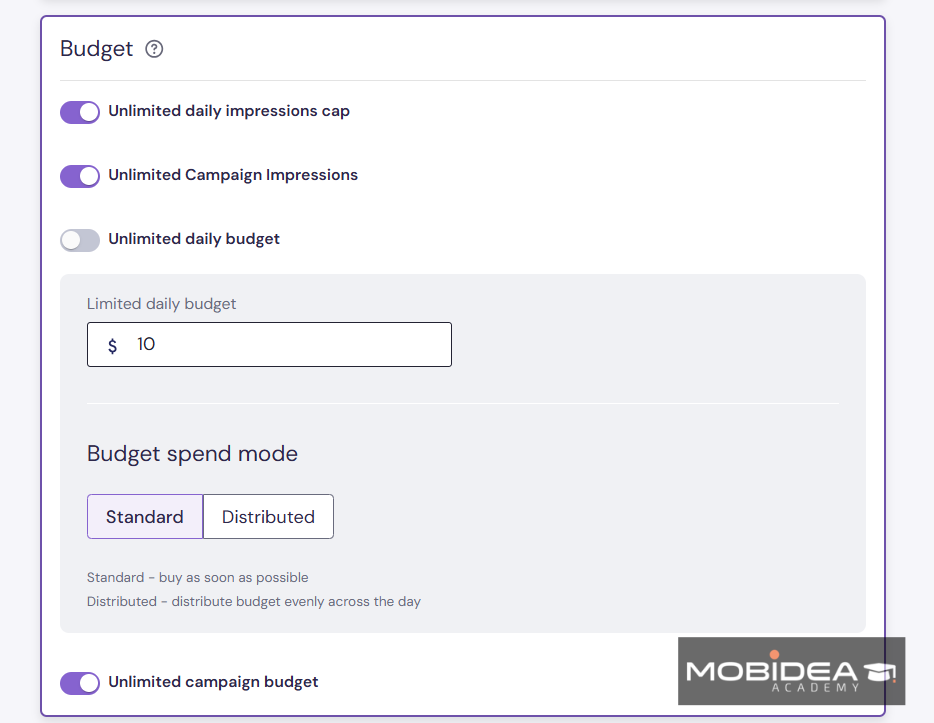
For both the daily cap and daily budget, you can choose between two spend modes.
- Standard, which spends your budget as fast as possible, and
- Distributed, which spreads it evenly throughout the day.
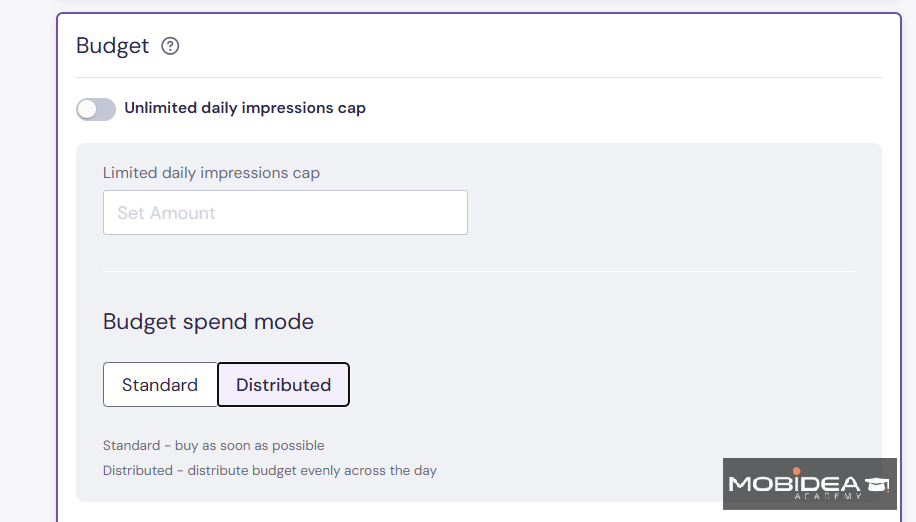
I recommend going with Distributed so you get data on traffic and conversions across different times of the day, instead of burning through your budget first thing in the morning.
At the bottom of the setup, you will find a Postback URL field.
If you have already set up your tracking URL with Ad Maven’s postback earlier in the process, you do not need to do anything here.
Once everything is set, click Submit & Activate to send your campaign for review.
It normally takes about 24 hours for your campaign to be approved.
Viewing Reports and Optimizing Campaigns
Your campaign data lives in the Campaigns section of the dashboard.
Each campaign is listed with its name, ID, format, and pricing model, along with a toggle to pause or activate it without leaving the page.
The default columns shown are Redirects, Cost, CR, Profit, ROI, and Bid.
You can customize this view using the Edit Columns button to add or remove metrics based on what you want to track.
You can also filter the campaign list by:
- Status
- Pricing Model
- Active/Inactive state
- Live/Archive state
- Countries, and
- specific campaigns.
This is useful once you start running multiple campaigns and need to quickly isolate the ones you want to look at.
Hit Get Report after setting your filters to pull the data.
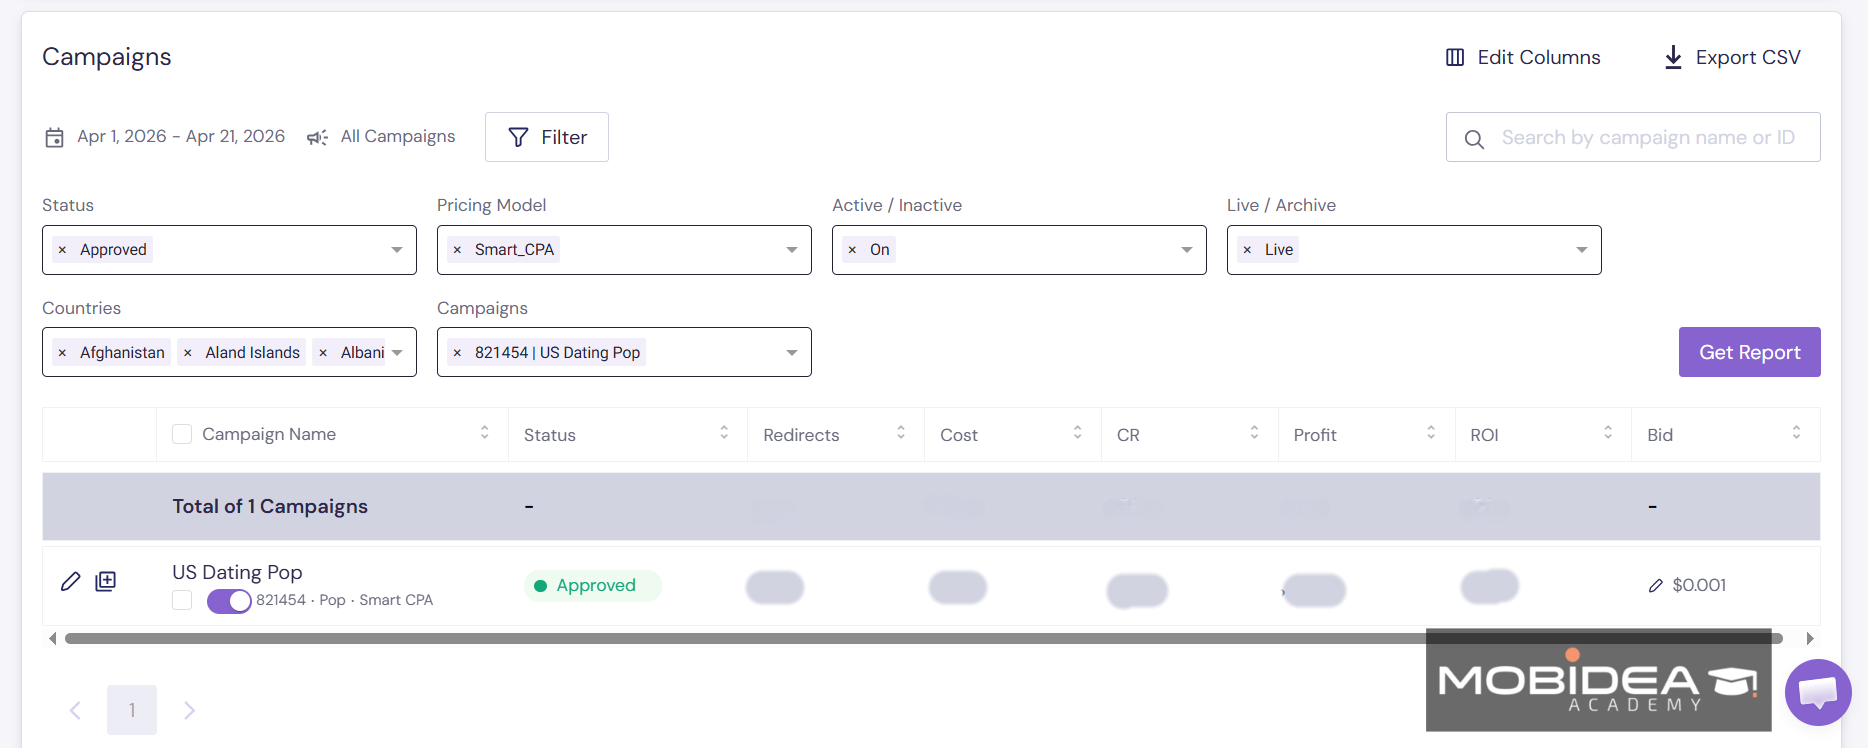
If you want to work with your data outside the platform, the Export CSV button at the top right lets you download your campaign stats.
If you click on any campaign name, you’ll be taken to a dedicated analytics page for that campaign.
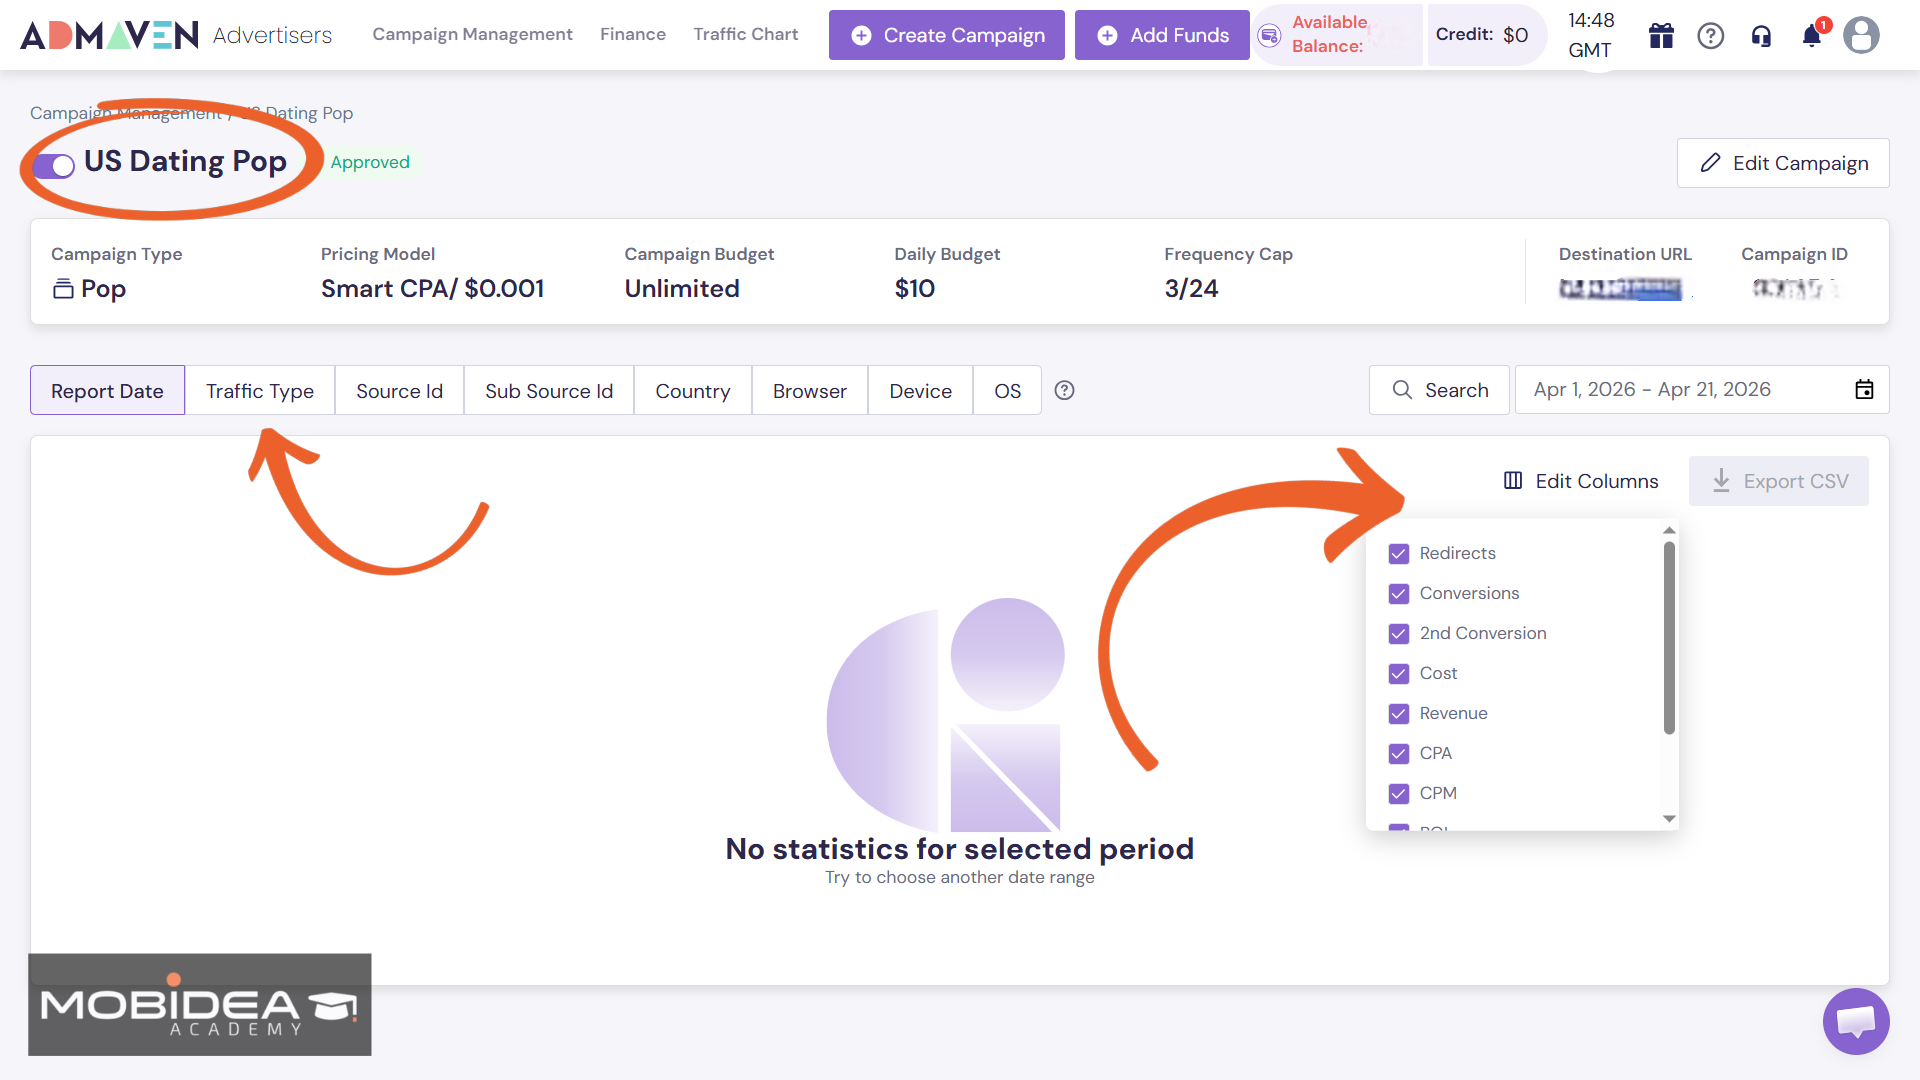
One thing I noticed is that you cannot assign individual bids per source ID from within this page.
Bid adjustments still have to be made at the campaign level.
Here is what I recommend doing regularly as you review performance:
- Check your CR and CPA to see which campaigns are converting and at what cost
- Review your Bid against actual results — if a campaign is spending but not converting, the issue is often the traffic source rather than the bid itself
- Pause underperforming campaigns directly from the toggle in the campaign list rather than deleting them, so you keep the data for reference
- Create whitelists or blacklists
Once you have enough data, you can start building blacklists and whitelists directly inside the campaign.
Go to your campaign’s Targeting & Bidding section and use the Source ID and Sub Source ID fields.
Here, you can either include only the sources that are working (whitelist) or exclude the ones that are burning through your budget without converting (blacklist).
This is one of the most effective ways to improve campaign efficiency once you are past the initial testing phase.
If you notice the same poor-performing sources showing up across multiple campaigns, it is worth setting up a Global Blocked List instead of excluding them one campaign at a time.
You can find this by clicking the Profile icon in the top right corner of the dashboard, then selecting Global Blocked List.
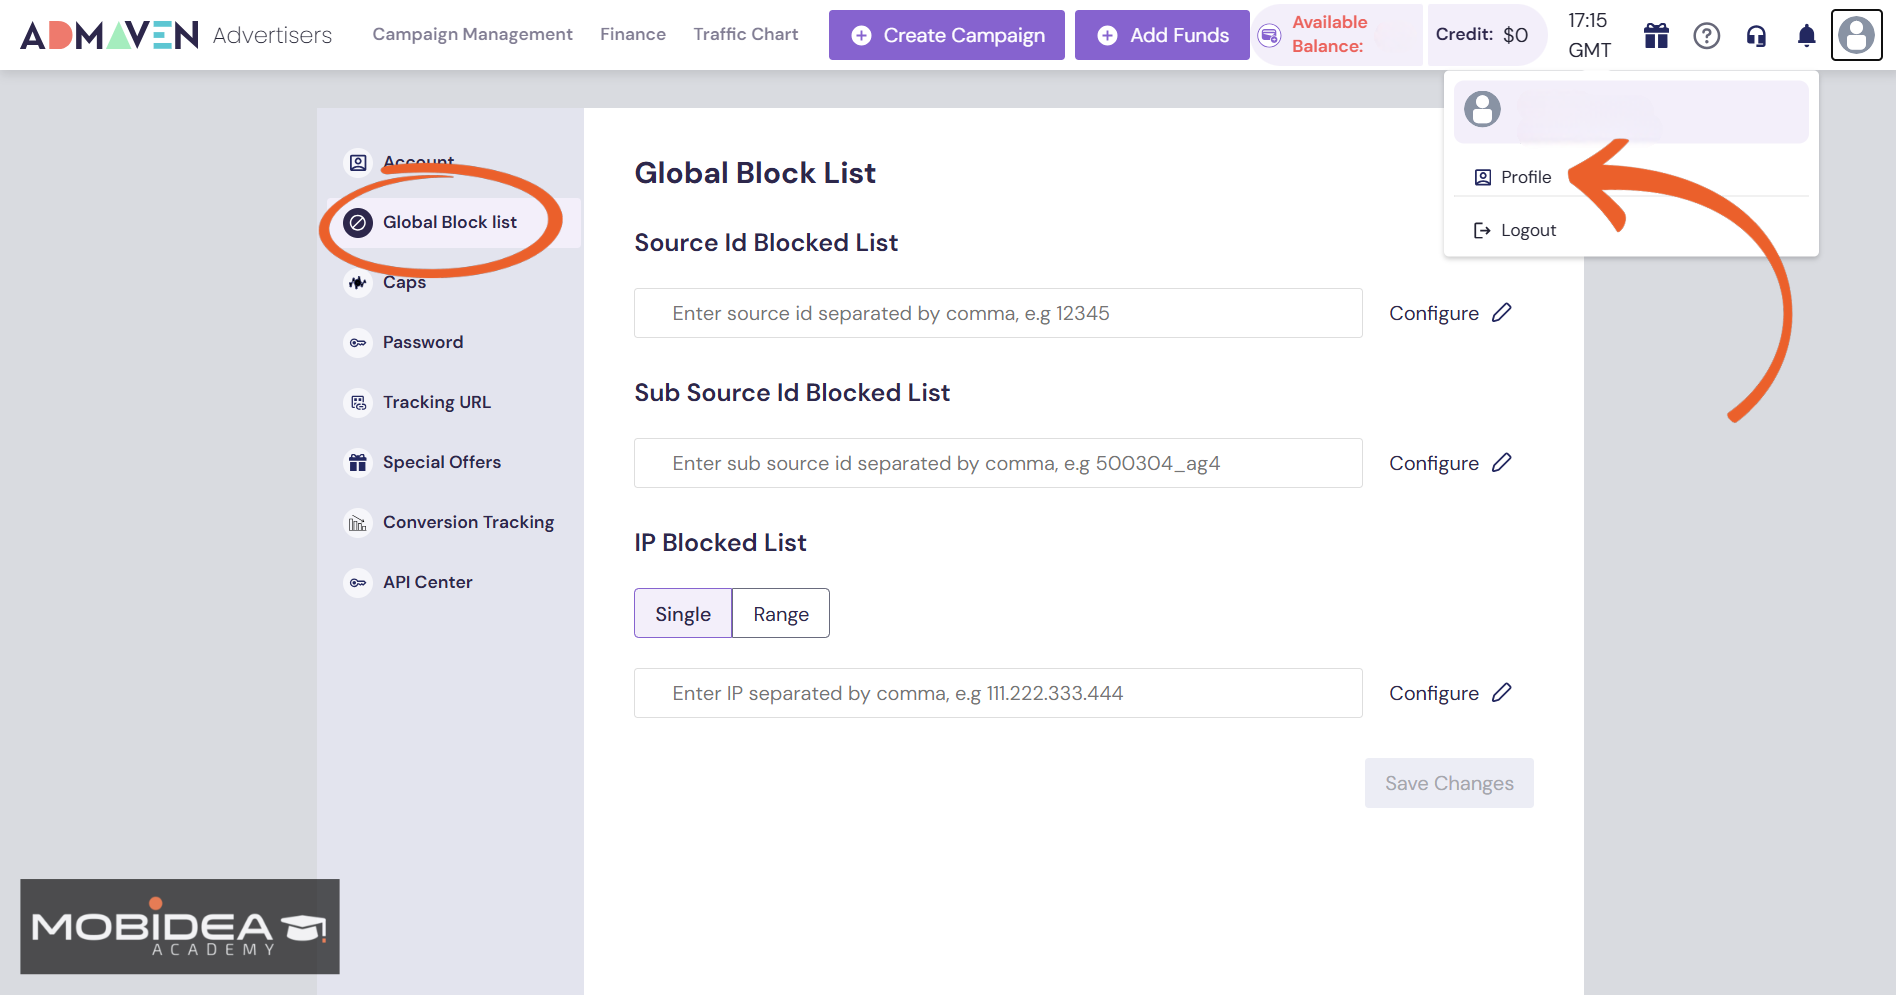
From there, you can block sources by Source ID, Sub Source ID, or IP address, and those blocks will apply across all your campaigns automatically.
It saves a lot of time once your account starts scaling.
Running Traffic on AdMaven — Our Experience
Running campaigns on Ad Maven is a smooth process once you know how the platform works.
Push and pop are the two best formats to start with, and they work quite differently.
For push campaigns, pay close attention to your bid range.
Setting a minimum and maximum CPC matters because the auto-optimization tool works within that range.
A good starting point is to set your default CPC close to Ad Maven’s suggested rate for your target country.
Setting the budget to spend evenly throughout the day, rather than all at once, helps you see when conversions happen and how much traffic is available at your current bid.
Pop campaigns are simpler to set up since there are no creatives involved.
Most of the optimization work comes from reviewing your sources and removing the ones that spend without converting.
After a day or two of data, it becomes clear which publisher feeds are worth keeping.
Traffic quality is good, especially for Sweepstakes and Casino offers.
Results are better when you focus on Ad Maven’s direct publisher sources rather than using all available traffic from the start.
Testing with direct sources first gives you a cleaner view of what the platform can do before you open up to third-party feeds.
Moderation is faster during daytime hours in the GMT+2 timezone, so submitting your campaigns and creatives at that time means less waiting before your ads go live.
AdMaven Best Features for Publishers
Ad Maven has paid out over $230 million to publishers since it launched.
That number gives a sense of the scale at which it operates and how much traffic flows through the network.
For publishers, the platform offers seven ad formats, wide traffic acceptance, and several tools to help you build a diverse ad revenue mix from the same visitors.
Multiple Ad Formats
Publishers get access to seven ad formats: Pop, Push Notifications, Inpage Push, Interstitial, Content Locker, Smartlink, and Direct Link.
You can run each one on its own or mix them as part of your publishers monetization mix.
Pop ads run alongside AdSense ads, push notifications earn passive income from subscribers who have already left your site, and Smartlinks and Direct Links are great for redirect and remnant traffic that does not fit your other placements.
Anti-AdBlock Technology
Ad Maven has a tool that allows ads to show even to users who have an ad blocker installed, including those using Google AdBlock extensions.
Ad Maven says this can increase your total revenue by up to 50% from traffic that would otherwise earn nothing.
The ad-block bypass code is separate from your regular ad tag.
You can request it from the support team after your account is set up.
AI Optimization Algorithm
Ad Maven uses an AI system on the publisher side that learns from your traffic over time.
It automatically adjusts which ads are shown to get the highest possible eCPM.
The more data it collects about your audience, the better it gets.
Revenue typically goes up gradually after setup, without you needing to change anything manually.
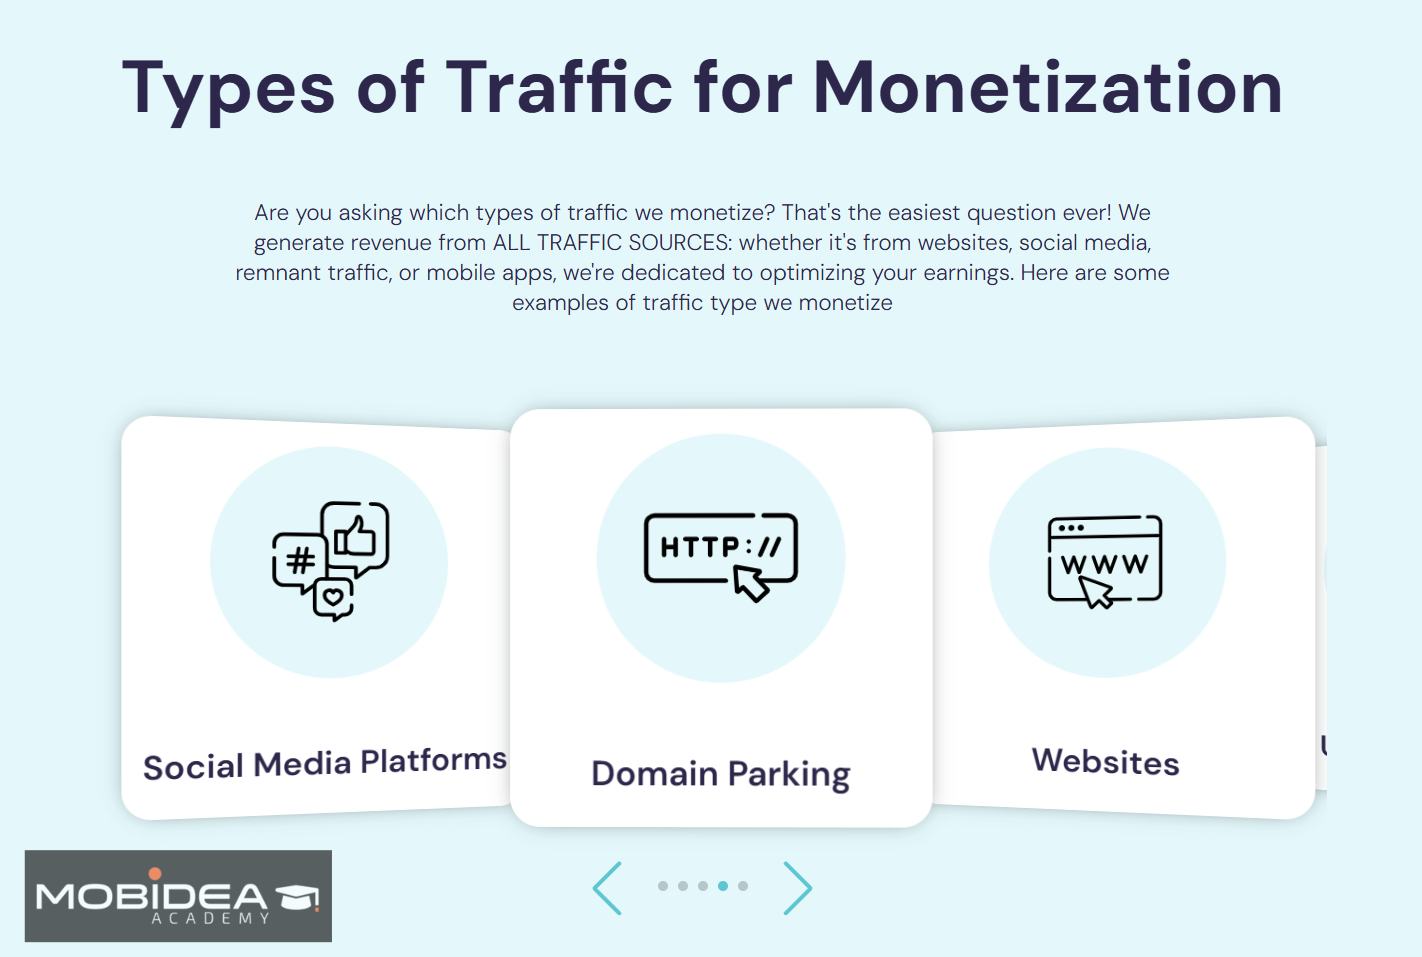
Traffic Types Accepted
Most ad networks only accept traffic from standard websites.
Ad Maven accepts a much wider range of traffic sources, making it a decent ad network option for publishers who do not fit the typical mold:
- Websites and blogs
- URL shorteners and link shorteners
- Mobile apps
- Social media channels, including Telegram communities and YouTube audiences
- Domain parking traffic
- In-app traffic
This makes Ad Maven a good option if you run traffic from multiple platforms, not just one website.
Referral Program
You can earn extra income by referring other publishers to Ad Maven.
You get a 5% commission on the revenue they generate for their first year on the platform.
The referral link is in your publisher dashboard and can be shared anytime.
How to Earn Money with AdMaven
Sign up at AdMaven and choose the Publisher option.
Fill in your details and submit.
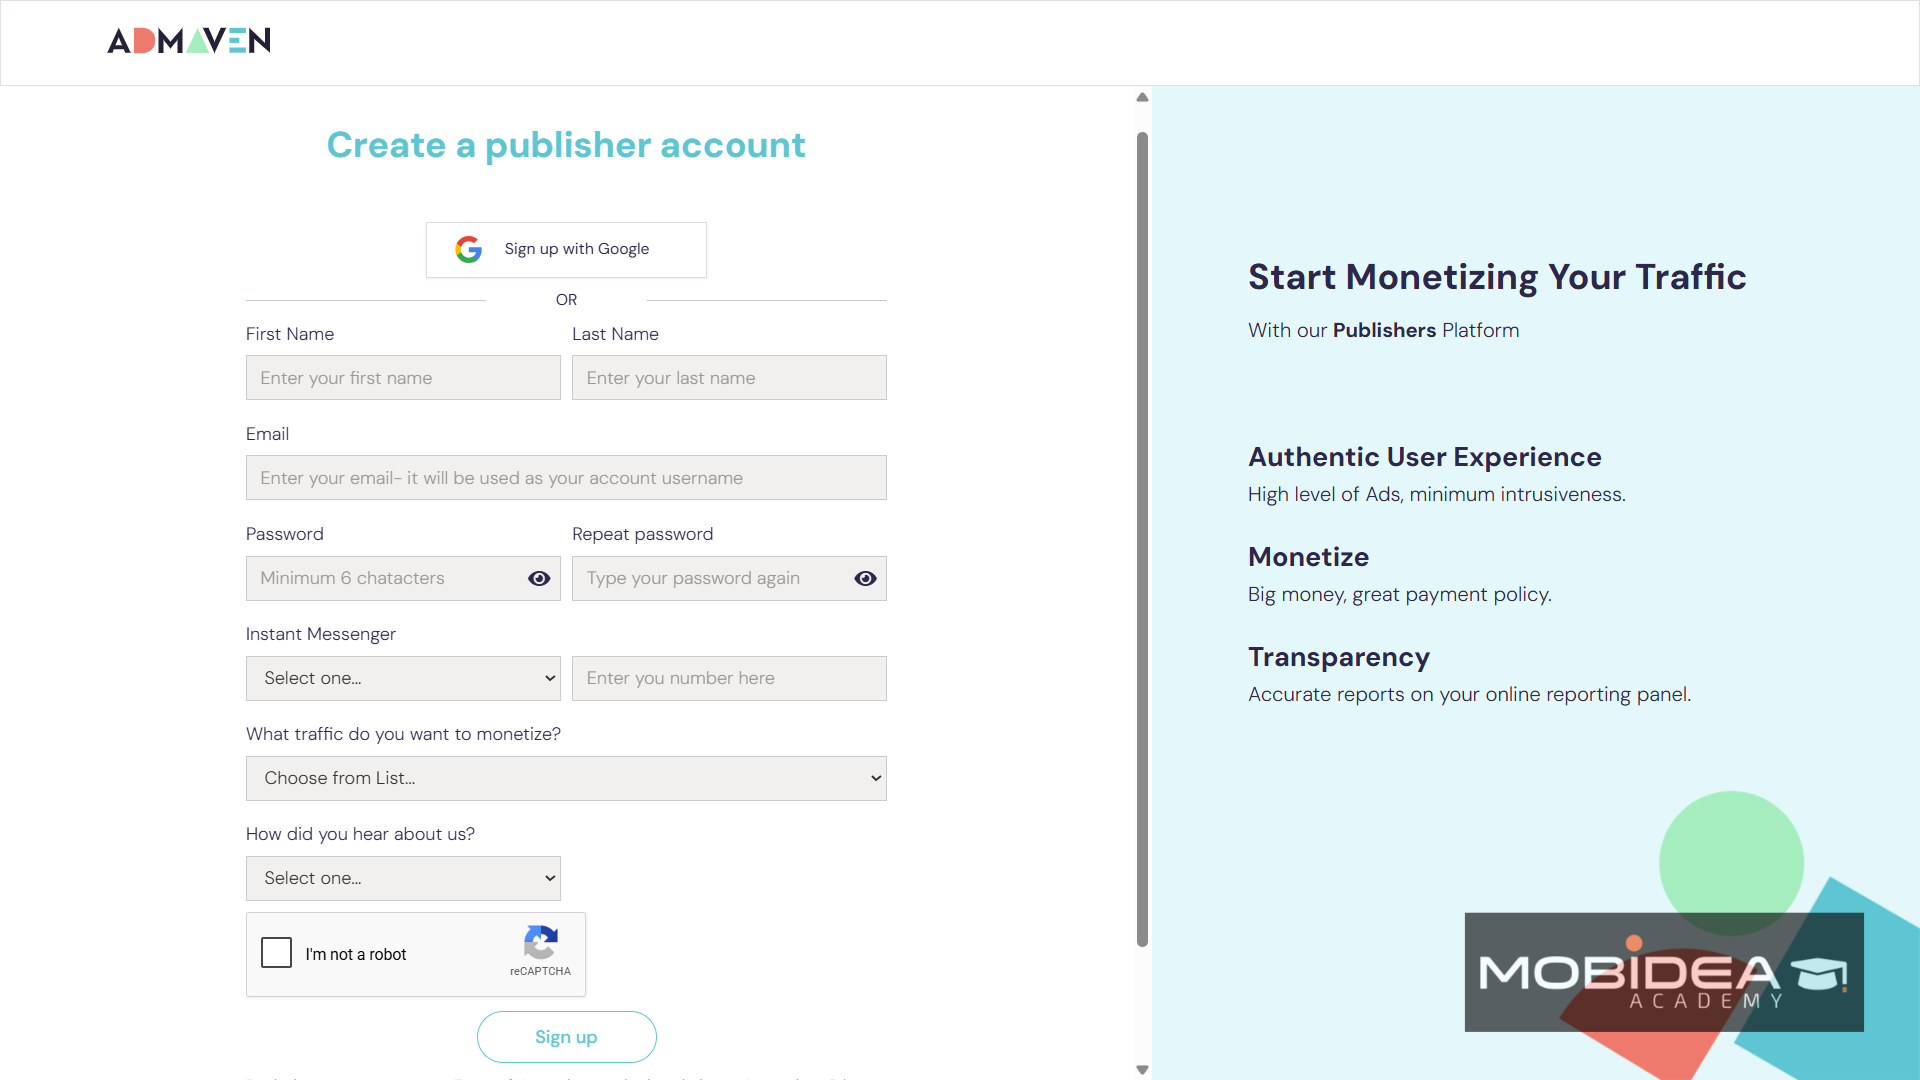
Approval is generally fast and you can get started without a long waiting period.
Once your new account is active, log in to the publisher platform at publishers.ad-maven.com.
Adding a Site and Creating Ad Tags
To start monetizing, add your traffic source and create an ad tag.
Here is how to do it:
- Click New Site Ad in the dashboard.
- Create a new site by entering the site name, your domain URL (without a trailing slash), and selecting the correct vertical. Choosing the right vertical is important because it determines which advertiser categories are matched to your traffic.
- Add a campaign tag by selecting the ad format you want to use. Available formats are: Pop, Push Notifications, Inpage Push (Floater), Interstitial, Content Locker, and Ad-Block Solution.
- Select the code type and follow the integration instructions provided.
- Copy the JS code and paste it between the <head> and </head> tags in your website’s HTML.
After implementation, it typically takes 15 to 30 minutes for ads to start appearing.
For the Content Locker and Direct Link formats, you generate a unique link instead of a JS code, which you can share or embed in your content, social posts, or Telegram messages.
Getting Paid
Ad Maven pays on a Net-30 schedule.
Payments are automatic, but make sure your payment details are set up in the dashboard before the end of the month.
The minimum payout is $1, which means even small-time publishers can work with AdMaven and get consistent payouts, even if their earnings are low.
Payment methods are:
- PayPal
- Payoneer
- Bitcoin
- USDT (ERC20)
- Paxum
- WebMoney
- Capitalist
- Wire Transfer (Bank)
AdMaven Verdict
Overall rating: AdMaven is a popular online ad platform that is a solid option for both advertisers and publishers.
For advertisers, the main strength is access to direct publisher inventory alongside useful optimization tools like CPA Goal.
The best way to find out if any ad network works for your offer or traffic source is to test it.
Ad Maven’s minimum deposit starts at $100 for advertisers, which is pretty standard in the industry.
Give it a try and see what results you get!
Don’t forget to use our exclusive coupon code MOBIDEA to get 10% bonus on your first top up!
AdMaven FAQ
Is AdMaven good for beginners?
Yes. The setup process is simple, the minimum deposit starts at $100, and every advertiser gets a dedicated account manager to help.
What ad formats does AdMaven offer?
Advertisers have five formats: Pop/New Tab, Push Notification, Inpage Push, Interstitial, and Content Locker.
Publishers get two more: Smartlink and Direct Link.
What verticals work best on AdMaven?
Sweepstakes, dating, casino and sports betting, nutra, mobile apps, VPNs, and software installs perform well on pop and push traffic.
Does AdMaven have a minimum traffic requirement for publishers?
No strict minimum. Ad Maven accepts websites, apps, Telegram channels, URL shorteners, and more, as long as the traffic is real and not artificially generated.
How long does it take to get approved as a publisher?
Most accounts are approved on the same day.
How does AdMaven pay publishers?
On a Net+30 schedule.
Payment methods include PayPal, Payoneer, Bitcoin, USDT, Paxum, WebMoney, Capitalist, and bank wire.
Minimum payouts start from $0 depending on the method you choose.
Can I use a third-party tracker with AdMaven?
Yes. Ad Maven supports S2S conversion tracking via postback URL and works with trackers like Voluum and Binom.
Custom postbacks are also supported.
What is the difference between direct and third-party traffic on AdMaven?
Direct traffic comes from Ad Maven’s 15,000+ exclusive publishers.
Third-party traffic comes from programmatic feeds and adds more volume but with more quality variation.
You can choose to run on direct sources only.
Does AdMaven have an anti-adblock solution?
Yes. Publishers can request an ad-block bypass code from the support team.
Ad Maven says this can add up to 50% more revenue from traffic that would otherwise show no ads.
Do you have an AdMaven promo code?
Yes. Use code MOBIDEA when making your first deposit to get a 10% bonus on your balance.
This is exclusive to Mobidea Academy readers.


Check the latest and fresh MegaPush Review! Learn how to make money on MegaPush by correctly optimizing your campaign and putting the platform features to their best use.

This fantastic PropellerAds review is gonna show you how to explore a network that's remarkably famous for its pop traffic!

Editor's note: Go2mobi is no longer available. Check this Go2mobi review and understand how to make money on Go2mobi like an expert!