[Case Study] How to Scale Your Dating Offers on In-Page Push
March 10, 2021 10 min read
Introduction
We are sure that by now most of you are already familiar with the In-Page Push ad format. For those of you that are new to the world of online advertising and the benefits of Push Notifications, no worries, we will guide you through it.
About In-Page Push and Why You Should Give It a Try
In-Page Push had gained importance in early 2020 as an answer to growing restrictions toward classic push notifications.
Thanks to In-Page Push, a broader range of users are able to see the ads again as often as it was before Chrome’s restrictions.
In general, it is a user-friendly and highly-engaging ad format for advertisers that wants to reach their audiences on any device.
Advantages of In-Page Push:
- No user subscriptions needed – Extensive reach
- Works on all devices
- Broader audience – including iOS users
- Advanced targeting options
- Immediately displayed
- No browser restrictions
- Higher CTR than classic push
How do They Work?
In-Page Push is a native-like push message that appears when a user is browsing the Publisher website.
Unlike Push Notifications, In-Page Push doesn’t depend on a Browser, is available on all devices and all Operating Systems, including iOS. It also doesn’t require a user subscription to show the advertisement, which allows it to reach broader audiences and get a much higher fill-rate.
In-Page Push ads look very similar to the classic Push Notifications, but they are in fact Banner ads that appear directly on the website. Thanks to this, they represent a cheaper Push-like ad format that generates higher CTRs.
In-Page Push Case Study On Dating Vertical
We decided to choose a Dating offer to run a test campaign on the In-Page Push, as Dating, together with Crypto, Antivirus, VPN, iGaming and Sweepstakes belongs to the best performing verticals on this specific ad format.
This campaign was set up to run within a period of one month and a half. Since the Dating offer we worked with was targeting English speakers (English Dating Site), we decided to target South Africa, to have a closer range example.
Below you can see the general information about the campaign 👇
- Ad Network: RUNative
- Time Period: Dec 15, 2020 – Feb 01, 2021
- Vertical: Dating
- Format: In-Page Push
- GEO: South Africa
- Device: All devices – Mobile/Desktop/Tablet
- Bid: Min. bid of $0.005 + adjusted bids on individual ad spots
- Daily Budget: From $15 to $40
In case you’re not registered on RUNative yet, make sure you signup here because we asked them to share a promo code to get you started!
Use the promo code #MOBIDEA10 and get a 10% extra on your first deposit.
Campaign Setup

1 – General Settings
On the campaign creation page, we started by setting up the general settings of the Campaign – Name, Ad Format Push > In-Page Push, and selecting the Country targeting > South Africa.
As you can see, the RUNative platform also offers a granular targeting option by Regions, however, we left this field empty as the goal of this campaign was to collect as much data as possible and scale based on the observations.
2 – Targeting

Languages – As the Dating offer was in fact in English and had an English Landing Page, we selected the English language only.
Devices – Targeting all devices: mobile, desktop, and tablet.
OS – In this campaign, we also targeted all Operating Systems as we wanted to try all traffic sources and make further optimizations based on the collected data. This also included iOS as In-Page Push can work on this operating system, unlike classic Push.
Browsers – Targeting all Browsers.
Carriers – Targeting all Carriers.
The available Advance Targeting Options also include the Proxy traffic type targeting and targeting by IP range.
However, we left these options selected by default on all, to gather more data.
3 – Scheduling

We scheduled the campaign to run from December 15, 2020, until the 1st of February 2021, for 1,5 months.
4 – Audience

We wanted the campaign to receive traffic from every available traffic source from the network, so we selected RON (Run on Network).
Tip: To all new users, we recommend starting by running a test campaign on RON traffic. This will allow you to see the results on a variety of traffic sources and ad spots. When you get the feel of what works best, you will be able to scale your campaigns by adjusting your strategy accordingly.
5 – Pricing

We run the campaign on the CPC (Cost Per Click) Advertising model with a minimum bid of 0.005$. Our daily budget was always between $15 and $40 on an Even Distribution.
For the whole period of time, while we were running this campaign, we managed to keep the bid to a minimum.
In addition to this, we did several adjustments on individual ad spots, where we increased the bid on better performing spots with higher potential, to multiply the results. We will talk more about this in the final conclusion below.
6 – Ads
With In-Page Push, it’s important to keep in mind that they have different requirements than Native or other ad formats.
There are 2 things to keep in mind while creating Push campaigns:
- Images – this campaign requires an Icon image. If you proceed without uploading the image, your campaign won’t be published.
- Meet specific image size requirements – The Icon Image requires a maximum size of 192×192 pixels. You will need to meet this requirement in order to publish the campaign.
7 – Deposit
After finishing the final setup we’ve added $500 as a deposit to the account, to have enough balance for running the first week without running out of budget.
We did this in order to have the campaign running without any interruptions for at least a week, as we were not planning to do any optimizations or changes to the original setup, during the first stage of advertising.
However, you can of course start with a different sum, depending on how long you want to have the campaign running uninterrupted. The minimum deposit is just $25 so don’t be shy to start low.
Campaign Optimization
After launching the campaign we kept it running on RON traffic for the first week, without interfering at all with the original setup.
Our goal was to collect as much data as possible.
For the start stage of launching a new campaign, it is expected to see some negative ROIs. Therefore, we just kept it going.
After approximately one week, when we let the campaign run with the original setup, we started optimizing.
1 – Bid Optimization
On the RUNative platform, they guarantee 100% transparency which means that they fully disclose their traffic sources.
This plays a key role in the Bid optimization process. On the statistics page, you can see all traffic sources targeted with your campaign, including all available ad spots within each site.

As we mentioned before, we kept the campaign bid as a minimum, of $0.005 but, we adjusted the bids of each individual ad spot, based on their performance.
2 – Increasing Bids on Well Performing Ad Spots
Tip: In order to clarify your Statistics and gain better focus on the performance on the ad spot level, you can use the filters located in the top bar menu of the stats page. By using these filters you can sort out your data based on different factors, such as the ROI, Cost, Leads, Impressions, etc.
In our case, we sorted our data by impressions, which allowed us to see the quality of traffic coming from each ad spot.
Example: We identified one traffic source (source ID 2775) with 5 available ad spots. Out of all 5, we noticed that 3 were converting way better than others so we decided to increase their bids.

The first 3 ad spots were clearly generating the biggest amount of impressions.
We used a second indicator – the amount of Generated Leads – to really evaluate the quality of the traffic.
The second and third ad placement generated a comparably fewer amount of impressions, but a higher number of leads. Therefore, we decided to increase the bid of the first placement slightly higher than is the minimum bid. Whereas we multiplied the bid of the second and third placement by almost 6 times more than the original minimum bid.
Our main focus was on what shows the biggest potential. Increasing the bid on these placements meant increasing the number of conversions, this means that we invested in better-performing ad spots. The same logic was applied to all traffic sources.

Tip: It’s recommended to keep optimizing your bids throughout the whole period of running your campaigns. Keeping an eye on your bids and overall performance will help you get better control over your spendings.
Optimize the bids to get the best results.
Exclusively on RUNative, you have the option to change the bid for each ad spot, directly from the stats – saving your time and leaving you to focus on what’s important – making a profit!
3 – Pausing Underperforming Sources
While using the same logic of filtering your data, you can easily identify underperforming ad spots that are eating up your budget.
In this case, we decided to pause all ad spots with an ROI under -50%.

Tip: Keep on track with the performance! Nothing will help to optimize your campaigns more than the performance results.
Use the stats customization option to see what is working for you, or identify places where you are wasting your budget.
4 – Targeting Optimization
While adjusting your bids, you can continue using your data to optimize your campaign further based on many different targeting options.
As an example, we will show the case of Browser optimization.

On the statistics page, we went under the Browser tab and sorted our data by Cost.
We saw from the stats that the leads are mainly coming from the top 5 browsers in this list.
Traffic coming from Firefox has a negative ROI but we decided to keep it along with Chrome, Safari, Edge, and Opera because it generated more than 100 leads and up to minus 50% ROI. We are tolerant to keep a source if we see potential in it. So, we eliminated the remaining underperforming browsers from our scope.
The same applies to all the rest of the targeting options – Operating Systems, Carriers, Devices, Languages, etc.
We optimized them all in the same way, by focusing only on the ones that show the biggest potential.
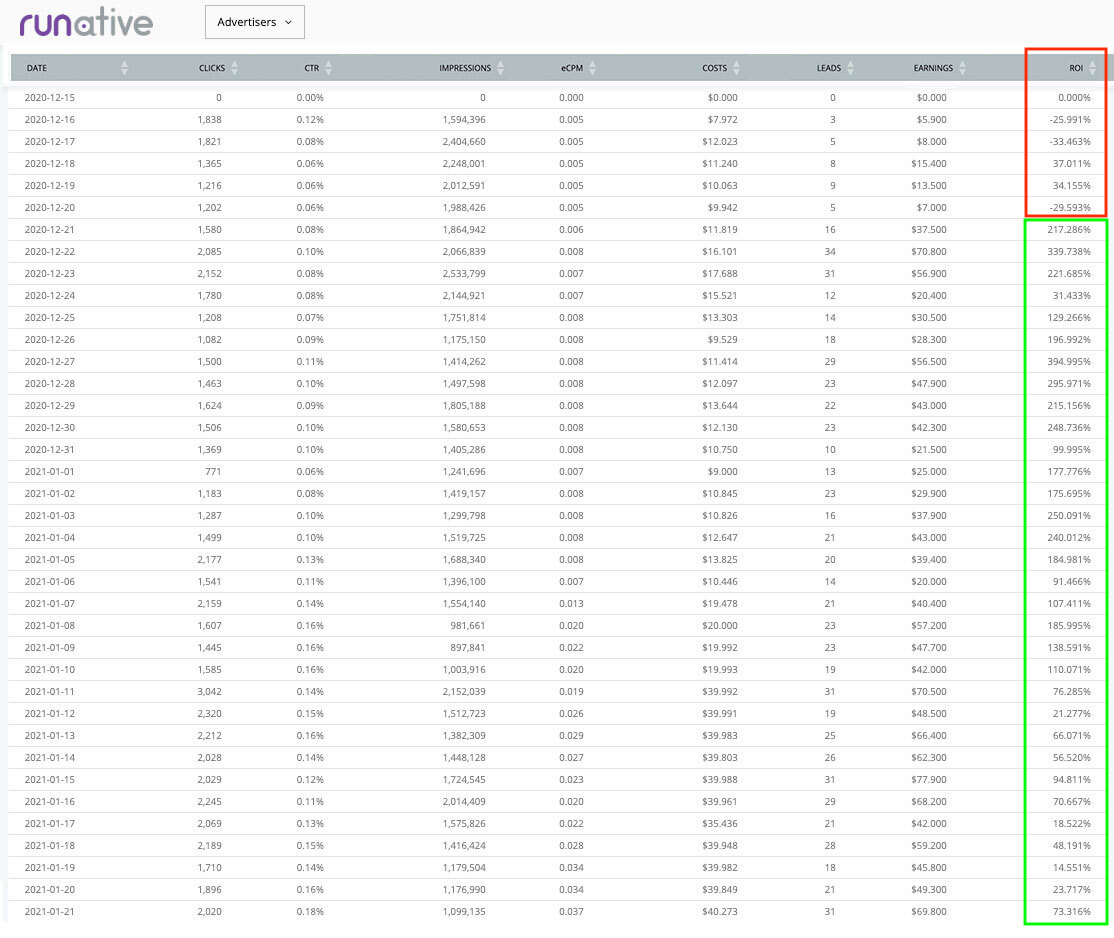
Final Results
During the first week, where we let the campaign run on ROI with the original setup, we observed negative ROIs. This was a very essential step that we took in order to collect as much data as possible. These data were later on used as a base for all our optimization decisions.
Without counting the first week, we record 3 weeks of fully positive ROIs. During the whole period of advertising, we also managed to keep ROIs above 90% while being on minimum BIDs.
Campaign Outcome
- Time period: Dec 15, 2020 – Feb 4, 2021
- Money spent: $1257.81
- Money earned: $1954.76
- Profit: $696.95
- ROI: 54.53%
- Leads: 1620
As a result of running this campaign for about 1.5 months, we had almost $700 profit with around %55 ROI, and in total, we generated 1620 leads. Again, we would like to emphasize that we managed to get these results by keeping the campaign’s bid at the minimum Bid but doing lots of optimizations.
Takeaways:
- Allow at least one week of testing period to collect lots of data.
- Take advantage of your statistics, use filters for better clarity.
- Identify your best/worst-performing sources.
- Bid up on the best performing, profitable sources.
- Don’t hesitate to pause underperforming sources.
- Focus on what shows the biggest potential and invest in it.
In case you’re looking for offers to run on their traffic, browse Mobidea offers here.


Wanna know when to stop media buying campaigns? Read this awesome article and start earning like a pro right here and now!

Get to know how this media buyer made 310% ROI on mobile subscriptions.

Read this affiliate marketing case study on sports betting in India, with over $1000 in profit in a month.