
DatsPush Review
Hi everyone! Today I am going to write my DatsPush review.
This is a young but well-known Push Ads network, which appeared in 2018.
I started to work with this ad network when it was in the beta testing stage. At that period, I had some questions about the functioning and interface, but I really liked the traffic from this network.
I tested Nutra and Dating, and some countries worked pretty well.
Their friendly and loyal support helped me to resolve my issues.
One year has passed, and I am currently writing a review about them. I am interested to know what has changed and improved since then.
Let’s get started!
Dashboard

Once logged in – we can see a user-friendly interface.
The dashboard section provides the information on clicks, price, campaigns and countries.
By choosing the All Statistic button, you can directly get to the statistics section to analyze the active campaigns in detail.
The left menu with the option to select sections is automatically hidden, which gives more space for information display.
Everything is clear with the interface.
Now let’s proceed to the campaign creation.
How to Create a Campaign on DatsPush (Step-by-Step)
First, press the “+” button in the Campaigns tab:

Enter all necessary campaign-related data once the New Campaign page has opened:
- Name
- Category
Targeting
- Country, Region, City – GEO targeting
- Device type, Browser, Browser language, Platform, Android version, Device resolution – targeting based on the device, browser, language, OS version and even screen resolution used.
- White list/Black list site – respective white and black website lists
Limits
- Budget limit
- Daily budget limit
- Click limit
- Daily click limit – different limits per campaign, based on general and daily budget or the number of clicks.
- Start at, Stop at – end and start of the campaign.
Speaking about the start date, I’ll tell you about the time when notifications are sent to users.
Ad views take place 8 times throughout the day – from 9:00 to 23:00 – and 2 times at night, according to the user’s local time. The Ads are sent every 2 hours during the daytime.
You can press the Create button at this stage, and then proceed to adding the creatives or continue the configuration, having specified additional parameters.
Let’s check them!
Audience
- White list/Black list audience – that’s an interesting point! Some sort of retargeting list with no need to embed the code to your website (you can find more detailed info in the Optimization section) – I’ll tell you upfront that I highly recommend you to use this option and in the long run you will see whether it proved useful to you or not.
- Carrier, White list/Black list ISP – mobile operator targeting
- Usage type
- White list/Black list IP – the list of IP bandwidth
- All these parameters will be more than enough to set up an accurate targeting, based on any operator or IP bandwidth.
After pressing the Create button, we proceed to adding the Creative.
Creatives
Here, you have to fill in the corresponding lines one by one:
- Category – category of the offer you are working with.
- Title and text – you should write the headline and the text of push ad here, using a maximum of 30 and 45 characters accordingly.
Remember, the use of emojis can increase the efficiency of your ads, so consider using it!
You can add emojis by clicking on the smile icon as it is shown in the picture above.
- URL address – this is your link to the affiliate network or tracker.
BTW, if you are still not using the tracker – check Mobidea Academy’s list of the best trackers, including special offers.
It’s obvious, that further optimization will be impossible unless we transfer tokens from the traffic source.
Then you need to add the images for your push ad:
- Icon file: 192x192px
- Image file: 492x328px
When adding the images – they are added at once, as they are, without cropping option, which is a little bit inconvenient.
I got used to crop images after downloading when I work with other platforms.
- Bid price – here you should indicate the price per click.
Here you can see minimal and recommended rates, as well as maximum CTR for selected GEO.
You should consider this data as an indicator, for you to understand where to start from.
Talking about rates and CTR, it should be mentioned that an ad with high CTR will receive more traffic at the same rate as compared to an ad with a lower CTR.
So, in other words – the more clickable the ads are – the less rate for the same volume of traffic it has.
Also, if you need to indicate the price for several countries – just click on Bid by GEO.
- Frequency capping – notification frequency per user

As can be seen from the example above, the notification frequency and ad view take place once a day.
You can either increase the frequency or completely remove the limit if everything is perfectly converted but I would recommend you to start with the parameters mentioned above.
And the interesting thing is that the parameters are normally specified on the campaign level. Hence, we’ve got the opportunity to specify them on the ad level.
So, all ad-related data has been entered but do not hurry to press Save and close this section!
I would like you to pay attention to the right side of the screen.
Drag the mouse pointer to this part, and you will be able to preview your own creative.
Here, you can see the way your ad looks on various devices.

This is a very useful option, you can always make sure the text is fully visible.
Once the first ad is ready – it’s time to add a few more. I usually try to test the offer of at least 5 ads, in order to evaluate different approaches in creatives.
Since we already have the first creative – the second one can be easily created by copying the existing one.
Click on the copy icon on the right:

Open the received ad copy and change its headline/text/icon/image – then press save, and the new ad is ready.
Repeat the whole process 5-7 times to test different approaches in creating push ads.
Tokens List
- {CAMPAIGN_ID} – Campaign ID
- {CREATIVE_ID} – Creative ID
- {CPC} – Bid (rate)
- {DEVICE_ID} – Device ID
- {COUNTRY} – Country
- {BROWSER} – Browser
- {DEVICE_TYPE} – Device type
- {PLATFORM} – Platform
- {CLICK_ID} – CLICK_ID (for conversion transfer)
- {SITE_ID} – Site ID
Campaign Optimization
White list/Black list
Now, when everything is clear with campaigns and creatives – let’s proceed to optimization.
Everything is pretty the same and clear here – we can optimize creatives as well as include platforms into white and black lists.
In order to add the website in white or black list, you should open necessary campaign for editing and then add the platform into the corresponding list:

Audience
I would like you to pay special attention to this since I have never found a similar option in other networks before, and it seemed very interesting to me.
As I have mentioned before, it is very similar to retargeting (when you catch the user, who has searched through the website before) – but the difference is that there is no need to embed the code to the website.
The users who clicked on your ad will be automatically included into the list you created in the All Audiences section.
In other words, you can include those people, who have already seen your offer into the separate list. That will be eventually those users, who got interested in your ad.
In order to activate this option – click on More settings when creating the campaign, and select Collect data in the audience.
You can make a more attractive offer to your users, e.g. using a more attractive ad, make another offer or any other product category.
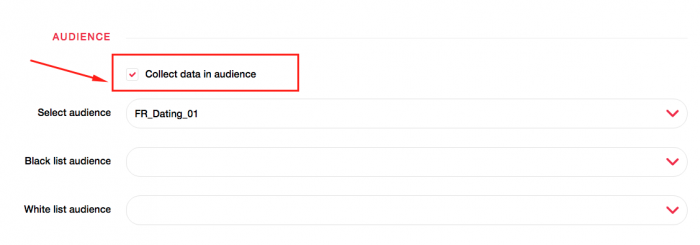
You can easily remove these users when you realize the audience is no longer interested in your offer, and you need completely different users.
Similarly, with White/Black website lists, we can add Audience lists in campaign settings.
Payments
Minimum Deposit: $50
Payment Methods: WebMoney, ePaymants, PayPal
Support
Personal Account Manager: Yes
Support Response Speed: Good
Support Rating: Good
Contact Methods: Email, Skype, Telegram
For more information, read their FAQ.
DatsPush Pros
- User-friendly interface
- “Audience” option – similar to retargeting
- High-quality traffic
- Fast moderation
DatsPush Cons
- No option to add and “crop” the images


Traffic Factory is one of the most popular ad networks around. Learn everything about it by checking this Mobidea Academy post!
Looking for ad networks with traffic from direct publishers? Look no further—AdMaven is here! Is it worth the try? Let's find out together.

Read our in-depth SelfAdvertiser review and learn how to start working there.