Push traffic continues to grow in popularity among newbies as well as professional media buyers, and a growing number of ad networks add push ads to their ad formats.
Today I am going to review SelfAdvertiser.
Here you can buy not only push ads but also domain redirect and pop.
We are going to go deeper into the push ad format in this review.

Let’s start with creating the campaign and then we’ll find a way to optimize the traffic in this source.
Let’s go!
How to Create a Campaign on SelfAdvertiser (Step-by-Step)
Before you get started you’ll need to deposit some funds into your SelfAdvertiser account and also set up the traffic source in your tracker.
Here is the list of available macros on SelfAdvertiser:
- @@BID@@ – Bid (rate per click)
- @@CLICK-ID@@ – ClickID – used for integration and conversions transmission from the tracker into the traffic source.
- @@SOURCE@@ – Source
- @@GEO@@ – Country
- @@CAMPAIGN_NAME@@ – Campaign ID
- @@DEVICE@@ – Device
- @@OS@@ – Operating System
- @@BROWSER@@ – Web Browser
- @@CARRIER@@ – Carrier/Operator
- @@KEYWORD@@ – Keyword (used in domain campaigns)
- @@CREATIVE-ID@@ – Push Creative Optimization
Please pay attention, the macros are separated by “@@” from both sides.
Tip: Recently, I have started to add rate per click macros not only in tracker’s price field but as a separate value as well. I do this in order to analyze a specific campaign, based on different rates per click. This is especially useful when you are dealing with traffic sources, where you can set different rates for specific sources, like in the case with SelfAdvertiser.
Also, SelfAdvertiser is a verified traffic source on the major trackers such as Voluum, RedTrack, BeMob, Binom. When defining SelfAdvertiser as a traffic source, you’ll automatically have all the tracking tokens on your tracker.
Well, I hope everything is clear with macros so far, now let’s proceed to the campaign creation.
I would like to have your attention that SelfAdvertiser has a one-page campaign creation:
However, due to the fact that it is going to be quite complicated to show up the entire page, I decided to split it up on several sections.
Campaign Information
Group Name: Ads group (you can either create new or select the existing one)
Campaign Name: Campaign Name
Destination URL: URL address
Bid CPC: Bid (rate per click)
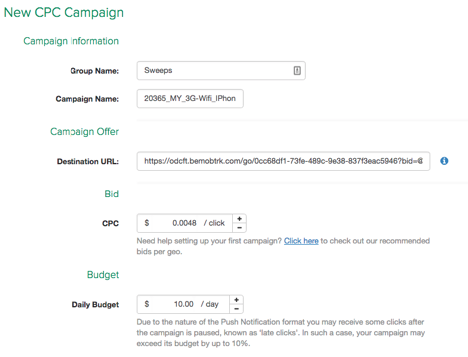
You can find the recommended rates and traffic volume here.
Considering the fact that the price of traffic sales has been changing rapidly, and table updating sporadically – you better contact the manager regarding the current price for your GEO.
Daily Budget: please, don’t forget about this parameter so you won’t waste the whole budget on one creative only.
Geo-Targeting
Here, you should indicate the countries that you’re going to work with.

Audience Targeting
User targeting:
- Device
- Operating System
- Browser
- Connection Type
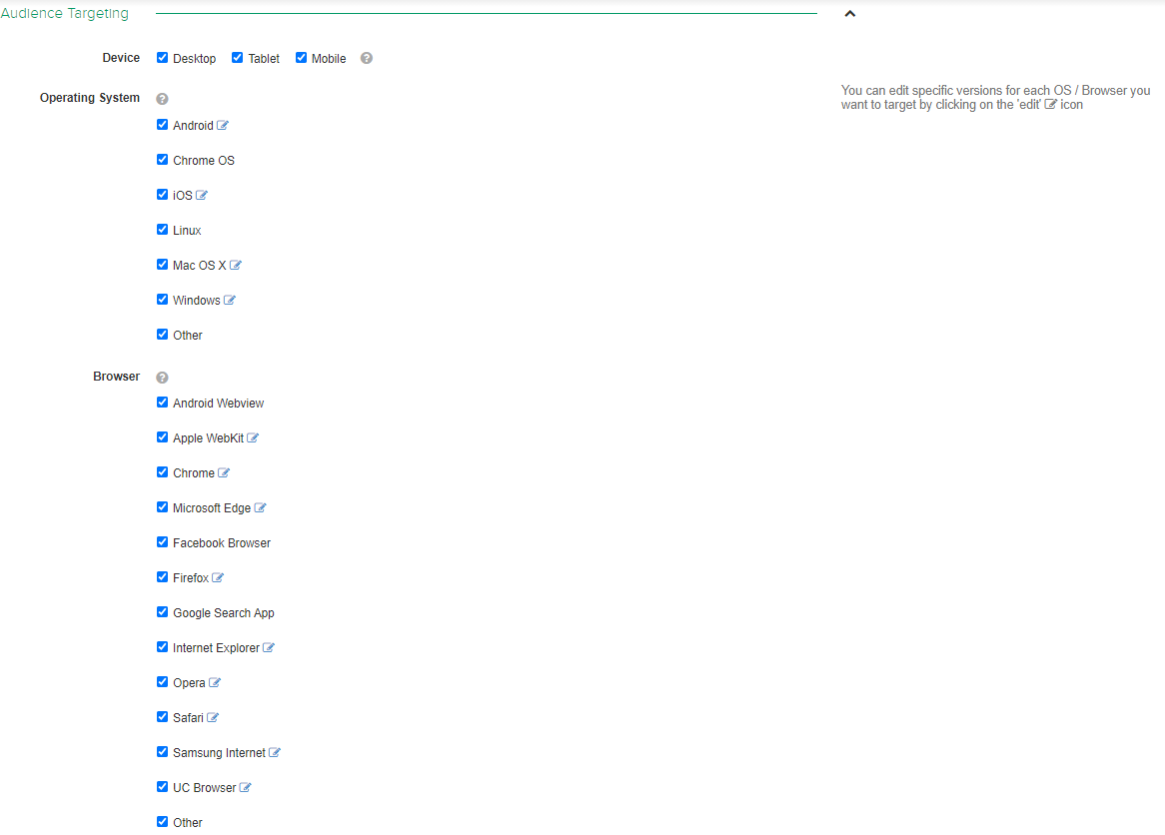
Note: It’s possible to edit specific versions for each OS/Browser that you want to target by clicking on the “edit” icon.
Campaign Targeting
Targeting Mode: here you should select either Black or Whitelist (it is called Specific Sources).
Blacklist/Specific Sources: you should indicate the sources that you’re going to block, or make use of, in case you’re going to work with the Whitelist.
Global Blacklist: you can set it up in account settings.

Creative (Ad)
This section should be quite familiar for those who got used to working with push traffic:
- Title – Ad title (mandatory)
- Description – Ad description (optional)
- Badge – Small image, instead of which the user’s browser logo is typically used in other push sources. (optional)
- Icon – Small push notification icon. The standard for push – 192х192 px. (mandatory)
- Image – Large image of push notification. Standard – 720х360 px. (optional)
SelfAdvertiser also has a feature for “Multiple Creatives” – they call it “The Juggler.” This feature enables you to run your push campaign with multiple creatives at the same time and easily A/B test them.
See the screenshot below:

Campaign Delivery
Here, here you can see the final settings before you send it to further moderation:
After Campaign Approval: you can select either to launch the traffic right after moderation or to pause the campaign.
Frequency Capping: frequency capping for unique users. Here you can set Unlimited/6/12/24 hours.
Learn more about frequency capping.
Dayparting: use this feature if you need to set certain days of the week or hours for the delivery of push notifications.

Click on the “Send Campaign for Approval” button and wait for moderation – meanwhile, you can create a few more campaigns with other creatives.
However, this time there is no need to fill in all fields – just copy the campaign you created before, then change the description and images.
You can clone campaigns so you create new campaign variations really quick:

Select the campaign, click on the circle, which can be green, yellow, or gray, depending on the campaign status and click on “Clone” in the dropdown list.
Then, you can change the description and images in the copy you created before, and click the “Send Campaign for Approval” button.
Simple as that, few clicks, and the ad is done!
Traffic Counter

Use the traffic counter and in-built filters to get an idea of volumes for your campaign.
Use the results to see daily impressions and the average cost per view for each OS to give you a baseline figure to work from.
If you have Domain Redirect selected you can choose between Keyword Targeted or Run of Network to narrow things down to your liking.
Campaign Optimization
>>> SelfAdvertiser Coupon: Get 20% Bonus
I hope everything is clear with creating campaigns and launching the traffic so far – now let’s find a way to optimize the traffic.
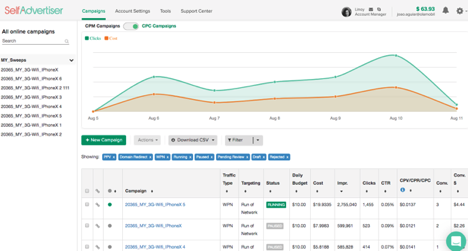
Having opened the ads group, you can see the chart with rate-per-click data and the list of campaigns with the information on them.
If you have set the integration with a tracker – you can find the information on conversions there as well.
Click on the campaign you’re going to optimize and you’ll be further redirected to the page, where you can find the information on sources:

After highlighting all necessary sources, you can further block them or create a new campaign based on these sources.
Here, you can reduce the price for specific sources, or increase it to receive more traffic.
If you want to do this action in bulk, check here.
When working in affiliate marketing you start to realize that it is never that easy to get high-quality traffic from your offers.
Platforms like Facebook or Google have quite a negative attitude towards affiliate marketing offers.
In this sense, a source like SelfAdvertiser can be very useful.
Even though push notifications format started to gain popularity in the previous year, it is still trendy and has high demand.
The user normally has a loyal attitude towards push notifications. All you need to do is target in a correct way and send the necessary push-ad, i.e. you need to choose an appropriate image and description. On SelfAdvertiser, it is really simple.
SelfAdvertiser is currently making around 180M daytime impressions of push notifications, using more than 33.000 direct publishers.
Therefore, you are quite unlikely to have any problems with traffic volume. By the way, here is the link to the traffic counter.
With regard to the traffic quality – they’ve been working since 2014, and they’ve got their own groundwork on how to clean the traffic.
Apart from that – SelfAdvertiser is a quality traffic source, and I’d advise you to give it a try.
Ad Formats
There are 3 ad formats that you can choose for your campaigns. These come with various targeting options and cost models.
Push – A good source of non-intrusive bot-free traffic from subscribed users with instant delivery. Uses the CPC bidding model.
Pop – These full-page high converting PPV ads can be RON or Keyword Targeted. They have a high CTR and conversion rate and can be targeted to desktop or mobile users and be broadly or narrowly targeted.
Domain Redirect – These ads are called Zero Click ads by SelfAdvertiser. This ad format is derived from domain misspellings. If a user clicks, they are redirected to the advertiser’s offer page. The trick for getting conversions is to make your ad look like a webpage and be closely related to the product the user is searching for. As these ads can be fairly competitive, you may need to enter a higher bid than for other ad types.
Tip: Make sure to use the correct domain spelling – and not the misspelling – in your keyword list.

Each ad format comes with its own benefits. You will get better value with RON targeting but it’s recommended that you use Keyword Targeting if you need to target a specific niche audience.
Keyword Tool
So far we’ve focused on Push Ads, but what if you wanna run domain redirect (zero-click) or pop ad (full-page PPV) campaigns?
Well, there’s good news for advertisers here. Basically, with these campaigns, you have two targeting options – Run of Network (RON) or Keyword Targeting. If you select RON the algorithm will select traffic from all sources which are best for high volume campaigns.
However, if RON targeting doesn’t quite rock your socks, you can use the SelfAdvertiser Keyword Targeting tool instead. This works with both domain redirect and pop ad campaigns, and gives you the ability to target websites with specific keywords using broad, phrase, or exact match targeting. This may result in less traffic but more target users.
Let’s say you wanna start a domain redirect campaign – Select Keyword Targeted and click next. You can then search the SelfAdvertiser keyword database for suitable keywords to add to your campaign and even find additional keyword suggestions from the related keywords function, or add keywords in bulk.
Keep the results fairly broad to increase your volume, and watch your bids! You want to aim for the lowest cost traffic that will convert for your offers. You can even use SelfAdvertiser’s tokens to see which keywords are performing best.
You can also use this tool to target specific domains by using the URL as a keyword, and include or exclude specific keywords from your campaign. This gives you much greater control over your targeting, and is a neat addition to the platform.
Check out the SelfAdvertiser support article for more info on how to use this tool to your advantage, including detailed guidelines for both domain and pop traffic.
Offers & Verticals
Ad Types: Push, Popunder, Domain
Cost Model: CPC for push, CPM for popunder and domain redirect.
Offers Verticals: Sweepstakes, Dating, Mainstream, VPN, E-commerce, Crypto
Payment & Investment
Minimum Deposit: $100 (Minimum deposit is $100 for the first deposit, and after that $50 for each deposit.)
Payment Methods: PayPal, Credit Card, Wire Transfer, Payoneer
To deposit funds to your SelfAdvertiser account you can use Paypal or CC by default, but you can also use wire transfer and Payoneer after getting in touch with your account manager (you’ll get an AM assigned to you when you create your new account).
Support
Personal Account Manager: Yes
Support Response Speed: 10 min – 4 hours (Depending on the timezone)
Support Rating: Good
Contact Methods Available: Live chat, Email, Skype
SelfAdvertiser Verdict
Pros
- Good traffic quality.
- There is not only Push but Pop and Domain traffic as well.
- You can increase/decrease the price for selected sources.
Cons
- Slightly different user interface compared to other push networks.


Check our PlugRush review and get to know everything you'll need to succeed with this platform. We created a campaign from scratch on PlugRush so you can follow all the steps.

This fantastic PropellerAds review is gonna show you how to explore a network that's remarkably famous for its pop traffic!

Editor's note: Go2mobi is no longer available. Check this Go2mobi review and understand how to make money on Go2mobi like an expert!