PopAds: The Complete Guide to Succeed
Last updated on February 11, 2019 19 min readYou are currently in the "Advanced" - Learning paths

PopAds: The Complete Guide to Succeed
19 min read

The Best Affiliate Marketing Tools (Free and Paid)
7 min read

Best Productivity Tools to Save Time and Money
10 min read

How to Create a Six-Figure Blogging Business in 2018
6 min read

How to Make Your Website Go Viral in the Twenty-First Century
18 min read

CPA on Facebook Ads: Definitive Guide for Beginners
6 min read

How to Use Facebook Ads to Drive Sweepstakes Entries
5 min read

How to Promote CPA Offers with PPV Traffic
17 min read

Wanna check an article that’ll allow you to understand how to create and optimize mobile campaigns on PopAds? Then start reading our PopAds guide!
PopAds Guide – Introduction
In this guide, I’m going to walk you through each step of the way to properly setup your campaigns and targeting options on PopAds.
Indeed, this is a PopAds case study that’s really gonna help you out big time!
Even so, the Mobidea Academy experts have already created an awesome PopAds review you can check!
In this one, you will also learn how to optimize your campaigns as I share a quick case study about optimizing that will help you build more profitable campaigns.
For those of you who may not know me, my name is Andrew Payne and I’m an affiliate marketer who focuses on mobile pop traffic.
But for now, let’s get to the good stuff and see if we can increase your PopAds earnings.
The Mobidea Crew hit me up and asked if I would share some of my insights with you.
When we started to brainstorm about what topics I could write about, the idea of a guide and case study about PopAds was just a perfect fit.
You see, I have been scaling one of my campaigns on different sources and using it as a demonstration for my coaching students to learn how to optimize and scale their own.
I had just started to run traffic to a test campaign on PopAds and the data I’ve collected is a great example to use for this guide.
How to Properly Set Up a PopAds Campaign
First things first, we need to understand the right way to set up a PopAds campaign.
Click Here to Create a PopAds Account
What I’ve noticed is that many new affiliates will overthink the process of setting up a campaign.
They either second guess themselves or they get stuck when seeing all of the options available on the settings.
Pro Tip: it’s very important to understand as much as you can about a traffic source.
Each one is very different and what works on one source may not work on another.
I encourage you to read through the entire knowledge base or FAQ section on PopAds, and even consider sending a support message if you have a few specific questions that you can’t find the answer to.
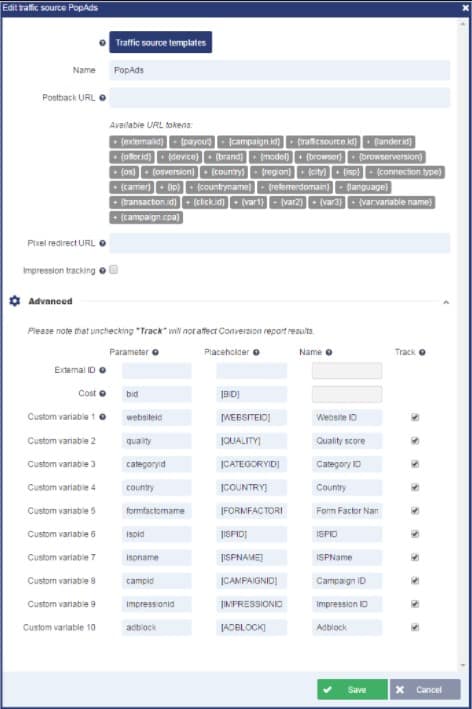
Tracking Your Campaigns is Vital
Whether you’re using Voluum, FunnelFlux, Thrive or another tracking platform, Voluum offers a specific set of tokens that need to be configured inside your chosen tracker.id
These tokens will pass data back to your tracker and allow you to make good decisions when optimizing your campaign.
It’s important to set this up correctly because you are spending money to collect data on your campaigns – you do not want to lose this data by not having things working as they should.
Look at the screenshots below to see the available PopAds tokens and an example of how to set it up in Voluum.
Here are all of the available tokens offered by PopAds:
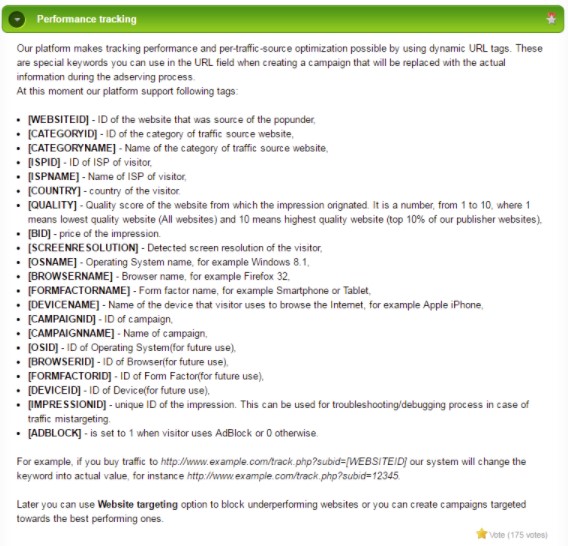
Here’s an example of how to configure the tokens in your Voluum account:
Example Link:
If everything is set up correctly, when you create a new campaign in your tracker, the end of the campaign link should look as crazy as this one:
http://example.com/123456/?websiteid=[WEBSITEID]&quality=[QUALITY]&categoryid=[CATEGORYID]&country=[COUNTRY]&formfactorname=[FORMFACTORNAME]&ispid=[ISPID]&ispname=[ISPNAME]&campid=[CAMPAIGNID]&impressionid=[IMPRESSIONID]&adblock=[ADBLOCK]&bid=[BID]
Choose Your Vertical, Target GEO and Offers
After you have chosen the vertical you will be testing, the country that you want to target and have collected one or multiple offers to test – go ahead and set those up in your tracker and create the campaign link that will be used on PopAds.
Learn More: Affiliate Marketing Verticals: The Definitive Guide
It should look similar to the example link posted above.
Then, proceed to Step 1 below.
For this example, we will be using an iPhone Sweepstakes offer that accepts both Wi-Fi and all major mobile carriers for the country of South Africa.
These offers typically range in the $1 to $5 payout range. The one I used had a $4 payout.

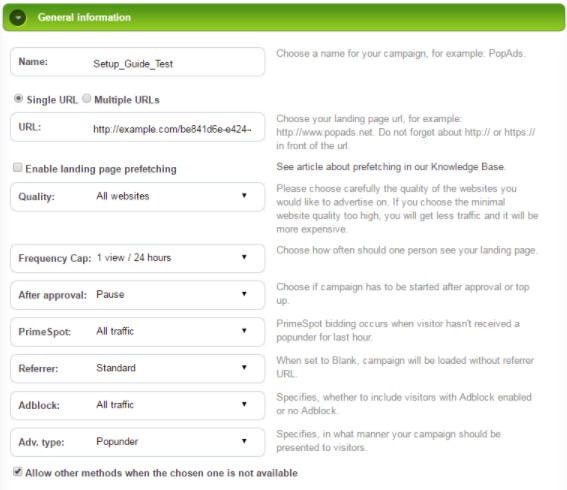
Step 1: General Information
This section has a lot of options.
You can choose the campaign name, place the campaign link that your tracker gave you, and more.
Don’t overthink this area! I see many affiliates make mistakes right here.
Type in the name you want to use, keep the option selected to Single URL, and insert your campaign link.
I typically will leave the Prefetching option unchecked and will test it later, after I have a good campaign.
I get questions all of the time about the Quality option inside of PopAds. Leave it set to “All Websites”.
Why?
Well, I’ll tell you but pay very close attention: the reason you leave it set to “All Websites” at the beginning is because you do not want to limit the amount of traffic you get.
You need to test broadly and see what is and isn’t actually converting for your campaign.
This applies to all settings on the campaign.
At the beginning, you want to set just enough options to be targeting your correct type of traffic for your offers and not worry about all of these tiny details.
Later on, during the optimization process, you can revisit some of these, if necessary.
Keep the Frequency Cap at “1 view/24 hours” at the beginning.
I like to leave the “After Approval” on “Pause” so the campaign doesn’t start until I’m ready for it.
You can also accomplish this by setting your “Time Targeting” to daypart for the correct days or hours to run the campaign.
For the “PrimeSpot” option, go with the same approach we took for the “Quality” option.
We will leave it set to “All Traffic”.
The “Referrer” option can remain set to Standard, “AdBlock” can be set to “All Traffic” and the “Adv. Type” is set to Popunder.
There is a little checkbox at the very end asking if you want to “Allow other methods when the chosen one is not available.”
I usually leave this checked as most of the traffic is the Popunder type anyhow.
Here’s a screenshot:
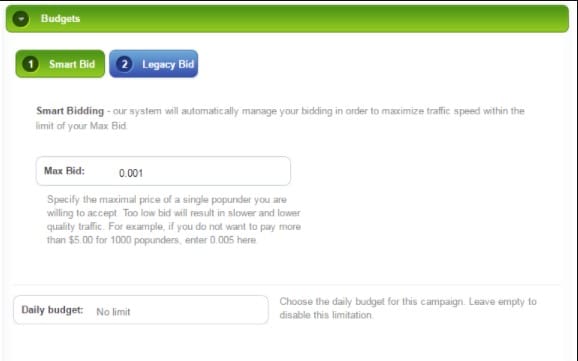
Step 2: Budgets
Under the budgets section there are two primary options, the “Smart Bid” and the “Legacy Bid”.
I recommend leaving it on “Smart Bid.”
This will allow PopAds to adjust your bid to different levels based on the competition of each website sending you traffic while keeping the campaign’s average bid within your max bid range vs. the “Legacy Bid” which will give you a flat rate bid for all websites sending you traffic.
I bet you’re now wondering about how to choose a bid?
For now, just set it to $1 CPM which is .001 but we will come back to this later on, before saving this campaign.
For the daily budget, you can specify a max daily spend.
By leaving it blank, it will spend up to the amount you have added to the overall campaign budget.
Here’s a screenshot:
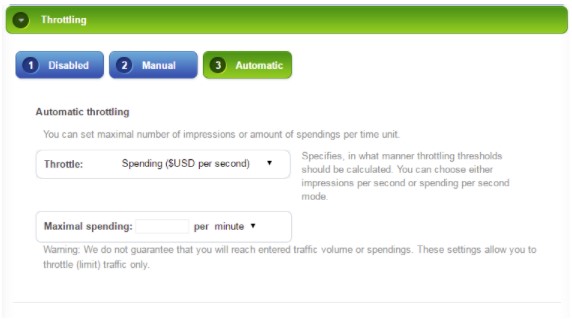
Step 3: Throttling
This section is self-explanatory.
If you would like to stretch your test budget out over a longer period of time by regulating the speed of traffic or your ad spend on a second/minute/hour level, you can do that.
However, I personally do not use these features.
I leave it “Disabled”.
Here’s a screenshot:
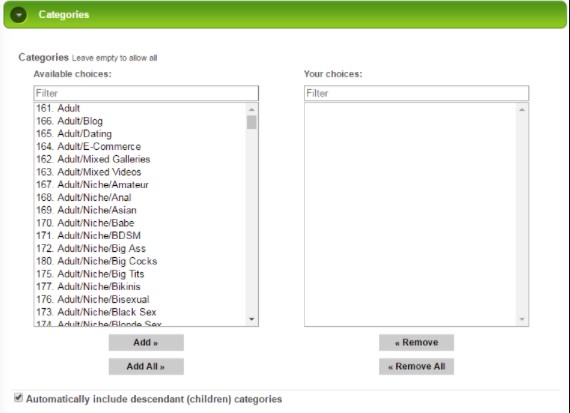
Step 4: Categories
The category section helps if you are promoting an offer that is targeted to a very specific niche.
In most cases, I’ve only used it to target either all Adult traffic, all Mainstream traffic or both.
Seldom have I used it to target a very specific niche since it really reduces the volume of traffic.
For most offer types, such as Antivirus, Sweepstakes and Mobile Apps, there is no need to be this granular with your targeting.
These offers work on all categories but you should follow the guidelines set forth for the particular offers you are testing.
For example, if it doesn’t allow Adult traffic, then you could set to target just Mainstream traffic.
In this example, we are selecting all the traffic, which means we will leave the section as it is.
Don’t forget: when leaving the right box for “Your Choices” blank it will automatically target everything in the section.
If you manually add one or multiple items over to the right box, that would mean it’s only targeting those specific options.
Here’s a screenshot:
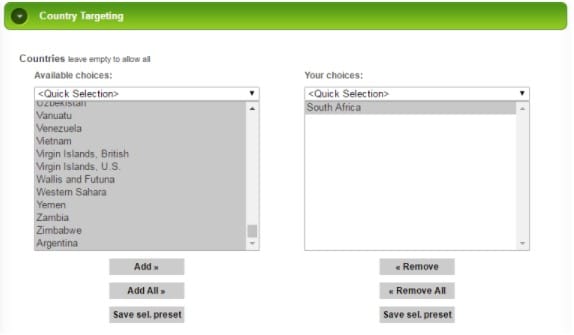
Step 5: Country Targeting
Most of the time, you will only be targeting one country per campaign and this is where you make that selection.
Even so, in some cases, you may choose to target multiple countries and perform a global test.
Here’s a screenshot:
Step 6: Society Targeting
This section allows you to adjust which languages you are targeting and population sizes.
Again, there may be some cases for using this but most likely just the language options will be used.
Perhaps you’re targeting multiple countries in the campaign and need control of what languages you are targeting.
In other cases, you are focused on one country that has multiple languages but one is profitable while the other isn’t.
What to do?
You can later go back and remove the poorly performing one.
In the end, targeting all languages for the country we selected in step 5:
Step 7: Environment Targeting
One of the many reasons why PopAds is a great traffic source for beginners is the targeting capabilities it can boast about.
PopAds has more options for targeting than most other traffic sources, which really helps you narrow down to the most profitable segments when building campaigns.
Operating System
Some offers only allow Android or iOS traffic and some allow both. This is where you specify that.
Browsers
You can pick specific browser types to get traffic from.
At the beginning, I recommend targeting all browsers and reviewing your data later to see if it’s worth making changes.
Screen Resolution
I seldom have the need to target or remove specific screen resolutions.
Once you have a winning campaign, it will usually work across most screen resolutions – assuming your landing page is correctly coded.
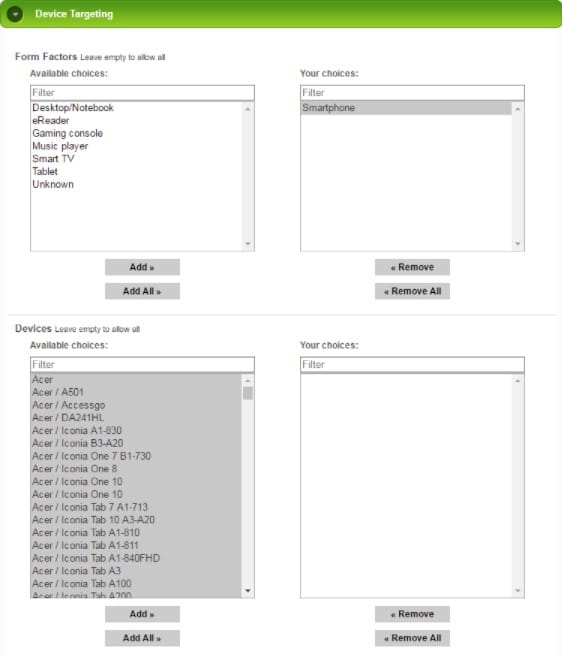
Step 8: Device Targeting
With the device targeting options, you can select whether to target desktops, phone, tablets and a few other device types.
For this example, we are going to only target smartphones.
PopAds also gives you the ability to target specific device models.
While this feature is nice, in many cases it’s not needed unless there is a particular device model that has a high volume of traffic and doesn’t convert well or the other way around.
In that case, you can revisit this option later and then remove that device model.
Alternatively, you can target only the most profitable device models.
To begin with, we will target all models.
Here’s a screenshot:
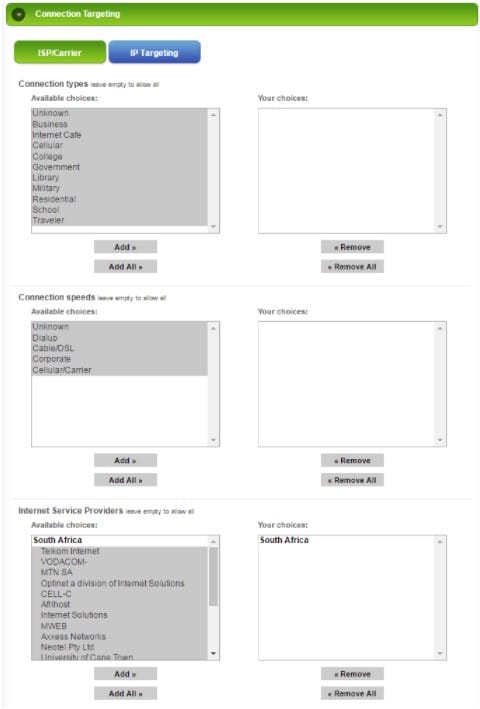
Step 9: Connection Targeting
In this section, you can define the type of internet connection the visitor is using and target accordingly.
For example, some offers accept only mobile carrier traffic or a specific ISP.
This is where you make that selection for your campaign.
The three options are:
Connection Types
I want as much traffic volume as possible when I set up campaigns so I leave this option selected to all choices.
Connection Speeds
For connection speeds, you can determine if you want to target Wi-Fi traffic, Carrier Traffic or the other options.
Unless I want to target only carrier traffic, I select all options.
If I were to target only Carrier traffic, I would select “Cellular/Carrier”.
Internet Service Providers
If you need to target a specific Mobile Carrier, this is where you can make that selection.
For this campaign demonstration, we will be targeting all traffic.
Pro Tip: on PopAds, you will notice that some of the ISP names do not match the current Mobile Carrier names. If you are having trouble finding which ISP is the actual Mobile Carrier you want, you can simply perform a quick Google search of the ISP name displayed by PopAds and you will find out the actual name of the Mobile Carrier.
This will help to make sure you are targeting the correct ISP for the Mobile Carrier traffic you want.
Here’s a screenshot:
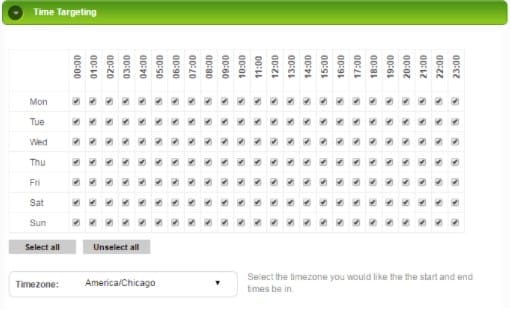
Step 10: Time Targeting
The benefit of time targeting is that you are able to control when your campaigns are going to run.
This is great when first launching new test campaigns because you can set up the dayparting (time targeting) to only run during certain hours or on certain days.
If you’re working with a limited testing budget, you could start off by testing only during the time periods showcasing the most potential.
The best time period is usually in the 6PM to midnight time frame in your target country.
After getting some initial test results and making sure the offers are converting, open the time targeting to allow for more traffic.
Here’s a screenshot:
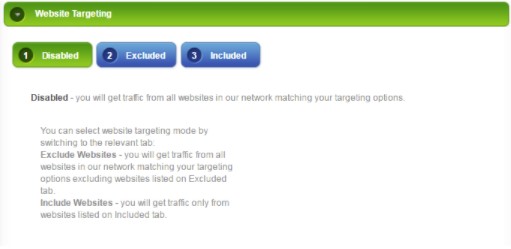
Step 11: Website Targeting
This section is where you will either be Excluding (blacklisting) or Including (whitelisting) websites that you add to these lists.
Of the three options – Disable, Exclude or Include – you can only choose one per campaign.
At the start of a new campaign, you will keep this part selected on “Disabled”.
As you go through the optimization process and become able to see which websites are sending you traffic while not converting, you can add those Website IDs to the Exclude list and help improve your campaign.
Here’s a screenshot:
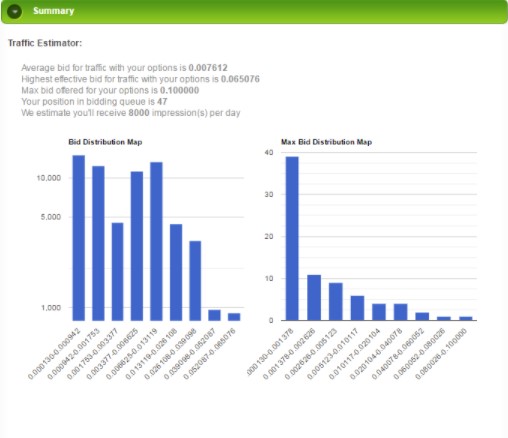
Step 12: Summary
Finally, we make it to the “Summary” section and this is an important part to consider.
This is where you can see the estimated amount of traffic you will receive based on your campaign’s target settings and the bid you’ve set.
The two maps give you some information about each bid range, the associated number of campaigns, and the amount of traffic for each range.
I don’t usually pay much attention to this section.
Based on our selection, the Traffic Estimator states:
Average Bid: 0.007612
Bid Position: 47
Estimated Impressions: 8000
Here’s a screenshot:
Final Steps Before Clicking Save
Now, if you remember back at Step 2, we set a temporary bid for our campaign.
We now want to figure out exactly what to set as our initial starting bid.
There are many methods that can be used but I’m going to share two specific approaches with you.
These two approaches will help you increase PopAds earnings!
Remember: everyone has their own approach and you can’t expect one method to work for every single campaign.
A mobile app offer with a payout of $0.25 is going to be approached in a different way than the offer in this example (which has a payout that’s in the $1-5 range.)
Method 1
This method is simple: you look at what the average bid is and – in this case – it is 0.007612 and you increase it by 25% or decrease it by 25%. And that would be your starting bid.
With this method, you will usually need a bigger testing budget to work with.
Why? Because you will get more traffic at a higher bid range.
This will help you test faster, but you will also be paying for a large chunk of traffic that doesn’t convert that well.
At least, until you weed the lousy aspects out.
The benefits are simple: you get data coming in faster and also become able to make decisions more rapidly.
Method 2
With this method, the objective is to get an idea of what traffic volume is available at what bid ranges and pick the one that has a great volume at a good bid price value.
Let’s do a demonstration!
In our example above, we started off with a $1 CPM, which is a .001 bid.
I will manually input different bids on PopAds.
Then, I will look at the number of impressions shown on the “Summary” page.
Lastly, I will manually calculate the estimated spend per day.
See below:
.001 = 9,000 impressions and estimated spend of $9 per day
.002 = 13,000 impressions and estimated spend of $26 per day
.003 = 17,000 impressions and estimated spend of $51 per day
.004 = 20,000 impressions and estimated spend of $80 per day
.005 = 21,000 impressions and estimated spend of $105 per day
.006 = 29,000 impressions and estimated spend of $174 per day
.007 = 29,000 impressions and estimated spend of $203 per day
.008 = 29,000 impressions and estimated spend of $232 per day
.009 = 29,000 impressions and estimated spend of $261 per day
From this data, I put together the $3-4 CPM and $6 CPM ranges which give me a solid amount of traffic.
This means I would choose a bid somewhere between one of those two options.
By increasing the bid to the $7-9 range, I may discover new placements that convert awesomely.
Even so, my overall traffic hasn’t increased that much.
Meaning?
By starting at the lower ranges, I will still get a cool amount of traffic while reducing my ad spend by having a lower CPM.
Go Ahead – Save the Campaign!
Now it’s time to click “Save” and let the campaign get submitted for approval.
Case Study: Optimizing a PopAds Campaign
Step 1: Find a Solid Offer
Test as many similar offers you can find and narrow it down to the best converting one.
This is the most important step in the process.
Try to test 5-10 offers at least and ascertain which is the best-performing one using this Bayesian calculator (here) from Peak Conversion.
Now, what? Run more traffic to increase PopAds earnings and then proceed to the next step.
Step 2: Find the Best Lander
Go through a similar process for your landing pages and test 5-10 of them.
At the very beginning, you should start with around 3-4 and focus your attention on more offers, as shown on Step 1.
Only after finding your best offer can you start testing a greater number of landers.
You should narrow it down to the best one using the same Bayesian calculator mentioned before.
Sidenote: don’t focus too much on your ROI or on being profitable at this point, so long as you are getting steady conversions and with each round of testing you see an offer/lander combination that’s improving.
In fact, that’s how you know things are moving in the right direction.
The exception would be if – after your initial test – all you see is -80% ROI or worse on all combinations.
Then it may really be time to move onto another test.
Now run more traffic and proceed to the next step.
This step is a critical stage in this PopAds tutorial!
Step 3: Look at the Major Segments
After you have found the best offer and lander, it’s time to look at the major segments.
From the campaign setup example, we already know we are targeting smartphones only.
Device Types
Take a look at the device types, in the event that you are targeting more than just one.
In this specific case, we almost only have traffic from mobile phones.
The rest?
Some visits coming from tablets.

Operating System
Next, you can dive into the operating systems.
Depending on the country you are targeting, you will see a different amount of traffic for each one and there are sometimes very drastic differences in performance, as you can see in this PopAds guide on the example below.
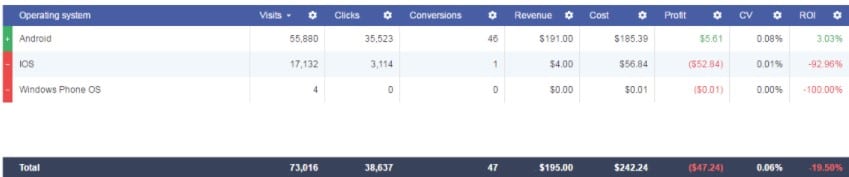
Mobile Carrier/ISP
Typically, I would just look at the normal tab under Connection Type > Mobile Carrier in my Voluum tracker.
If you recall, though, I had mentioned that PopAds has their own token for tracking ISPs.
Let’s use that one, located under Variables > ISP Name.
You can see that one of the ISPs is already profitable right off the bat.
There are several others which can use improvements but are not far from being profitable either, especially given the fact that iOS traffic wasn’t converting that well, something you can check by looking at the previous screenshot.
Now run more traffic and proceed to the next step.
Step 4: Review Website IDs
By this point, we should be near break-even on the campaign.
Ideally, you want to be in the 25% or better ROI range.
Now, we are trying to improve it further to see if we can actually increase our PopAds earnings.
We keep running traffic to the campaign and start to exclude Website IDs that have spent between 2-3x the offer payout and that have also received zero conversions.
In some cases, I make the judgement call and will exclude a placement if it has spent 1x the offer payout with no conversions.
You can afford to be more aggressive when excluding placements if you are running in a country with a high volume of traffic.
If you are running in a smaller country with limited traffic, you should allow your threshold to be a little higher before excluding the placement.
Here’s an example of data that has been accumulated, with some Website IDs being profitable, some negative but converting, and others which haven’t converted at all.
From now on, you can continue running the campaign and excluding Website IDs which aren’t converting after reaching your threshold.
This will continue to increase your campaign’s performance.
Step 5: Profit and Keep Improving
As you follow each step I’ve laid out in this PopAds tutorial, you will see improvements along the way.
By the time you reach Step 5, there should be at least one profitable segment on your data.
No profitable segments? Maybe it’s time for you to start testing a new campaign.
Something to remember: you should always try to improve the campaign.
Keep testing new offers and exclude low-performing Website IDs.
Final Pro Tip
You have just learned a very solid process that’s gonna help you set up and optimize campaigns on PopAds.
This PopAds tutorial is gonna help you a lot and the whole process works well for sweepstake, antivirus or mobile app campaigns.
You may need to change the targeting and test a few different bid levels, but otherwise you’re good to go!
I’m going to leave you with one more tip in this PopAds guide.
Trust me: I see new affiliates making this mistake over and over again.
Ready?
Stop looking at the data from your entire testing period and making choices based on the collective data gathered from the beginning of your test.
This is the wrong way to do it.
When you are working through the optimizing process, take things one step at a time.
When you complete Step 1 and start to work on Step 2, you should only be looking at the data for the time period from when you started Step 2 and onwards.
Then, repeat for Step 3, only look at the data from the time you start Step 3 and onwards.
And I will write it one last time so that it sinks in: only test one major step (variable) at a time.
The One Major Mistake to Avoid
The one major mistake you can make is giving up, so never do it!
You may need to test 5, 10, 20, 50 or 100 campaigns before you find your first real winner but once you do, it only gets easier!
Learn your traffic source inside and out, and keep testing.
There are no shortcuts to building successful campaigns but the hard work will payoff, as you could see in this PopAds guide.
I want to thank the Mobidea Academy for reaching out and asking me to share some of my experience with each and every one of you!
I loved writing this PopAds case study!
For those who’ve read this lengthy post, I salute you!
P.S: if you want to check other case studies and learn more about how I build profitable campaigns, subscribe to my exclusive Insider Tips newsletter – Join Here!