How to Effectively Use Mobidea’s Tracker Capabilities
Last updated on June 21, 2023 17 min read
Introduction
Boom!
Yep:
The article you see in front of you is now published.
This is reality.
You’re not dreaming!
We know you were waiting for these step-by-step guidelines of Mobidea’s free tracking solution.
Now, read each sentence with pleasure because we’re gonna be revealing some major secrets, allowing you to get to know how to use Mobidea’s tracker!
This article will tell you how to keep track of your campaign’s traffic.
It also includes lots of tips, tricks and suggestions on how to make the most of Mobidea’s tracker capabilities.
Got it?
Then enter your account and examine each detail of your tracker configuration while you check our hyper-detailed explanations.
Still haven’t set any campaigns with our tracker?
No worries!
This is the day where you’ll get an explanation of how to:
- Create a campaign to get a wide range of detailed info with the tracker
- Set the rules of your campaign using traffic conditions
- Add your own custom pre-lander to an offer by using a tracker
- Manage cost/profit calculation with the tracker
Now, what?
Let’s start by learning how to correctly configure your awesome tracker!
Tracker Configuration
First things first:
Custom Domain Configuration!
This is one of the most important steps in the game.
Your Tracker is not gonna work on full power mode unless you go ahead and add a Custom domain.
The Custom domain will be used to generate a Tracking URL of your campaign.
This is a final URL which should be placed on the traffic source where you’ll run your offer(s).
Just go to your Account Settings and click on Custom Domains.
On the configuration page to where you’ll be redirected, you’ll see one little surprise:
A domain that’s already linked to your account – topphoneapps.mobi
![]()
This is the test domain that Mobidea provides to all affiliates.
You’re welcome to use it anytime to test whether or not your campaign was correctly set up.
You have to make sure no errors appear while testing a Tracker URL.
What’s the mantra?
Test!
Why?
Imagine you start driving real traffic with big volumes to a campaign with the test domain.
Then, the domain stops working.
You’ll lose your traffic, your users won’t be redirected to an offer page, and they’ll never be able to subscribe to an offer and bring you money.
Don’t risk it, bro!
Mobidea won’t take any responsibility in the event that the test domain gets flagged by a specific traffic source or antivirus software.
That’s why adding your own Custom domain will protect you from unexpected issues that might arise with the Test domain.
Now, what?
Click on the Add tracking domain – green button – to insert your Custom Domain on a new field.
Once you confirm that the domain is written correctly, our platform will display four Name Servers.
Just go ahead and copy one by one.
Paste them to an account where you manage your Domain.
Or you can go for host Domain Name System – to host a DNS.
Save them in the corresponding fields for Name Servers or NS!
NS is not a CNAME, or AAAA, or TXT!
You have to find four empty fields for NS and save them there.
Done?
Click the “Verify” button.
Go and grab a coffee because you’ll have to wait for your domain to be verified.
Indeed, you’ll have to wait for a while until the domain gets approved by Mobidea.
The system will need to check all the four NS now hosted under your Domain.
Let’s say you’ve copied them correctly.
After some time, you’ll see that your Custom Domain is verified.
In fact, it’s now marked as your new Main Domain.
That’s all for the Custom Domain!
It ain’t complicated.
It won’t require you to have a Masters in Programming!
If you check the page below, you’ll see some settings for a few more Domains.

There’s nothing mandatory about updating/changing them.
Even so, it’s important for you to know what they’re all about.
Ready?
Let’s define these different domains!
Cloaking Domain
You’ll only have to configure this domain if you happen to be working with Double-Meta Refresh redirects.
This type of redirects isn’t used often.
Its usage is only mandatory in case you wanna ensure that your referrer data is not accessible by the tracker.
In other words, if you want to be sure that Mobidea won’t see the source from whence your users came to the offer, you can use a Double-Meta Refresh redirect.
As for the Cloaking Domain, you can use Mobidea’s default domain as well as your own.
Root Domain
Imagine you’ve made a mistake during the campaign’s configuration process.
Or that you misspelled your tracking domain URL.
Then, what?
Your users will be redirected to a 404 error page.
You can also add your own Root domain and your users will be redirected to it.
Now’s the time to end this Domain topic and move on to the fun part:
Creating a campaign!
Campaign Creation
Let’s guide you so that you know how to Create a Campaign on Mobidea’s Tracker.
First, go to the Stats and Tracker section of your Account.
Click the green button – New Campaign.
![]()
As soon as you click it, you’ll see a form with your campaign’s primary settings.
Let’s discuss them one by one.
Campaign Name
This part speaks for itself.
Just give a name to your campaign.
Tracking Domain
Select among the tracking domains that’ll be used to create a Tracking URL.
Don’t risk running your campaigns on a Test Domain.
Always go for your own Custom Domain.
If you want to add more than one Custom Domain, you can click on the green cross button and go directly to the page we’ve mentioned so as to edit your Custom Domains.
Traffic Sources
In these fields, you’ve gotta select the traffic source where you’re gonna run your campaign.
We’ve already configured over 30 different traffic sources.
The only step that you have to go through?
Find the name of your traffic source in the dropdown grouping menu.

What can you do in case your traffic source isn’t included on the dropdown list?
Simple:
Add it to your tracker manually.
Click “Add New Traffic Source” and fill out all the mandatory fields in the form.

Let’s check what you have to insert.
- Traffic Source’s Name
- Postback URL
This is a Postback URL that you get from your traffic source.
Normally, you can find it in your traffic source’s account.
It’s probably located in the tab “Conversion Tracking”, or “External Tracking” or anything that’s similar to that.
Once you insert your Postback URL, don’t forget that you must match your token for Click id (the token to pass conversions) with our tokens {{EXTERNAL_ID}}.
That’s the token you need to use.
What if you don’t use it?
Your Postback will not pass any information from Mobidea.
You can also add a token to pass a payout of conversion with tokens {{MONEY_EURO}} or {{MONEY_USD}} which depends on the currency you wanna receive data in.
Don’t forget to update the “Advanced Tokens”.
These shall be applied to your offer URL.
They should all be found on your traffic source.
The only token you can’t leave out is the Click ID token.
If you don’t save it, you won’t receive info about the conversions which have occurred on your traffic source.
What are the other tokens?
Cost of Click
It passes data about the costs of each click.
It’s useful if you want to check the ROI of your campaign.
Website ID
It passes the ID of the website where your ad is placed.
Placement
It passes the zone where your ad is displayed.
Don’t ignore these tokens.
Try to save them all.
They’ll help you with the future optimization of your campaign, and will also help you when it comes to creating white/black lists.
Moreover, there are 10 extra tokens you can use if you feel like you want to pass them.
At the end, save all your changes.
Your new custom traffic source will appear on the list.
Traffic Source: Cost Model
You can update the costs you pay to run your campaign.
CPM Model – in case you’re buying traffic based on the price for 1000 impressions
CPC Model – in case you’re paying per each click on your ads
After you select a Cost Model, you’ll need to set the estimated cost per either click or mile, according to your choice.
This number is gonna be taken into account when calculating your ROI.
For some traffic sources, the auto mode feature is available.
This means that the costs will be passed automatically from your traffic source.
You won’t be asked to insert any price per click/mile.
What if a traffic source doesn’t provide this info?
You’ll have to set it manually.

Currency
You can choose which currency data from your traffic source will be passed to Mobidea.
Select between EUR or USD.
This is the last step you have to go through before configuring a Rotation for your campaign.
Campaign Configuration
Time for the fun to start kicking in!
This is where we’ll start playing with the tracker.
Let’s push it to the limit!
Without further ado, let’s get down to biz!
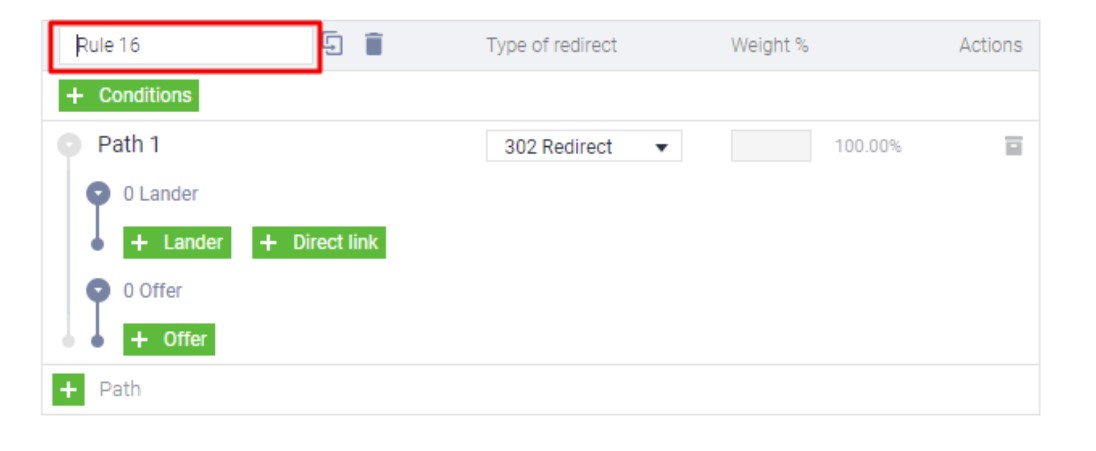
You’ll start by clicking the “rotation” button in the campaign’s “Edit” menu.
Then, a submenu will appear at the right side of the screen.
That’s where you’ll be able to connect the respective campaign to the “rotation.”

Later, don’t forget to set your campaign’s name and start playing with the rules!
You’ll see that you have to set up the default rule.
This means that – by default – your traffic will go to whichever link and rules you set here.
![]()
There’s always a lot to check.
Let’s start with this little arrow button for the path.
![]()
By clicking this button, you’ll be selecting the path which you want your traffic to go through.
In case you want to add more paths to your rules, click the “Plus” button that you can find below.
The idea is for you to be able to test different options in terms of landing pages and offers and compare their performances.
You can also see that you can select the type of redirect.
What are the types of redirects available on Mobidea?
302 Redirect
This is the standard temporary redirect.
It sends the visitor to the lander or offer, along with the referring data.
Meta Refresh
Use this to make the browser of the user refresh and load a new URL.
This way, the browser starts loading the page (but only the head, not the body) before going to the new destination.
This is usually sent in order to hide the referrer.
Double Meta Refresh
It’s the same as the one described above but it’s performed twice in a row.
The goal is the same:
Hiding the referrer.
You’ll also be able to set up the weight of traffic you’ll want to send to this path on the little box on the right.
Finally, you’ll see a tiny black box that’s used to delete the path.
Never forget:
You can always get more info about the meaning of the tools and features we’ve got.
How?
By mousing over the “i” icon that’ll show up along some key concepts!
![]()
Next?
Let’s find out what happens when you actually click the path arrow!

You’ll find that you can add a lander or a direct link.
Plus:
One or more offers, according to your preference.
You’ll also be able to set the weight of traffic that you wish to send for each respective offer or lander.
This will allow you to perform some decent A/B tests for your offers, landers, etc.
How can you select more than one offer?
By clicking the green “+ Offer” button that you see in the image.
This will open a menu with all the Offers and Smartlinks that are available on your account.

You even have a search field to type the offer ID or name, and the option to see only Single Offers or Smartlinks.
There’s also the “Single Offers” tab where you can filter by country, operator, and vertical.
Pretty slick, no?
This was the general setting for landers, campaigns, paths, redirection types, weights, and remove/delete actions.
Now, it’s time to check the real conditions you’re gonna set for each one of your rules inside the campaign.
Don’t forget that the first rule is always the default one.
That’s why we recommend you set a Smartlink or a global offer for when the traffic doesn’t match the rules you set, and then start creating your specific rules.
Check the following example to see what we mean!

Before moving on to the conditions, just bear two other details in mind:
After you create a new rule, you can assign a name to it, by clicking the rule.
Notice that little symbol with two sheets and a curved arrow, right next to the rule field?
The one that’s super close to the bin?
This is where you can duplicate the rule you’ve just created in order to save some time in case the next rule happens to be similar.
Now that all of this is clear, let’s move on to the conditions!
It won’t be hard for you to understand how to set them up.
Check the big button right below the rule’s name.
Once you click it, a right-hand side menu will emerge.
It’s got a variety of conditions for you to select.
![]()
After picking the category, you can choose the options you want.
You can also type what you’re looking for.
You’ll see that – after selecting “Operating System and Version” – all the options will show up.
What can’t you see here?
That – after selecting one of them (let’s go with “Android”, for example) – all the version options will show up.
You can select the ones you want.

Besides that, you’ve probably noticed these two words that show up when you select a category:
“Exclude” and “Only”.
This means that – by selecting one or the other – you’ll be either excluding or including only that condition.
Now, let’s go from category to category!
Campaign
It allows you to select the campaign you created.
Just go ahead and select the one(s) you want.
Traffic Source
Choose the source from whence you’re getting your traffic or exclude it.
Website
Filter the website(s) you want to include/exclude from the rule.
Make sure to include only the URL without the previous “www.”
Placement
This is where you select the placement you want to target, by inserting the respective ID from the source.
Brand and Model
This is where you’ll select the brand of the user’s device.
Later, you’ll also insert the respective model you wish to target.
Browser and Version
Use this to target or exclude a specific browser and its version.
Country
Target one or more countries.
Tokens
If you’re tracking any parameters in your campaign besides the ones we provide, you can target them here.
Select the respective token.
Type in the values, separated by a comma.
In case you want to add more than one token to the condition of the rule, simply click on “+ Add Token” and follow the same procedure.
Days of the Week
In case you want to apply the rule for only one or for specific days of the week, select them and choose the time zone that you want the system to take into account.
Device Type
Here, you’ve got the classic four options to choose from (desktop, mobile, tablet, and smart tv.)
IP and IP ranges
This is where you can apply the IP/IP ranges that you wanna target or exclude from your rule.
You’ll have to add IP ranges per line in the format xxx.xxx.xxx.xxx/xx
Language
Choose the language of the user’s browser.
Mobile Carrier
You’ll be able to target the mobile carrier or the Wi-Fi of the users.
Operating System and Version
This is where you’ll determine the OS and version of the user’s device.
Referrer
In case you want to include or exclude the URL where your traffic came from, type in the respective values here.
You’ll also have the option to show the empty referrer.
Time of Day
Here’s the dayparting feature!
Choose the period of time in which you want the rule to apply.
You must also set the time zone that you want the system to use.
User Agent
This is where you’ll be able to filter the user agent by simply typing it.
Finally, and this is really important…
SAVE EVERYTHING!
You can do this by clicking those little buttons on the bottom that have “Save” written on them.
Don’t forget you’ll have to save every menu where you’ve made changes.
In case you want everything to go back to black, just click “Reset”.
The Best Tips
Of course we couldn’t leave you without a couple of useful tips which pump your campaign and get you ready to go on to a whole new master level!
Go for the Best-Performing Offers
You can never be sure about which offer is gonna give you the best return unless you test many offers.
Set them against each other and see which one actually wins!
With a tracker, testing becomes easier.
Instead of creating many different campaigns on your traffic source for the same target, we advise you to configure an ABC test campaign.
This is a campaign where you’ll run several offers for a chosen segment.
Of course the conditions you set in the rotation have to match a segment (country/os/operator/hardware) of all the offers you’re running.
The crucial setting of your campaign will be the weight of traffic that goes to each of your offers in rotation.

You see three offers running for the same segment with the traffic distributed equally among all of them – 33% per each offer.
Your goal?
To catch the best-performing offer.
Why don’t you check whether or not the Smartlink can compete with the offers and bring some cool results?
It ain’t that rare for the Smartlink to conquer power and to actually beat the offers, yielding the best ROI.
Last but not least:
Take a look at the performance – EPC/CR – of each of the offers.
Then, adapt the weight according to the results:
The best-performing offer should get more traffic.
On the other hand, offers will a lower performance should either receive less traffic or be removed from this campaign.
One important note:
Make sure you drive enough traffic to make the decision of removing a non-converting offer from the algorithm.
Don’t cut or change your rotation rules until a reasonable amount of traffic has been sent to the campaign.
Test the Smartlink Over the Single Offers
You should split your traffic between the Offers and the Smartlink.
The idea is similar:
You’re driving part of the traffic to the offer(s) and another part to the Smartlink.
You probably think you shouldn’t use part of your campaign budget to do this.
However, you should at least keep the Smartlink’s weight at 10%-20% to see if your Single Offers beat the Smartlink’s performance.
This is how you make sure you’re getting the best possible results.
Direct Linking vs Landers
In case you’re not sure whether or not to run a campaign with a pre-lander, you should try finding the answer by performing a test.
Create a campaign with a 50/50 weight running on a direct linking and with a pre-lander.
After you’ve gotten enough data to analyze, reduce a percentage of a losing path and keep the weight of the other at max ability.
If – after some time – you still see the same results, you shouldn’t wait around.
Just delete the path that’s showing a lower performance.
Conclusion
That’s it, pal!
We’re sure we’ve explained everything you need to know about making money with Mobidea’s tracker!
Now’s the time for you to go ahead and give it a fine-tuned test drive!
Remember:
In case you have any doubts, you can get in touch with out Support Squad or your Account Manager.
The Mobidea Crew is always happy to help you out!
Take advantage of Mobidea’s super useful tracker capabilities and make money faster like a true master!
Cheers!
![]()
See Also:
- 5 Most Common Mobile Pre-Landers That Convert
- The Best Affiliate Tracking Platforms to Know in 2018
- Best Traffic Sources for Affiliate Marketing Pros
- How to Create Killer Affiliate Landing Pages in 2018


AdvertisementChecked all the Mobidea’s tutorials but you’re still feeling lost on our platform? No worries! Daliya is our dope Community…

AdvertisementStill struggling to find the best offers because you know you wanna make money faster like a real master? Lost…
Understand which are the 4 most profitable traffic types to run with Mobidea offers by reading an article created by Andrew Payne!