
Introduction to BidVertiser
BidVertiser is a first-class, self-serve demand-side platform that delivers highly converting traffic.
You’ll find everything you need to turn traffic into money, from exclusive traffic to segmented targeting, various tracking options, and detailed analytics.
The ad network is well established, with over 10 years of experience, and remains a popular choice for affiliate advertisers.
The ad network was created in 2008 as a solution to the problem many publishers had of selling their ad space directly to advertisers, without having to rely on automated systems.
It was designed from the ground up by the team of in-house developers in Haifa, Israel, which gave BidVertiser full control over their systems.
This meant that they were able to swiftly adapt to their customers’ needs and the rapidly changing landscape.
They now serve billions of impressions each month, cementing their place as a serious player in the advertising world.
As an affiliate, you may be impressed to learn that the company also boasts over 1 500 000 monthly conversions – a statistic that keeps thousands of advertisers coming back every day.
In addition to their HQ in Israel, BidVertiser also holds a support center in the UK, data center in California, and distributed data in AWS and Rackspace Cloud.
In this article, we’re gonna focus on BidVertiser’s demand-side platform for advertisers, which includes a global network of publishers, designed to help you get more conversions.
Registration
So you can follow along – or if you wanna jump right in and see what BidVertiser is all about for yourself – go ahead and hit the Register button on the top navigation bar of the website.
You’ll wanna register as an advertiser unless you are also interested in selling ad space on a website you own.

Registration is quick and easy, but you will need to watch your inbox for an activation code to complete the process. I did get a couple of verification errors on my first attempt, so make sure you don’t’ rush this step and that everything is entered correctly.
Once you’ve received your activation code register your new account and login to the platform to view the dashboard.
Account Activation (and how to run your first campaign for FREE)
One thing you’ll probably notice right away is the pink ‘Activate Account’ button on the top navigation bar. You can either do this right away or later, and we’ll go into what payment options you have in just a little while.
The minimum deposit amount for BidVertiser is usually $100, but, if you activate your account using the coupon code BIDEAL50, you’ll instantly get $50 added to your account if you use PayPal, Credit Card, Paxum and WebMoney. For payments with Crypto, Payoneer or Skrill, you need to contact your account manager after the deposit so they can deposit the $50 BONUS in your account.
BidVertiser Review: Dashboard
The same dashboard is shared by Advertisers and Publishers – so make sure you have selected the Advertisers tab. This should be done automatically for you, provided that you signed up as an advertiser.

From here you can manage your campaigns, reporting, funding and payments, and your account.
There’s also a Traffic Estimator tool you can use to view real-time daily traffic estimates and recommended minimum bids for your chosen ad format.
If you need help you can open a support ticket from the dash, or connect with a team member via Skype.
Times are in UTC, so remember to keep that in mind when you’re creating your campaigns.
There’s a well-documented User Guide and a bell notification icon for important messages.
Creating Your First Campaign
The campaigns tab has 5 sections:
- Manage Campaigns
- Create New Campaign
- Global Postback
- Conversions Upload
- Bid Automation Log
If you haven’t yet created your first campaign, the manage campaigns section will be blank, so skip that for now and click ‘Create New Campaign’.
Now it’s time to decide which ad format and targeting you wanna use.
BidVertiser has 5 distinct ad formats:
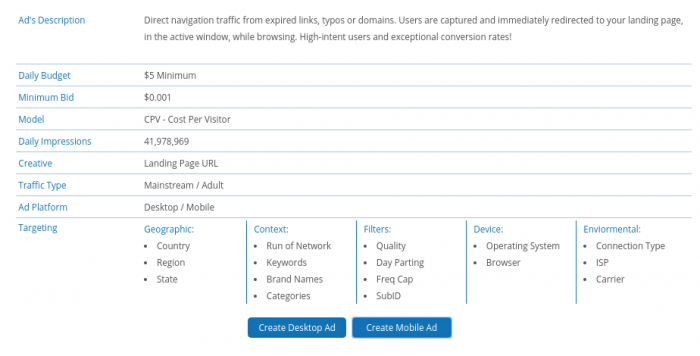
- Direct Ads – Traffic from expired links, typos, or domains which redirect to your domain
- Pop-Under – Ads are displayed underneath the active browser window
- Native Ads – Ads that match the look and feel of the surrounding content
- Push Ads – Ads which are sent as alerts to a user’s device
- Contextual Pops – These pops are based on the contextual content on the page the user is browsing
You’ll find each ad has a description to help you choose the right one for your campaign.
There’s also different daily minimum budgets and pricing models, depending on which ad format you choose, so it’s important to be clear on your campaign goals from the start.
Regardless of which ad format you choose, you’ll be bidding on traffic which is allocated to advertisers based on their bids.
Different ad formats have different minimum bids, so make sure to check the traffic estimator tool beforehand.
If you wanna bid on adult traffic (or ads with explicit content or nudity) you’ll need to use Direct Ads, Pops, or Push.
Each ad format is gonna perform differently depending on your offer, so make sure you choose wisely!
So let’s explore a campaign using BidVertiser’s most popular ad format – Direct Ads.
Direct Ads (also called direct navigation) offer an extremely effective and easy way to capture highly engaged traffic.
It has a daily minimum budget of $5 making it the ideal ad format to use with our exclusive BidVertiser coupon.
Using this ad format you can get bids from as low as $0.001 depending on the GEO and URL selected.
The best part?
You don’t need to to spend time on designing fancy creatives or eye-catching headlines, simply enter the URL you wanna target and press go!
Let’s go ahead and create a Direct Ad for mobile users.
Before we choose our targeting let’s take a quick look at the Traffic Estimator tool:
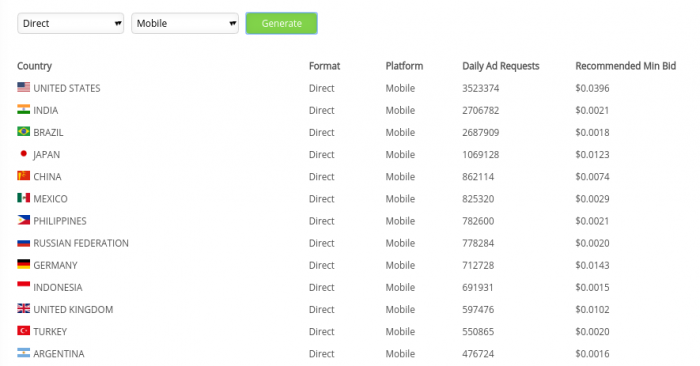
We can see the US has the most daily ad requests but also has the highest minimum bid.
So instead, we can decide to target Brazil with over 2 680 000 daily ad requests and a recommended minimum bid of just $0.0018.
On the CPV pricing model, we selected this equates to 2777 daily visitors for our daily $5 minimum ad spend.
That’s a lot of bang for our buck and should provide us with some useful test results.
Next, we can choose between RON (run-of-network) and contextual targeting.
If you are running some general offers like sweepstakes, carrier billing, etc – RON will be the smart choice.
Let’s select contextual targeting as we want to target engaged visitors only.
Now choose the categories and keywords that are best suited to our offer.
There’s a bunch of categories and you can select as many as you like here.
I’m using an adult offer from Mobidea so I chose categories that I thought to be closely related to the offer.
You can then add keywords based on your offer or choose from the preselected ones sorted by volume.
It’s good to take your time with this step so you don’t miss out on potential traffic – you can always optimize your keywords later.
Next, choose the websites you wanna bid on. These are rated by quality and given a score but don’t be too hasty to select only the best sites. Not only will you pay more but you could be losing out on high converting traffic for your offer.
I selected all websites at this stage as you can refine them later once you know which ones are performing for your campaign.
On the next tab, you’ll see a real-time bid analyzer to help you with choosing the optimum bid.
Since we’ve already used the Traffic Estimator tool we have a rough idea of what this will be.
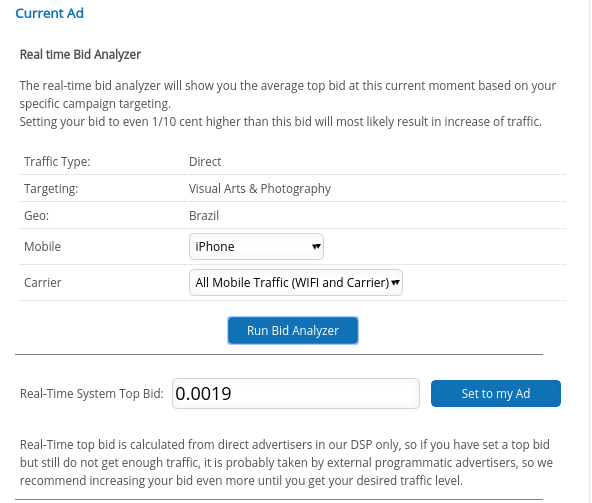
I went ahead and bumped this up by a fraction to get an initial boost of traffic to the campaign.
Next, enter the name of your ad and the URL for your landing page.
Don’t forget to add your destination URL macros here to improve the tracking on your campaign.
- Traffic source: {BV_SRCID}
- Search Term / Contextual data (if applicable): {BV_KEYWORD}
- Your Keyword: {BV_DBKEYWORD}
- Unique Click ID to use with server to server postback for conversion tracking: {BV_CLICKID}
- Campaign ID: {BV_CAMPID}
- Category ID (if applicable): {BV_CATEGORY}
- Country, Alpha 2: {BV_GEO}
- Your campaign’s bid (in US$): {BV_BID}
As this campaign has adult content I then selected the porn option and set the frequency to 8 hours.
As it’s a test campaign I used the minimum daily amount of $5.
And that’s it!
If you need to be more specific you can use the advanced settings for the following options:
- Browser
- Carrier
- Quality Score
- Day Parting
- SubID Blacklisting
- SubID Whitelisting
- Bid Override
- Bid Automation
You should now see your campaign in the campaign tab awaiting approval.

Tracking
We’ve already looked briefly at the destination URL macros, but what other tracking options does BidVertiser have to offer?
To find out click on Global Postback under the campaign creation section.
You can use this to discover which clicks resulted in conversions and optimize your traffic sources by entering the postback URL in your tracker.
The two parameters you can track are:
- {BV_CLICKID} – Make sure to Tag your ad with this parameter under the “Edit Ad” page;
- {REVENUE} – Represents the revenue of your conversion.
Firstly, activate Global Postback by clicking the green button on the page.
This will reveal a link that is associated with you advertiser ID, as follows:
http://secure.bidvertiser.com/performance/pc.dbm?ver=1.0&AID=XXXXXXXXX&CLICKID={BV_CLICKID}&revenue={REVENUE}
This postback URL will be fired on a conversion from the ad network, provided that you have appropriately tagged your ad on the ‘Edit Ad’ page.
Many trackers, such as Voluum and BeMob, have pre-existing integrations with BidVertiser which can make the process even easier.
Related Content: Best Affiliate Ad Trackers
There is also a manual conversion upload process if for any reason you are unable to use server postback.
If you have any difficulty with setting up your postback URL you can contact a support team member.
Bid Automation
One of the best things about BidVertiser is how easy it is to use.
Bid automation (accessible from the advanced campaign settings menu) instructs the advanced algorithm to optimize your campaigns while you sleep.
You’ll need to give it some time to run (it works best with more data) but once set up it’s a powerful way to optimize your campaigns according to predetermined parameters you set.

You can choose between Subid blacklisting and Subid automatic bidding.
For Subid blacklisting enter your target conversion rate and target cost per conversion and give the tool a timeframe and minimum amount of clicks.
It will get to work right away and filter out any low performing traffic sources
Perhaps a better way to manage this (at least at the start) is to use the Subid automatic bidding option.
For this you’ll need to set your optimization timeframe, along with your profit factor (as a percentage).
You can then configure your min and max override bids and let the system monitor the traffic performance for your campaign.
This may take a little more trial and error to find the sweet spot between cost per bid and profit margin, but has the advantage of not blacklisting sources which could still potentially convert by simply setting them to a lower bid.
If you want a minimal approach to campaign optimization you can use Automatic Optimization.
This allows you to set your campaign goals and ROI thresholds, and let the proprietary AI work its magic. This is the simplest way to maintain a positive ROI for the least amount of work and will appeal to anyone who has a busy schedule.
Campaign Reporting
This includes daily activity, a daily summary, and an analytics platform.
It’s useful to see your daily stats, including ad requests, visits, and cost, at a glance.
The analytics tool can give you a more detailed insight about your campaign and you can break the data into a few metrics:
- Daily
- Hourly (2 days max)
- Category
- Subid
- OS
- Browser
- ISP
The beauty is that if you are using the postback pixel which posts the conversion back to BidVertiser – you will see how your campaign performs by each of those metrics, which makes it super-easy to optimize.
Take for example the Subid reporting which allows you to blacklist, resume, or override the bid by any specific sub id.

It also provides a neat way to visualize the data for those who prefer to crunch the numbers.
Funding and Payments
I mentioned earlier that to take advantage of all BidVertiser’s features you first need to activate your account.
Here’s how to do that:
- Create an advertiser account
- Activate your account
- Deposit at least $100 with the promo code: BIDEAL50
- Boom! $50 bonus in your account!
BidVertiser has a bunch of different no-fee payment options including credit card, PayPal, WebMoney, Crypto, Payoneer, and InterKassa.
You can also choose to pay by international bank wire or local bank transfer.
Once this is done you can configure the options for automatic funding so your campaigns don’t run dry.
You can view your transaction history at any time under the funding and payment menu.
*Want an extra $50 on your BidVertiser account? Use the coupon code BIDEAL50 when depositing $100 or more and get a $50 bonus instantly. Valid for PayPal, Credit Card, Paxum, and WebMoney — for Crypto, Payoneer, or Skrill, just contact your account manager after deposit!
Wrapping Up
BidVertiser is a platform that works well for many kinds of affiliate offers.
The recent additions of push, native and contextual pops are a nice addition and will appeal to affiliates who work with multiple ad formats.
BidVertiser may be best known for expired links, domains, and typos, but it has lots more to offer besides.
It’s also one of the few ad networks that you can get adult traffic using different ad formats.
It’s a platform that has been able to continually adapt.
BidVertiser offers a high degree of transparency in their traffic sources, combined with excellent security that prevents you from falling foul of bot traffic, click farms, malware, and viruses.
And, perhaps most importantly, it’s an ad network that’s been proven to convert for affiliate offers time and again.
Go ahead and give it a try!


This Traffic Factory Review will allow you to launch a campaign on Traffic Factory and monetize on this ad network like the best of them!

This AdStyle review is going to allow you to learn how to work as an advertiser and publisher on their advertising platform.

Looking for another traffic source for native ads? Adskeeper is one! Let's uncover this hidden gem in this Adskeeper review.