Hi everybody! Without further ado, we are reviewing today an international ad network, ActiveRevenue.
They’ve launched their network in 2012 and from that time onwards they’ve been selling plenty of different advertising formats, such as Push, Pop, and Zero-click.
As usual, we’ll review all their targeting options, advanced statistics and ways of optimization available in their interface. From words to deeds – let’s start!
ActiveRevenue Overview
Should we take a deep look at their platform?
Let’s do it!
Dashboard
We usually start exploring all platforms from their interface, and we must say that the guys at ActiveRevenue did quite a good job here.
Their interface is intuitive, user-friendly, all main features are well-placed and it doesn’t take long to find what you are looking for. You’ll get used to its layout quite fast unlike other big advertising networks where some features are hidden or hard to reach.

When you log in to your account, on the main panel you’ll see your statistics for the month, as well as money spent, conversions and income.
Statistics
A well-thought-out statistics section allows you to make a comprehensive analysis as if you’d been using a traditional affiliate ad tracker. And this is quite an advantage if you are short with a budget and rather spend it on the traffic itself.
Start by selecting which traffic you need to analyze:
- Push
- Pop
- Zero-click
In your report, you will see not only the number of clicks and impressions but also details about conversions, revenue, and profit.
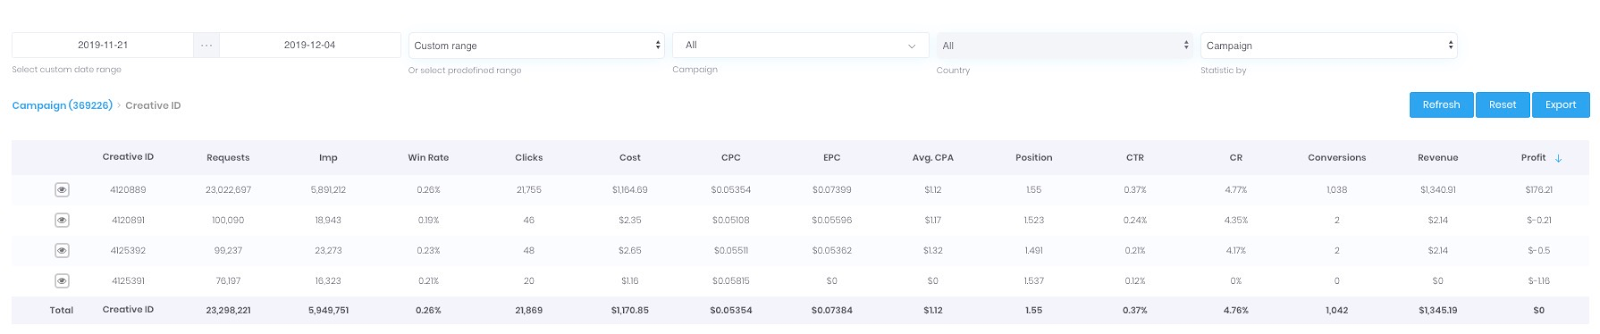
Next, you can drill down to the report and analyze Source Creative, as shown in the example below:


Such stats will allow you to determine the most profitable campaigns, sources, formats, and ads that you should focus on.
And of course, you can download your stats in CSV format and analyze further in Excel if you need additional calculations.
Available Macros in ActiveRevenue
Prior to creating a campaign let’s see which macros are available in this ad network.
- {source_subid} – Source subid
- {conversion} – Conversion tracking
- {campaign} – Campaign ID
- {bid} – Bid price
- {browser} – Browser
- {os} – Operation system
- {carrier} – Visitor’s ISP
- {ip} – User IP
- {keyword} – Keyword matched on campaign
- {user_agent} – User agent
- {country} – Two-letter visitor’s country (ISO 3166-2)
- {state} – Visitor’s state
- {city} – Visitor’s city
- {zip} – Visitor’s postal code (if available)
- {banner} – Ad ID
Also note that ActiveRevenue presents all default settings inside the main ad trackers such as Voluum, RedTrack, BeMob, Binom, and more, so configuring a Postback won’t be difficult.
After your traffic source is configured in the tracker, you can move to create a campaign.
You will see 3 options to choose from once you click on “Create a Campaign”.

Let’s begin with a push campaign, the most trendy ad format nowadays.
Creating a Push Campaign
There are 4 steps in the campaign creation process:
- Budget & Limits
- Targeting
- Micro Targeting
- Creatives
Let’s dig in each of those.
1. Budget & Limits
By its name you can guess that this step will be about budget and various traffic restrictions.
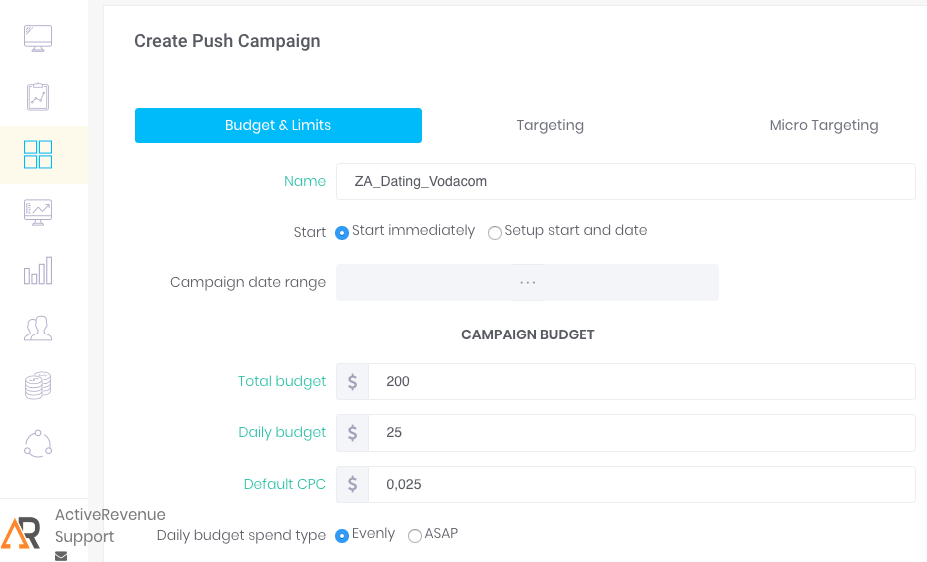
- Name – Choose a name for your campaign.
- Start – Start immediately/Setup start date. Here you can set when you’d like your campaign to start (whether it is immediately after your campaign is approved or at a certain date).
- Campaign date range – This field will become active if you opted for “Setup start date“.
You’ll be able to set up the first day of your campaign as well as the last day until it should run.
Campaign Budget
- Total budget
- Daily budget
- Default CPC
- Daily budget spend type: Evenly/ASAP (choose the first one if you want your budget to be spent evenly within 24h of your campaign or second if you want to spend it as soon as possible.
Below is the section where you can specify other campaign restrictions:

- Frequency cap – Frequency of showing your ad to one user within 24 hours.
- Total Clicks per day – The total number of clicks for your campaign.
- Conversions per day – The total number of conversions is convenient if you have CAP per offer. This way you can be sure that you will not make more conversions than you are allowed during the day.
Click on the Next button to move to the Targeting settings.
2. Targeting
Geo

Here you can select which countries you want to work on, you can quickly find it by typing the country name in the search bar.
Operating Systems
In this targeting section, you’ll indicate the device and operating system targeting.
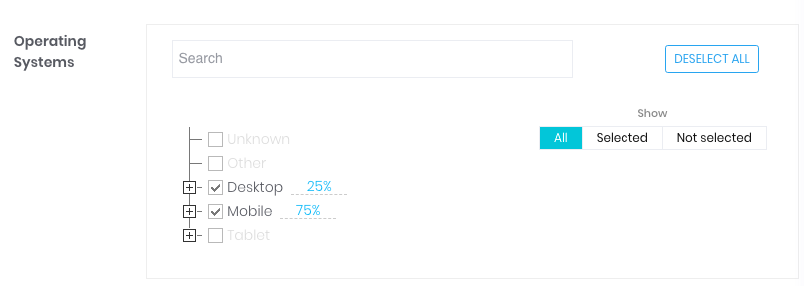
I also want to draw your attention to one interesting and useful feature: you can set up a certain percentage of traffic for a device or operating system, as indicated in the example above.
Browsers
Serves for detailed browser and browsing versions targeting.

You’ll set up here carriers for your campaign. For my tests, I’ve selected Vodacom for South Africa.
Time Targeting
The last targeting option is dayparting. Go and indicate here which hours you want your campaign to receive traffic.

Click Next to move to the next step.
3. Micro Targeting
At this step, you can configure targeting by IP ranges and sources.
With IP ranges – everything is standard, just specify if the system should take them as a whitelist or blacklist and enter the ranges.

When adding a White/Blacklist for sources, consider the following:
- Source ID / {source_subid} – should be added with a dot at the beginning. E.g: .123456
- Publisher ID / {pubfeed} / {source} – should be added, as is, without any additional value.
Learn more about the source and publisher.
4. Creatives
The final step is managing Campaign Creatives.
You might be already familiar with its structure: 1 campaign, several creatives/ads.
Click Add new ad and start filling out the details:

- Title – short title of the ad.
- Description – description of the ad.
Note: you have an option to use City and Country macros. This is very convenient if you want to reach users from a specific city or country.
Such personalized ad, if wisely set, gives the best clickability results.
- Destination URL – URL with macros.
- Call to action – here you can place additional text forcing for Call to action.
- Main images – the main image of the ad.
- Icon images – additional image (icon).
Their platform actually helps you to save editing time while cropping and preparing the image for the ad.

After all the details were introduced click on Create Add to save your Ad in the list.
If needed, you can continue to create other ads.
I usually add at least 3-5 ads to the same campaign to try different approaches and angles. There are more chances to attract your target audience with an ad that particularly matches your users’ interests.
Let’s take a look at options for automatic optimization of your campaign. They are placed just under the list of ads.

Auto Blacklist – this option allows you to automatically disable an ad that doesn’t perform effectively.
Auto Bid Optimization – allows you to raise or lower your bid depending on the ROI.Note: these options will only work if a postback is configured.
That’s all!
We’ve got through all steps of Campaign creation. Your campaign will be sent to moderation prior to starting traffic.
Creating Pop and Zero-Click Campaign
The process of creating a campaign for Pop and Zero-Click traffic is very similar to what was described for the Push campaign above.
So, let’s highlight the only few points which are different.

For Pop campaigns, in the first step, you’ll have a choice to select among the following traffic types:
- Site
- App
- Extensions
- Adult
Basically, you can specify what type of traffic you want to receive.
Also, unlike Push traffic, for Pop campaigns you are going to be charged by impressions, thus when specifying a bid, indicate CPV.
All other steps of Targeting remain similar.
And only in step #3 of Micro Targeting, you’ll find specific targeting options that aren’t available for Push.

Domains List – allows you to create White/Blacklists of domains you’d like to receive traffic.

- Keywords tab – give you an opportunity to work with keyword lists. I would say that this feature is more relevant for Zero-Click traffic, although here it presents for Pop, too. It is possible to make a large list of keywords and load them from a file.
- Match type – this targeting will be familiar to those who worked with Google Ads.
- Broad – broad match, all keywords which are found in the phrase.
- Phrase – phrase match, that is, for the keyword or phrase to be displayed it is necessary that the whole phrase matches.
- Exact – a keyword or phrase must exactly match your impressions.
- Negative – if you tick this checkbox the specified keyword will be excluded.
- Bid adjustment – you can increase the bid for the keyword you need.
- RON – (run on network) it’s a switch that allows you to enable impressions throughout the network and don’t consider keywords.
Note: The keyword guidance can significantly reduce your traffic volumes, so I’d recommend starting a wide audience without keywords and RON parameter enabled.
The tab Creatives has almost no difference with the exception that it doesn’t include text and images as it is specific to Push traffic only.
What you need is only to add a link.
Note: ActiveRevenue gives you the ability to add several links per campaign. This means that you can actually run several offers inside one campaign and conduct Split testing without using a tracker.
That’s it! We’ve covered all you need to know about Campaign Creation.
Let’s move to optimization features.
Campaign Optimization
The campaigns were created, traffic has started, what to do next? Exactly, optimize!
Let’s take a closer look at available features for optimization.
Optimization is a detailed analysis of campaign targeting elements that you can influence to make your performance better.
In other words, your optimization goal will be to configure a campaign the way your traffic brings the highest ROI.
Let’s see which targeting parameters can be optimized on ActiveRevenue.
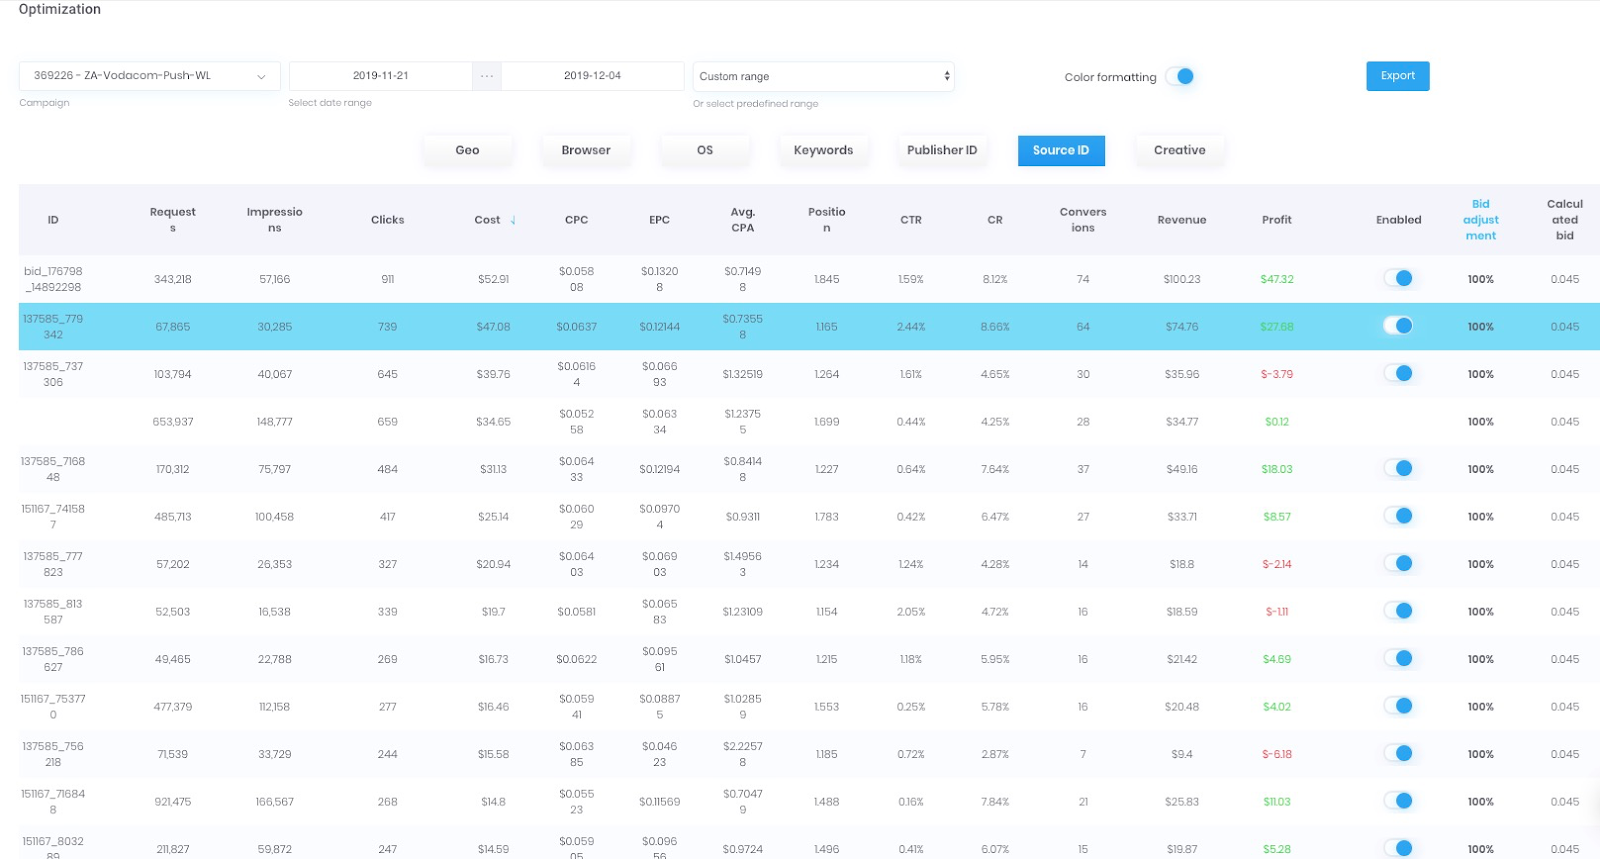
In the example above, you can see statistics per Sources.
Keep in mind that you can disable sites/sources directly from this section.

This is what the Publisher_ID report looks like.
Note: Publisher_ID is an essential Source defragmentation. Therefore, Publisher analysis helps in achieving a more accurate traffic optimization. I highly recommend analyzing this parameter.

Let’s take my test campaign as an example. From this report of ads, you can clearly see that I kept only those ads that were bringing some results for me.
Domain List – you can benefit from optimizing domains for your Pop and Zero-click traffic, just disable the ones which suit less to your offer audience.
Or vice versa, feel free to make a Whitelist for domains with the best performance for your campaigns.
IP List – a list of IP addresses to be used when targeting by IP ranges. It’s a must-have optimization to target only certain mobile operators.
Postback – ActiveRevenue provides you a postback URL to the integration with your affiliate network (or tracker) to facilitate profound analysis and optimization.
Traffic Estimator – a tool that assesses and displays real-time traffic volumes inside the ad network.
As you can see ActiveRevenue has many tools for optimization to focus only on relevant traffic for your offers.
Insights Tab

Here you can get access to a visual dashboard of your campaign statistics. I found it pretty clear and useful for a quick scan of performance.
Takeaways
It’s time to sum up everything we’ve learned about ActiveRevenue above:
- Convenient, intuitive and most importantly functional interface.
- Excellent opportunities for traffic analysis and optimization.
- Great features for fine-tuning: individual bids on Ads, Countries, Browsers, Sources.
- Big traffic volumes.
- Perhaps the most important thing for me as a Media buyer: quality traffic.
- Referral program – 5% bonus on referral spends for 90 days.
As can be seen in the screenshot above, during my tests I managed to optimize campaigns to be profitable.
Offers & Verticals
Ad types: Push, Pop, Zero-click.
Cost Model:
Verticals: Gaming, Dating, Adult, eCommerce, Gambling, Finance, Sweepstakes.
Payments & Investment
ActiveRevenue minimum deposit: $100
Payment methods: PayPal, Paxum, Wire Transfer, WebMoney, Payoneer.
Support
Dedicated Account Manager: Yes.
Support Response Speed: Good.
Support Rating: Good.
Contact Methods: 24/7 live chat.

Looking for ad networks with traffic from direct publishers? Look no further—AdMaven is here! Is it worth the try? Let's find out together.

Learn how to make the most out of TwinRed platform.

Read our in-depth ClickAdilla review and get to know all the pros and cons of this advertising network.