
Introduction
If you already know how to create a campaign in Traffic Factory this is the article you’ve been waiting for.
If you’re interested in this ad network but you’re not sure about how to begin, I recommend you read part I first.
The purpose of this article is to learn how we should optimize Traffic Factory and also when we should not be stubborn and accept the fact that the segment is not profitable whatever optimization you may do.
The remarks you’ll find in this article are mostly directed at banner and feature phones campaigns.
Now let us begin…
Traffic Source
Traffic Factory is based on only two websites: xvideos.com and xnxx.com.
Even so, the volumes generated by these two websites are so remarkably huge that it’s one of the ad networks with more traffic.
Don’t forget that, due to the lack of a carrier targeting option, you’re not allowed to target 3G or Wi-Fi separately.
In effect, the % of Wi-Fi traffic which we receive is larger than the one from 3G.
Actually, we receive around 80% of Wi-Fi traffic and 20% of 3G traffic, depending on the segment.
Dynamic Tracking
In order to get more info from your campaigns you should always work with dynamic tracking.
If you’re new to the concept of dynamic tracking, I recommend you spend some time perusing our academy, reading the article we wrote on it.
DT is basically a parameter added in the Smartlink.
It allows you to have info (the one that interests you) every time there’s a click, impression and conversion.
The most popular ones are:
campaign.id: The Id of the camapaign
user.device: Device information
banner.id: The banner ID
categories: The category
user.region: The region where the actions have been done. You can access the region’s codes on the following link
Statistics
Traffic Factory doesn’t give a wide range of info. From one side, you may get info by banner.
For each banner you have impressions, clicks and CTR.
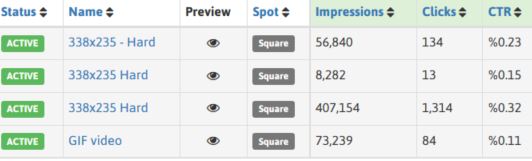
If you enter “actions” and you click on the stats for this campaign you’ll see a table containing impressions, number of clicks (which are unique clicks), CTR, spending, average bid, and eCPC (not important because it’s computed by dividing the spending by the impressions) by day for that specific banner.

If you’ve already optimized the banner and want to see the stats for the campaign you can enter Actions -> Stats for this campaign.
You’ll see a table similar to the one for the banners shown below.
Each line corresponds to a specific day.

How Important are Banners in One Campaign
As I have stated in the first part of this article, the ranking in Traffic Factory depends not only on how much you’re willing to pay but also on the quality of the banners, i.e. the banners’ CTR.
CTR is the most important metric you have to define the quality of a banner because it gives you, in the form of percentage, the proportion of clicks to the number of impressions for each banner.
If you have a group of banners with high CTR you can pay less for a higher position (Ranking=good), so banner quality takes on an important role.
There’s another parameter which is important in a banner: CR (Conversion Rate).
The CTR, on Traffic Factory, is normally an indicator for the CR (the higher it clicks, the more conversions you have).
There’s just one scenario in which it can be misleading.
Let’s suppose you have a banner which is very specific for an offer.
It will generate a few clicks and visits because the banner is too specific.
Even so, whoever enters the offer is probably already expecting it, which means the number of conversions for each click will be high.
Never forget: you should always verify the CR by cross-matching the costs and revenue info, i.e. margin, for each banner.
On this ad network, I advise you to try different combinations of high CTR and CR banners.
How to Have a Group of Banners With a Good Quality
If you read our article about banners tips you’re on your way.
Even so, I’ll still emphasize some of the “rules” you should follow in order to have the best possible quality.
There’s a golden rule for the number of banners you can use: a minimum of 3; a maximum of 5.
This obviously depends on the volume of the campaign/segment.
If you use more than 5 you’ll have to spend precious time and money to analyse and compare the different performances; if you use fewer than 3, you can’t compare performances for different banners.
- If you have a campaign which provides you with a large amount of traffic, you don’t have to worry with the quantity of data. Therefore, you can use up to 5 banners
- If you have a campaign with low traffic, you should use 3 banners. Your traffic will only be divided by 3 and you’ll have data to compare performances
The banners you choose for the campaign should be directed to the users/public which you’re targeting.
The user reaction to a banner depends on the country, culture, language, age, sex and other parameters.
A first step will be to understand the public target you’re trying to reach.
Let’s suppose you want to target a specific region of a country where the public target speaks a particular language.
If you choose to use banners with text you should write it in the language of the region.


As you may know from the first part of this article Traffic Factory only has two websites.
You may try to take advantage of this and do banners which attempt to simulate the environment of the websites by using similar colors, and other features of the website.
In conclusion, if you have just begun optimizing, remember that banners are the first and most important parameter to optimize.
Banner Optimization
You may look at the banners performance by looking at the CTR, the margin you’re getting, and the stats.
The first thing to do is to select a period which allows for a good amount of data.
Then you get the revenues by banner for that period, recurring to either Mobidea or any other Affiliate Network.
You check stats by banner, select the same period and compute the margin by making the difference between costs and revenues.
Look at CTR and margin and compare the different performances for each. Banners with high CTR will allow you to pay less for higher quality traffic and a high CR (Conversion Rate) will increase your profit even if the CTR is not so high.
When needed, replace the banner with the lowest performance for a new, preferably more similar to the best performing banner on the campaign.
Tip:
Try to have a mix of both.
For example, have two banners with a high CTR and one with a high CR.
How to Choose Your Bid
As for other ad networks, the rankings position is connected with quality traffic.
A higher position corresponds to a higher quality; a lower position corresponds to a lower quality.
With both time and experience, I’ve learned that, on Traffic Factory, there are only quality positions (good, average and bad) so, the objective is always to reach the good position when it’s possible.
If you’re doing your first optimization and you’ve already changed the banners we should compute the eCPC for the campaign. On this ad network, you pay by click (CPC) which means that you have to divide your earnings by the number of unique clicks.
Let’s try to go step by step:
First Step
You select a range of dates which give you the chance to get an acceptable collection of data but try not to go too far in the past.
If the segment has large volumes, I recommend you get the last 5-7 days.
If the segment has a low volume of traffic and no fluctuations were observed in the offers, I advise you to consider a larger period (10-15 days)
Second Step
You go to Mobidea (or another Affiliate Network) and select the dates for the campaign.
That way, you can get the revenue.
Third Step
You go to the global stats of the campaign on Traffic Factory and select the same period.
You’ll get the number of clicks (Don’t forget: this ad network works with CPC.)
Fourth Step
You can obtain your eCPC by dividing your revenue by the number of clicks.
You may change it by clicking in Click for max Ad Rate.
On the menu, you got your current bid, the AdRate (the rate of the bid and banners quality), the Max AdRate for the segment, and your ranking.
If your AdRate is larger than the Max, you’ve got yourself a good ranking.
Fifth Step
When you reach this point you have some options, depending on your conditions.
Let’s think about three possible scenarios:
Scenario Number One
The easy scenario, in which your eCPC puts you in a good ranking.
If you don’t like to work, you may leave the bid equal to the eCPC but you shouldn’t forget that we don’t have smart CPC.
I advise you to look to the AdRate and the Max Adrate and try to pay less while still maintaining a good ranking.
Scenario Number Two
If you have an eCPC which does not allow your bid to be high enough to get a good position you have 2 options:
You invest more money, increasing the bid, which I wouldn’t recommend.
Or:
You work with the banners and leave the bid equal to your eCPC.
A higher CTR in banners will make you increase the AdRate
If your eCPC only allows you to get the poor position:
- You leave the bid equal to eCPC and work again the side of the banners increasing the AdRate by increasing your CTR
- You have been defeated by the campaign and you pause it. (This should be your last resort; a last action after you’ve tried all the other available options.)
Capping
On Traffic Factory, each campaign is limited to capping equal to one.
If the campaign you created is excellent and you’re earning a bag full of cash each day, you can’t increase your profit by increasing the capping for the campaign.
That’s discouraging, I know.
But don’t worry!
Here’s a solution:
Create a new campaign equal to the first and your problem is solved.
If you have two equal campaigns, you have capping equal to two.
By doing this, you can increase your capping by one each time you create a new copy of the first campaign.
New Targets
I advise you to begin with two or three campaigns and do a specific target in each one.
For example, you may choose Mexico, Android.
Let’s suppose you have begun with a square campaign.
If the results are positive, you may consider creating a new campaign for the other two spots, tower and footer.
Thanks to the dynamic tracking which you should implement, you have important info about categories and regions.
You may run test campaigns for the ones in which you have good results.
To do this, just target specific regions or cities (using the geo-fence tool alluded to in part I) in Mexico or categories.
If the results are even better, you should consider getting all traffic to increase “capping”.
Another test you may run is to open the devices target. If you’re just targeting Mexico-Android, you should create new campaigns in order to target Iphones, Windows Phones, Other Smartphones, Tablets and IPads in Mexico.
Don’t forget to test feature phone campaigns for developing and emerging countries.
Traffic factory has large volumes in Asia, Africa and Latin America.
Knowing When To Stop
Stopping a campaign should always be a kind of last resort.
Nevertheless, there are some cases in which the segment just isn’t profitable.
If you’ve tried the different ranking positions and banners as a last strike, I advise you to leave the best performing banners and bid the minimum bid.
If you’re still losing money with this selection you should consider resetting your target choice or even stopping the country.
Conclusion
It seems pretty simple to understand that Traffic Factory is an easy-going ad network.
There, you can test different banners, putting your designer skills to good use.
You can invent; create new and, hopefully, better banners.
Hope this article was all you needed to carry on doing your thing on the websites represented by this ad network.
See you!


Traffic Factory is one of the most popular ad networks around. Learn everything about it by checking this Mobidea Academy post!
It's finally time for you to learn how to create a profitable campaign on Ero-Advertising, one of the world's most important ad networks!

AdvertisementStill struggling to find the best offers because you know you wanna make money faster like a real master? Lost…