How to Quickly Set Up CDN, Hosting and Domain
Last updated on July 19, 2023 5 min readYou are currently in the "Landing Pages" - Learning paths
Pre-Landers: Main Web Concepts Explained
5 min read

5 Most Common Mobile Pre-Landers That Convert
10 min read

How to Quickly Set Up CDN, Hosting and Domain
5 min read
A Guide on How to Create Converting Affiliate Landing Pages
17 min read
Best Ad Spy Tools for Affiliate Marketing
27 min read
AdPlexity Review: 7 Spy Tools, 100M+ Ads, Zero Guesswork!
22 min read
PureLander Review: Craft Affiliate Landing Pages in Just a Few Clicks
14 min read

Introduction
In the last article about pre-landing pages, I gave you some general concepts and tips.
Since you already know the basics, it’s about time you create your own online pre-landing page!
The best and easiest solution for you wicked beginners is to go with the Amazon Simple Storage Service (Cloud Hosting) and Amazon Cloudfront (CDN).
During the first year, those services will provide free packages – enough for a certain amount of traffic.
Why Amazon Web Services?
Because it requires zero coding skills, is very simple to set up, and free for the low volumes of traffic, which makes it the best option for the newbie extraordinaire!
Upon registration, you get free usage of:
- Amazon S3 for 5 GB of Amazon S3 standard storage, 20,000 Get Requests, 2,000 Put Requests and 15GB of data transfer out each month, for one year.
- Amazon CloudFront for 50 GB Data Transfer Out and 2,000,000 HTTP and HTTPS Requests each month, for one year.
Sounds good? Are you ready to make your first web page?
Let’s do it!
I could create a detailed step-by-step instruction.
Honestly, though, I can’t do it better than it’s already been done and presented on the official website of Amazon Web Services.
In case you feel like this option suits your affiliate marketing needs you should explore this Guide on Hosting a Static Website.
Trust me: in half an hour, your web page will be ready!
Now check these numbers and understand what you’re gonna need to complete the process!
1. Create and configure the buckets (Amazon S3) for your website
A bucket is a container for objects stored on Amazon S3.
To complete this step, just follow the Amazon AWS Guide I’ve alluded to before.
2. Upload pre-landing page files and deploy the website
The first thing you should bear in mind is this: you’ve gotta make sure your main HTML file is called index.html!
In this article, I assume you’ve already got a ready-to-use pre-landing page on your PC.
However, in case you got it from a spy service or from your account manager, you may have to do a couple of things before you can actually use it.
For instance, let’s say you got a pre-landing page from Adplexity (professional spying tool).
Here’s what to do next:
- Extract the file from an archive file and insert it into a folder
- Go to that folder, find the file with .html extension and change its name to index.html
- Open this index.html and find the final affiliate link to where it’s leading
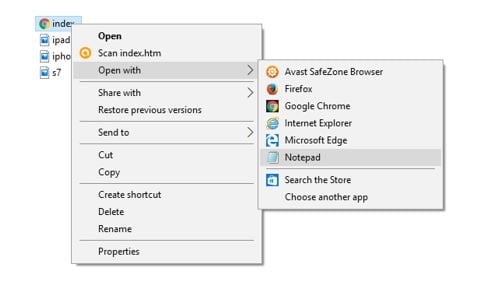
- Come back to the folder with the pre-landing, right click on index.html, then “Open with” and pick “Notepad”
- Search for that affiliate link through the text and replace it with your own link everywhere

Now your pre-landing page files are ready.
You just need to upload them all to the Amazon Bucket just like it’s described on the guide.
Note: you may wanna stop on step 2 since you’ve got that option.
After you set up the bucket and uploaded the pre-landing page, the pre-landing page will become accessible and you can send traffic on it.
However, in this case, you need to make sure your S3 server is located close to your traffic’s GEO.
In case it’s not, you risk losing many users due to your web-page’s slow loading speed!
Therefore, if your goal is to make a really good pre-landing page with a great loading speed all over the world, don’t even think about skipping a step and complete the guide!
In case you’re a lazy louse and feel like you don’t wanna go through this whole process, I really hope you keep getting that comfy minimum wage!
3. Register a new domain (check the suggestions regarding domain providers)
A domain is the only thing that’ll cost you some precious, hard-earned brass. Nonetheless, the price for a normal first level domain won’t ever get higher than 10 Euros.
I’m sure it’s not a big deal, especially since it’s an investment that’ll increase your returns to the max!
In my opinion, Namecheap is the domain provider you should work with.
Why should you work with these domain providers?
Because these services are quite cheap.
Moreover, they have a proven record of reliability and flexibility.
Can you really ask for more?
I thought so!
4. Associate your domain with your Amazon Cloud Hosting using Amazon Route 53 service
To complete this step, just follow the Amazon AWS Guide.
5. Connect your Website to CloudFront CDN
Is it really necessary to “Connect your Website to CloudFront CDN”?
That’s like asking if it’s important to have windows in your house or brakes in your yellow-colored Lamborghini.
Of course it’s important!
For you to know this is the real deal, I’ve performed a benchmark analysis of CDN impact on my web page’s loading speed with and without CDN using Website Speed Test tool.
Hosting used: Amazon S3
CDN used: Amazon CloudFront
The results with and without CDN are the following:
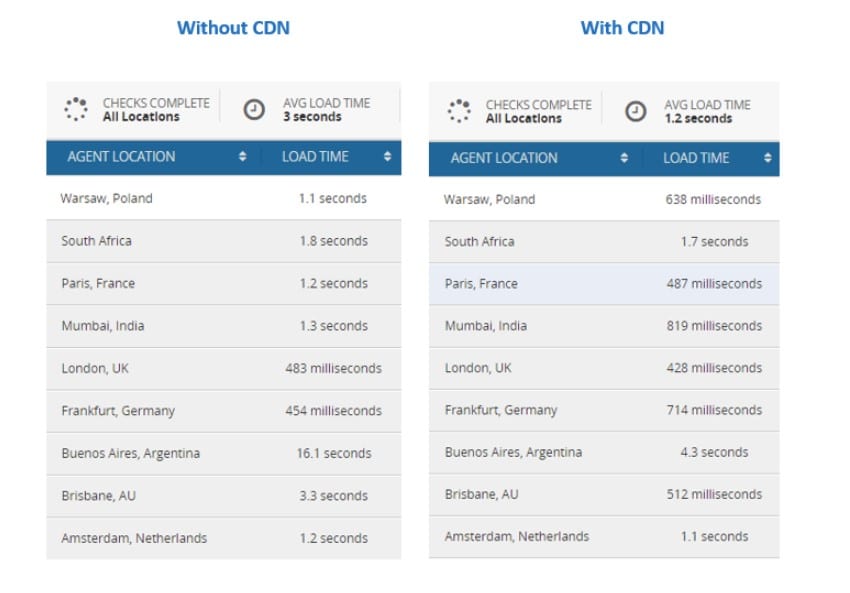
As you can see, the average loading time of my page across different GEOs is much lower with CDN than without it.
My cloud hosting is located in Ireland.
Therefore, the biggest difference you can notice is for the long-distance GEOs such as Australia and Argentina.
However, we can also notice certain decreases of the page loading time for all other GEOs.
Conclusion
I hope that you’re now convinced of CDN’s masterful and critical importance!
Make sure you go through all these required steps, get a good pre-landing page for your campaigns, and replace the link on an ad network.
If it’s all done, sit tight and expect an astounding, hyper-powerful boost in your campaign’s performance!
By the way, you can also use this guide to set up hosting for self-hosted trackers such as Thrive, FunnelFlux, etc.
In the next article, I’ll present a benchmark analysis of the different cloud hosting services, show you how to host your landing page with Digital Ocean, and connect it to the CloudFlare CDN.
Don’t miss it!
Cheers!
Feel like you wanna ask questions about this topic?
Ask now and I’ll answer them all!
See also:
