EvaDav Review: Your Gateway to Scalable Traffic
Last updated on October 2, 2026 20 min read
EvaDav has earned a reputation for having one of the most straightforward advertising platforms in the media buying space.
But here’s the real question: Is a user-friendly dashboard enough reason to invest advertising budget into a network?
What matters most to media buyers isn’t how pretty the platform looks.
What matters is whether the network delivers results.
Can the platform scale winning campaigns without quality dropping off a cliff?
This Evadav review digs into everything EvaDav offers for advertisers and publishers.
Take a seat, and let’s get started.
What is EvaDav?
EvaDav launched in 2018 as a performance-based advertising network, though the company had been active in the industry for years before going public.
Initially, the platform sold traffic via RTB (Real-Time Bidding) to other push ad networks.
By the end of 2018, EvaDav shifted strategy and began offering direct access to advertisers and publishers.
It now offers self-service advertising through its intuitive platform.
EvaDav has since branched out and now operates in four primary ad formats: Push Notifications, In-Page Push, Native Ads, and Popunder.
Evadav Traffic Group
EvaDav, the ad network, is actually part of a bigger company known as the Evadav Traffic Group, which, as its name implies, is a group of companies that are in the business of media buying and traffic monetization solutions.
Also under it are Evadav Performance Agency, Evadav Mobile Apps, and Evadav Academy.
EvaDav Best Features for Advertisers
Understanding what an ad network offers beyond the basics separates profitable campaigns from wasted budgets.
EvaDav provides several features designed specifically for performance marketers who need reliable traffic and flexible optimization options.
Let’s break down what actually matters when you’re spending real money on traffic.
Traffic Volume and Reach
Evadav’s reach covers all major markets:
- Tier 1 countries (US, UK, Canada, Australia)
- Tier 2 countries (Spain, Italy, Poland), and
- Tier 3 countries across Asia, Latin America, and Africa.
This distribution lets you test campaigns in expensive markets while scaling profitably in cheaper GEOs.
Traffic sources include both owned inventory and partner traffic acquired through RTB relationships.
The network maintains a dedicated team that actively purchases push subscribers and other formats from vetted sources.
This helps ensure consistent traffic quality across different GEOs.
Here’s what we found particularly useful: the platform updates traffic availability in real-time.
Before you start any campaign, you can check how much traffic you’ll likely receive for a specific targeting combination (ad format + country + device).
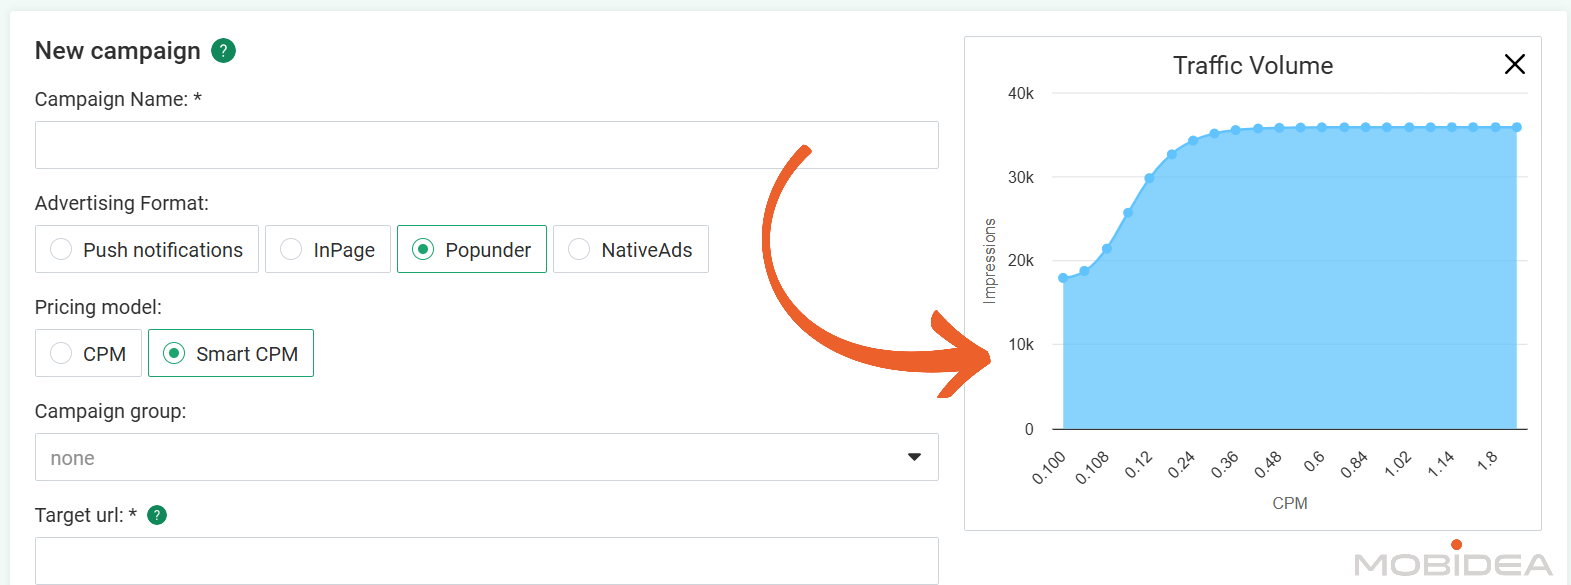
This transparency helps you plan your budget better.
You can even avoid launching in GEOs that don’t have enough volume, saving time and effort in the process.
Volume varies by ad format. Push notifications generate the highest daily impressions, followed by in-page push, popunders, and native ads.
Advertising Formats
EvaDav supports four distinct ad formats, each serving different campaign objectives and vertical requirements.
Push Notifications
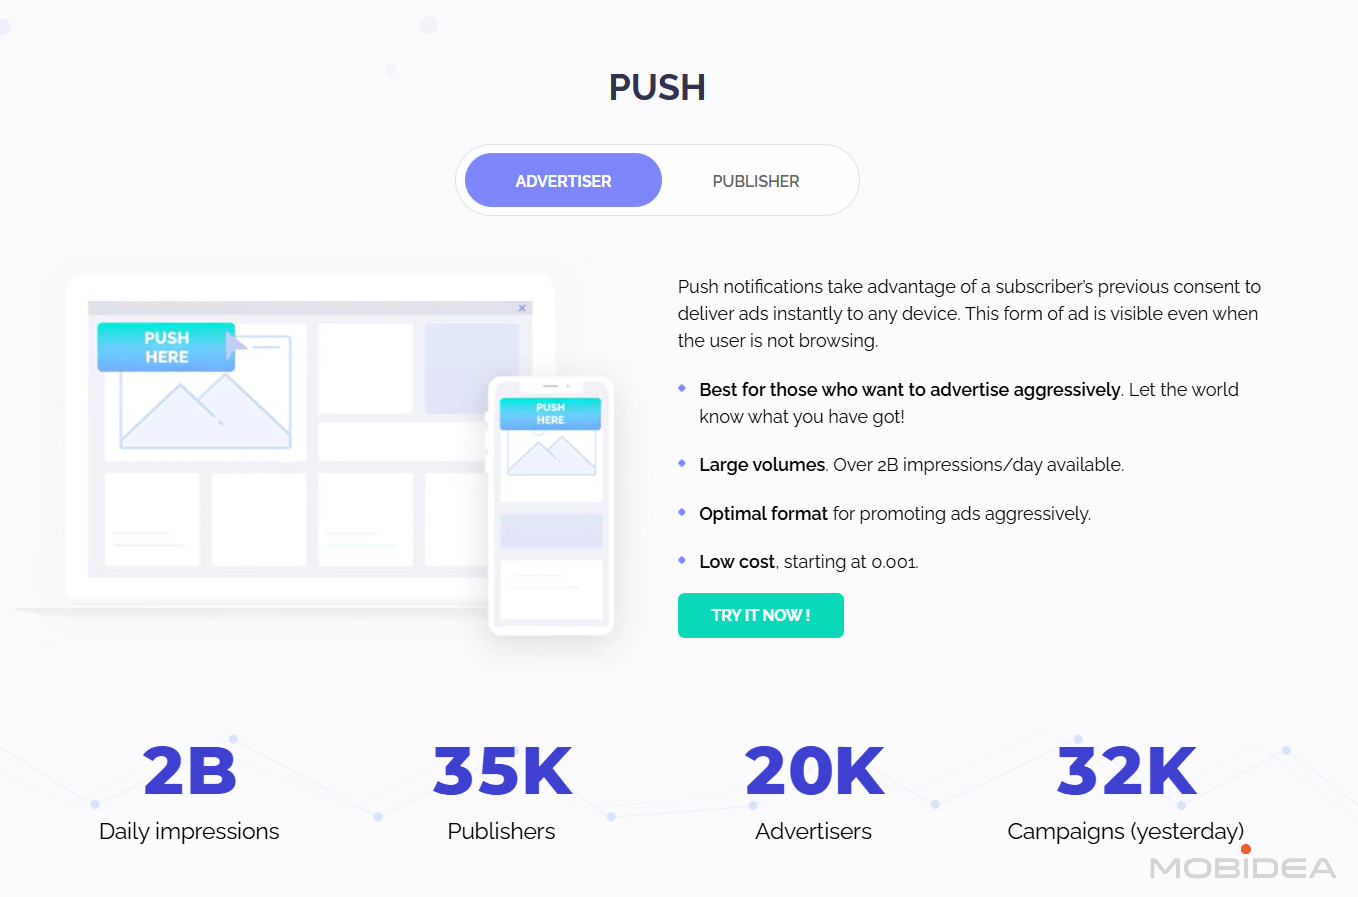
This format delivers strong performance for time-sensitive offers, app installs, sweepstakes, and content recommendations.
You can upload up to 5 creatives per campaign for split testing.
The platform rotates them automatically and provides performance data for each variation.
This makes creative testing straightforward without needing separate campaigns for each one.
In-Page Push
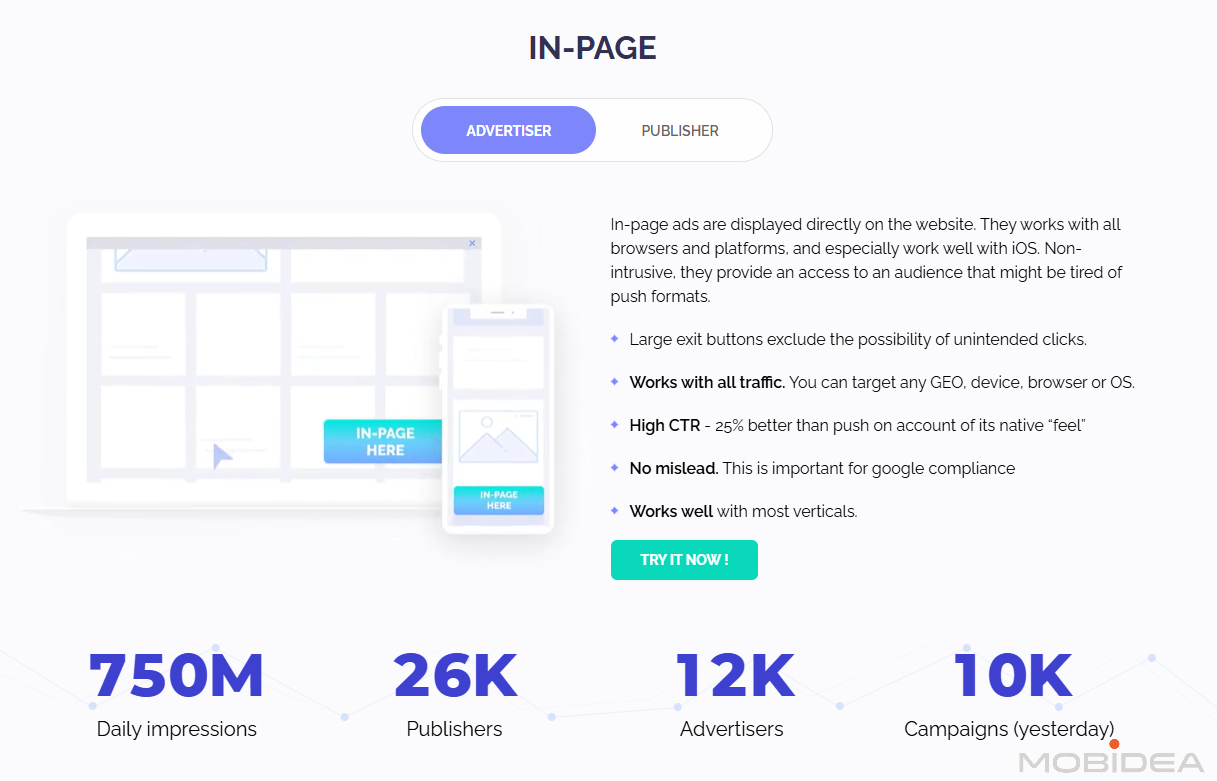
The format looks identical to classic push notifications but displays within the webpage itself.
Its difference is that it bypasses the subscription requirement which push notifications have.
As such, it reaches all website visitors regardless of browser or device.
If you’re running campaigns where iOS traffic converts well, in-page push becomes essential since traditional push notifications don’t work on iOS devices.
Native Advertising
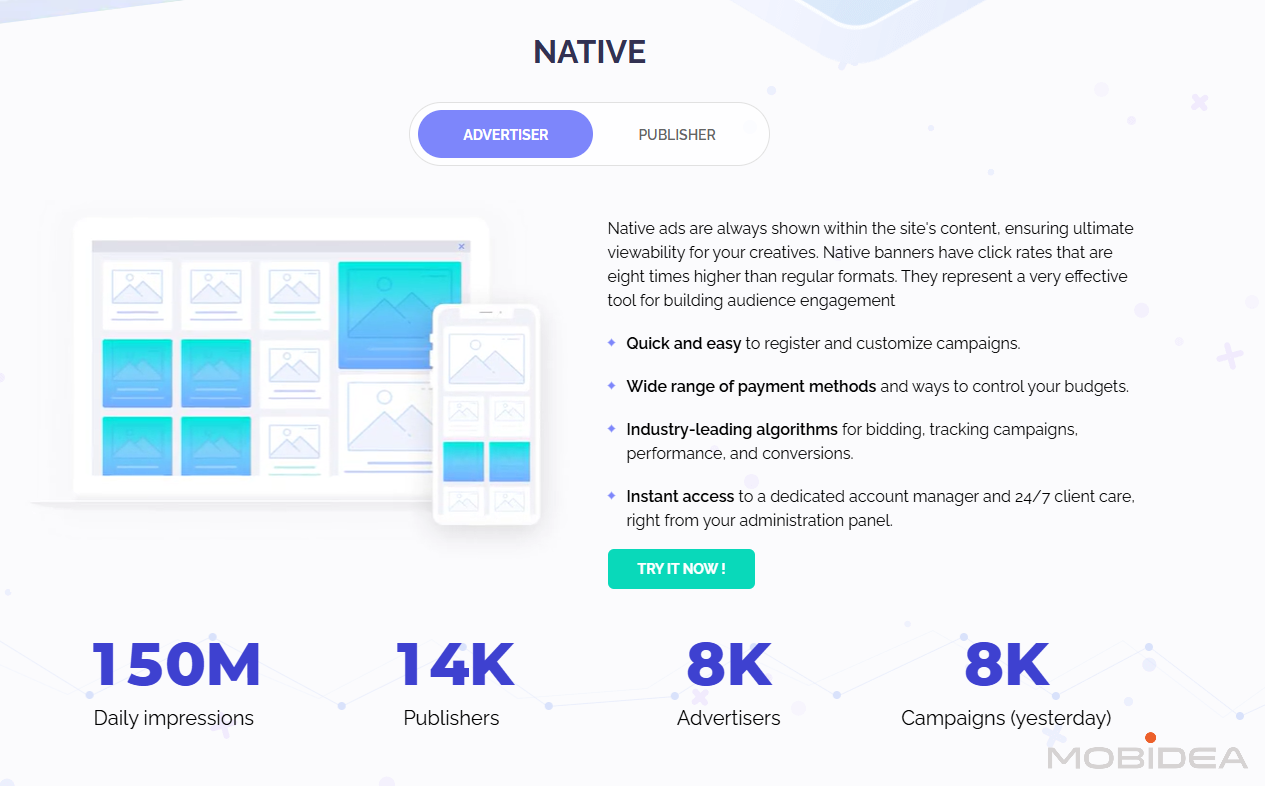
The format appears as content recommendations, typically positioned below articles or in sidebar placements.
Native ads deliver lower CTR compared to push formats but here’s what we’ve noticed: they often convert better due to higher-quality traffic.
Popunder
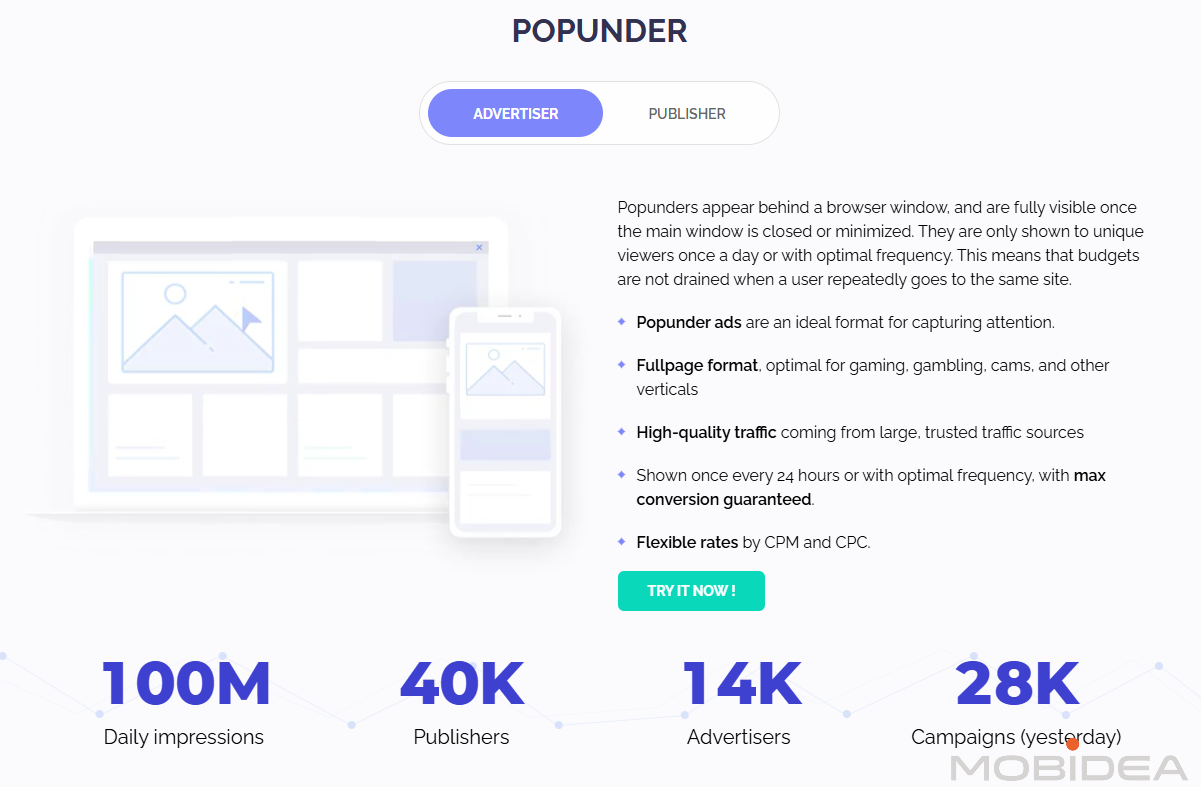
The format triggers on the first click anywhere on the publisher website.
Popunders work effectively for aggressive offers including Casino, Betting, App Downloads, and Sweepstakes.
The full-page format provides maximum visibility for landing pages without interrupting the user’s current browsing session.
Minimum bid for popunder campaigns starts at $0.0002 CPM, making it one of the most cost-effective formats for high-volume testing.
Targeting Options
EvaDav provides over 30 targeting parameters to refine audience selection and improve campaign performance.
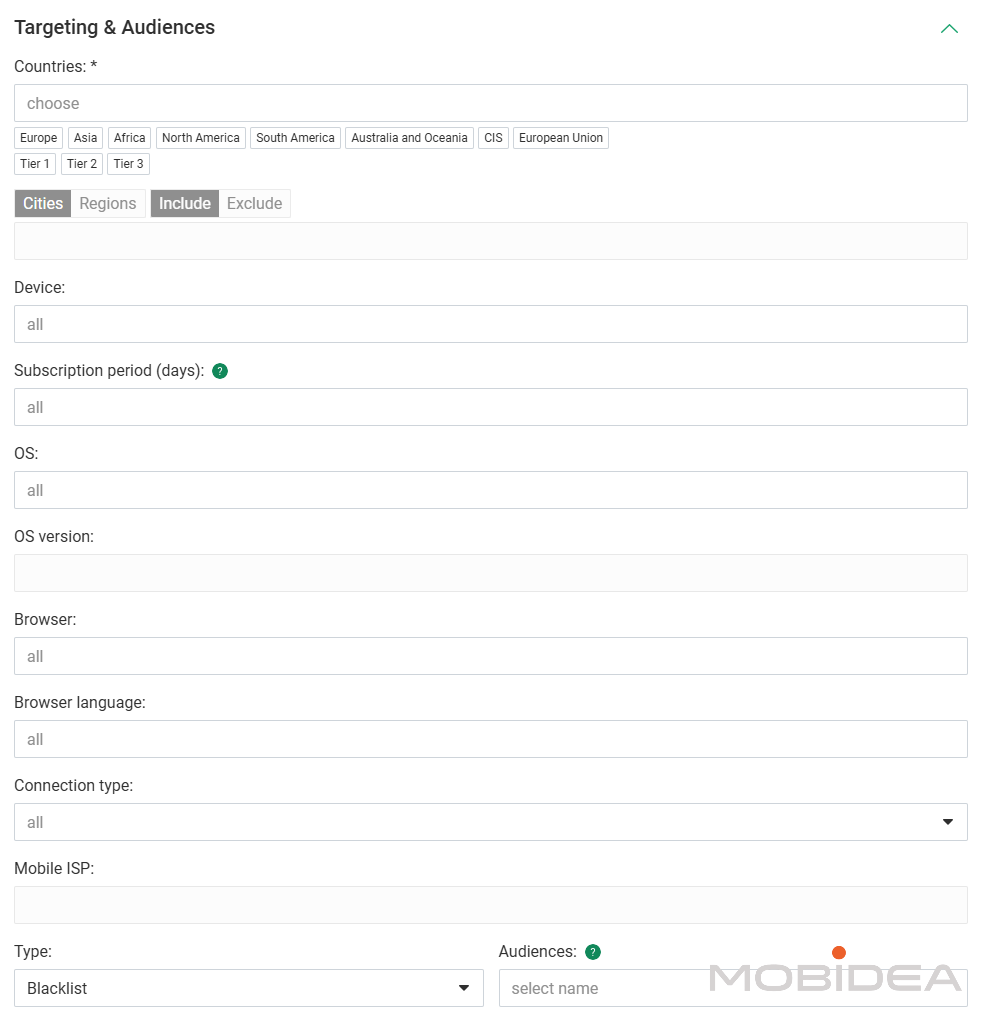
Available targeting options include:
Geographic and Location
- Country targeting (250+ GEOs)
- City targeting (major markets only)
- Multiple country selection with individual bid adjustments
Device and Platform
- Device type (mobile, desktop)
- Operating system (Windows, MacOS, Android, iOS, Linux)
- OS version targeting
- Browser type (Chrome, Firefox, Safari, Opera, Edge, others)
- Browser language
Tablet users appear in the mobile category and cannot be excluded independently.
Browser and Browser Language
This works particularly well for reaching specific linguistic groups within multilingual countries or targeting ethnic audiences within broader markets.
Connection and Carrier
- Connection type (WiFi vs mobile carrier)
- ISP targeting
- Mobile operator targeting
User Behavior
- Subscription age (for push formats)
- Frequency capping
Source Management
- Source ID blacklists/whitelists
- Zone ID blacklists/whitelists
Subscription Age (for push only)
Subscription age targeting stands out as a valuable feature for push campaigns.
Fresh subscribers (0-7 days) typically show higher engagement since they haven’t been overexposed to push advertising.
Older subscribers (30+ days) provide larger volume but may respond less.
Campaign Optimization Tools
EvaDav provides several automation and optimization features to improve campaign performance hands-free.
Audiences (Blacklist/Whitelist)
You can create an audience list to use for optimization.
Blacklists exclude specified sources while whitelists restrict campaigns to only approved sources.
Lists must be created in the Audiences section before you can apply them during campaign setup.
Automated Rules
Automated rules allow setting conditions to automatically blacklist or whitelist traffic sources based on performance metrics.
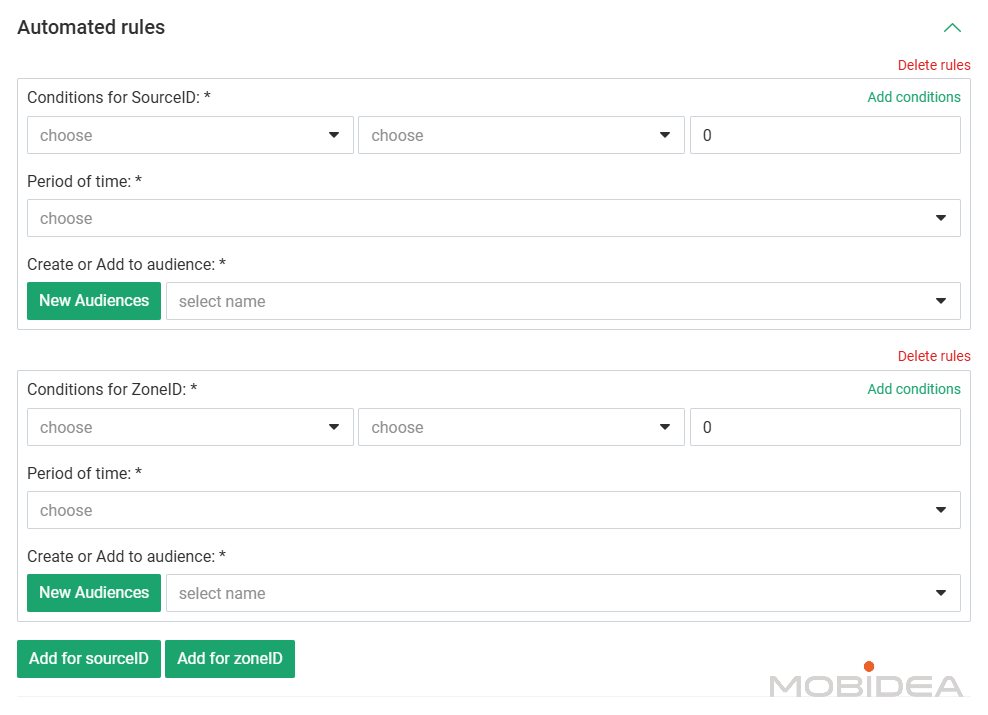
Rules can target:
- Source IDs
- Zone IDs
Conditions include impressions, clicks, leads, cost, CTR, cost per lead, profit, and ROI.
When conditions are met, sources automatically move to the designated audience list.
The limitation here is that automated rules only support 2 parameters (source IDs and zone IDs).
More advanced networks offer automated rules for additional parameters like GEO, device, OS, and browser, providing more granular optimization capabilities.
Anti-Fraud System
EvaDav maintains proprietary anti-fraud technology that monitors traffic in real-time.
The system identifies and blocks suspicious patterns including bot traffic, click farms, and fraudulent publishers.
Machine learning algorithms analyze user behavior to distinguish genuine users from artificial traffic.
While the anti-fraud system reduces fraud exposure, we still recommend using third-party tracking tools for additional verification.
No anti-fraud system is perfect, and having your own tracking provides another layer of protection for your budget.
Anti-AdBlock Technology
The platform includes anti-adblock capabilities, allowing ads to display to users running ad-blocking software.
This feature increases reach but should be used carefully to avoid annoying users who intentionally block ads.
Budget and Bidding Flexibility
Both CPC and CPM bidding models are available for push, in-page, and native ads.
This flexibility allows choosing the most cost-effective model based on campaign objectives.
CPC campaigns pay only for clicks, with minimum bids starting at $0.0001.
This model suits conversion-focused campaigns where click quality matters more than impression volume.
CPM campaigns pay for a thousand impressions, with the lowest possible bid at $0.1 for most countries.
CPM typically costs less than CPC for the same traffic when CTR is high, making it efficient for well-optimized campaigns.
You can’t switch between CPC and CPM mid-campaign, but advertisers can create duplicate campaigns with different bidding models to test which performs better.
Once you identify winning sources at CPC pricing, switching those sources to CPM in a new campaign often reduces costs significantly.
Daily budget caps prevent overspending.
Campaign pacing distributes the budget evenly throughout the day rather than exhausting it in the first few hours.
This prevents waking up to find your entire daily budget spent in the first 30 minutes.
For popunders, there’s CPM and SmartCPM.
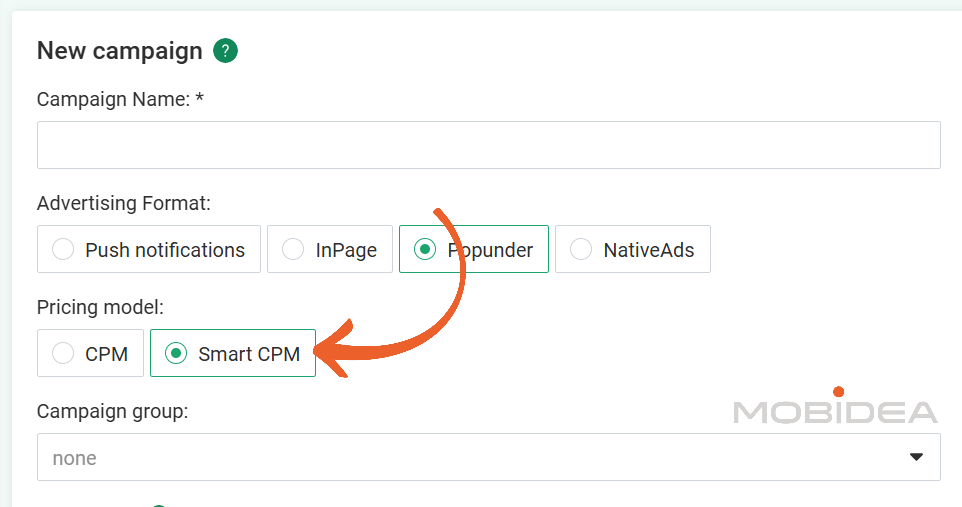
Smart CPM automatically adjusts bids based on conversion probability for each traffic source.
The algorithm learns from campaign data and optimizes bids to improve ROI without manual intervention.
sCPM works best after campaigns collect sufficient conversion data.
This feature saves significant time once campaigns have enough data for the algorithm to learn from.
Real-Time Statistics and Reporting
Statistics update every 15 minutes, providing near real-time performance data.
The dashboard shows key metrics including impressions, clicks, CPC, CPM, CTR, and spending.
The reporting interface allows drilling down from campaign level to ad group level to individual creative performance.
This granular data helps identify which specific elements drive results.
One limitation is that the platform doesn’t display sources with very low click volumes in standard reports.
This means sources receiving minimal traffic may not appear in optimization reports even though they’re consuming budget.
If you notice discrepancies between total spend and visible sources, this is usually why.
Integration and Tracking
EvaDav integrates with major tracking platforms including Voluum, Binom, BeMob, PeerClick, Keitaro, and others.
The network provides standard tracking macros for passing data to external trackers:
- {CLICK_ID} – Unique click identifier
- {COUNTRY_CODE} – Two-letter country code
- {OS} – Operating system
- {BROWSER} – Browser name
- {SOURCE_ID} – Publisher source ID
- {ZONE_ID} – Specific ad placement ID
- {COSt} – Click cost
- {IP} – User IP address
More can be found here.
Postback URL support enables conversion tracking.
When conversions occur, the tracking platform sends data back to EvaDav, allowing the platform to optimize campaigns based on actual conversions rather than just clicks.
Setting this up correctly from the start makes optimization much easier later.
Account Status and Level System
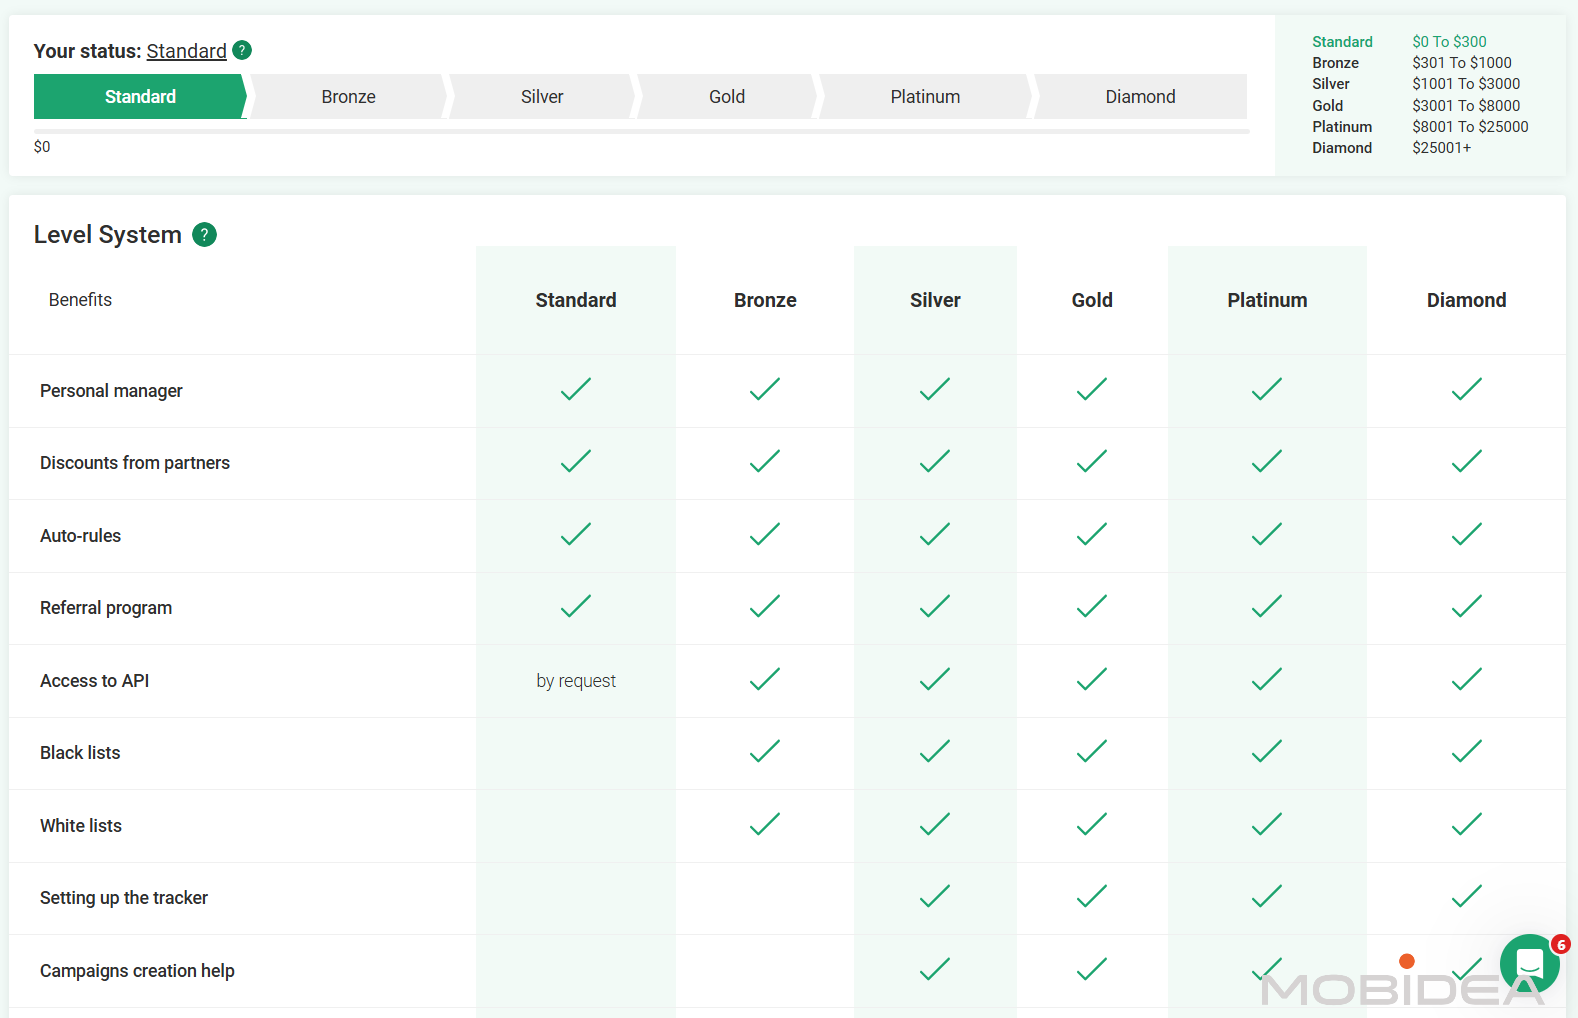
Evadav has a tiered level system based on total spending:
- Standard: $0 to $300
- Bronze: $301 to $1,000
- Silver: $1,001 to $3,000
- Gold: $3,001 to $8,000
- Platinum: $8,001 to $25,000
- Diamond: $25,001+
What’s this for?
Higher tiers may unlock additional benefits like API access, campaign creation assistance, exclusive offers from partners, and priority moderation.
The platform remains fully functional at all levels, though. Don’t feel pressured to spend more just to reach higher tiers faster.
Account Management and Support
Every advertiser receives a dedicated account manager upon registration.
There’s no minimum budget requirement to get assistance, which is refreshing compared to networks that only assign managers after you’ve spent thousands.
However, the amount of support you are given depends on your account level, as mentioned above.
If you qualify, managers can provide optimization recommendations, help with technical setup, and can offer traffic insights for specific verticals.
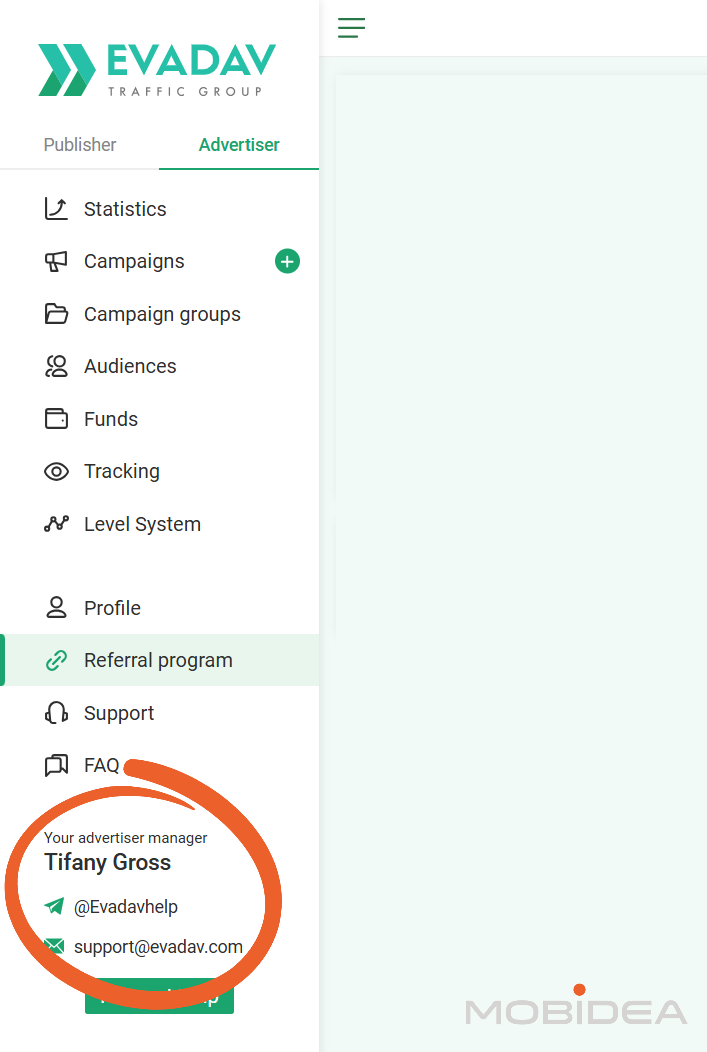
Support is available 24/7 through:
- Live chat (fastest response, typically within minutes)
- Email (support@evadav.com)
- Telegram
- Microsoft Teams
The Help Center contains detailed guides covering campaign setup, tracking integration, and optimization strategies.
Video tutorials walk through common tasks, reducing the learning curve for new advertisers.
Based on our experience as well as several other advertisers’, response quality is consistently high according
Support staff understand media buying fundamentals and can provide actionable optimization suggestions rather than generic responses.
How to Start Advertising with EvaDav
Getting started with EvaDav follows a straightforward process that takes minimal time from registration to launching your first campaign.
The platform prioritizes simplicity without requiring extensive technical knowledge, we keep saying.
Click here to register to Evadav.
It’s pretty straightforward.
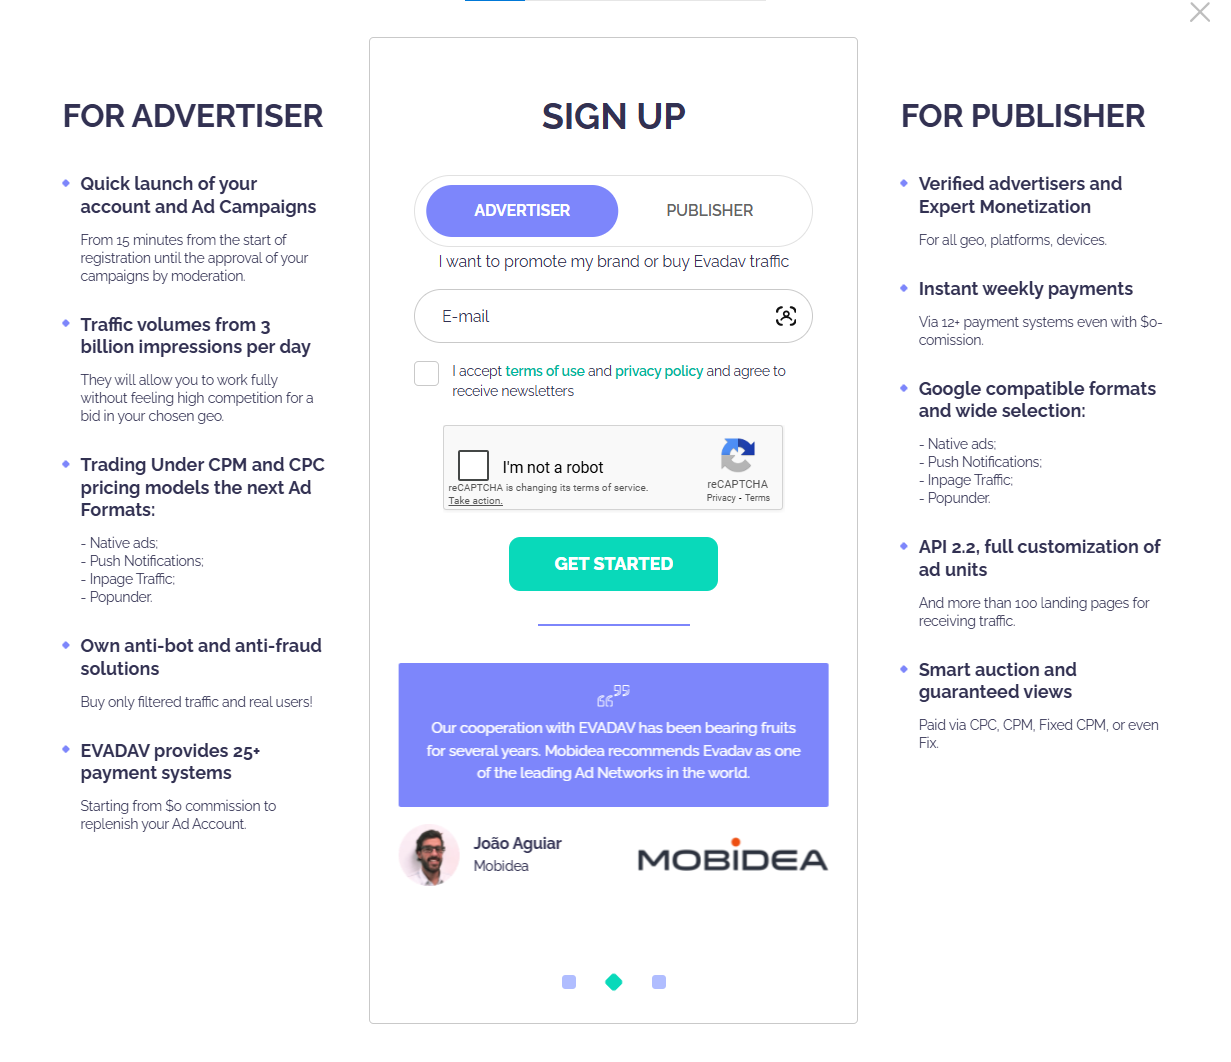
Unlike some networks that review applications before granting access, EvaDav provides instant approval for advertiser accounts.
The only requirement for launching campaigns is adding funds to your account balance.
Dashboard Overview
The EvaDav dashboard uses a clean, single-page layout with left sidebar navigation.
Upon login, the Statistics page displays by default, showing campaign performance data.
Left Sidebar Navigation
All primary functions are accessible through the left sidebar.
Here’s a quick overview of what each one does:
- Statistics: Main reporting dashboard with comprehensive filtering options
- Campaigns: View, create, edit, and manage active campaigns
- Campaign Groups: Organize multiple campaigns into groups for easier management
- Audiences: Create and manage blacklists and whitelists for optimization
- Funds: Add balance, view transaction history, check spending
- Tracking: Set up conversion tracking and postback URLs
- Level System: View current tier status and spending requirements
- Profile: Manage account settings and personal information
- Referral Program: Access referral links and track referral earnings
- Support: Contact support team via live chat
- FAQ: Access help documentation and guides
The sidebar also displays your assigned account manager’s name with direct contact options via Telegram and email.
Don’t hesitate to reach out to them if you need help or recommendations for your vertical.
Publisher/Advertiser Toggle
At the top of the sidebar, tabs allow switching between Publisher and Advertiser views.
This unified platform approach means the same account can both buy traffic and monetize websites without separate logins.
If you have websites with decent traffic, you could potentially fund your advertising campaigns with publisher earnings.
Adding Funds to Account
Campaigns require a funded balance before launch.
Click “Finances” in the sidebar, then select “Add Funds.”
The minimum deposit is $100.
Multiple payment methods are accepted some of which are:
- Credit/debit cards (Visa, Mastercard)
- PayPal
- WebMoney
- Skrill
- Paxum
- Payoneer
- ePayments
- Bitcoin
- Bank wire transfer
- Capitalist
- UnionPay
- WeChat Pay
Get a deposit bonus when you use our exclusive promo code for Evadav!
The bonus depends on your top-up amount (anywhere from $50 to $100, so go check it out!)
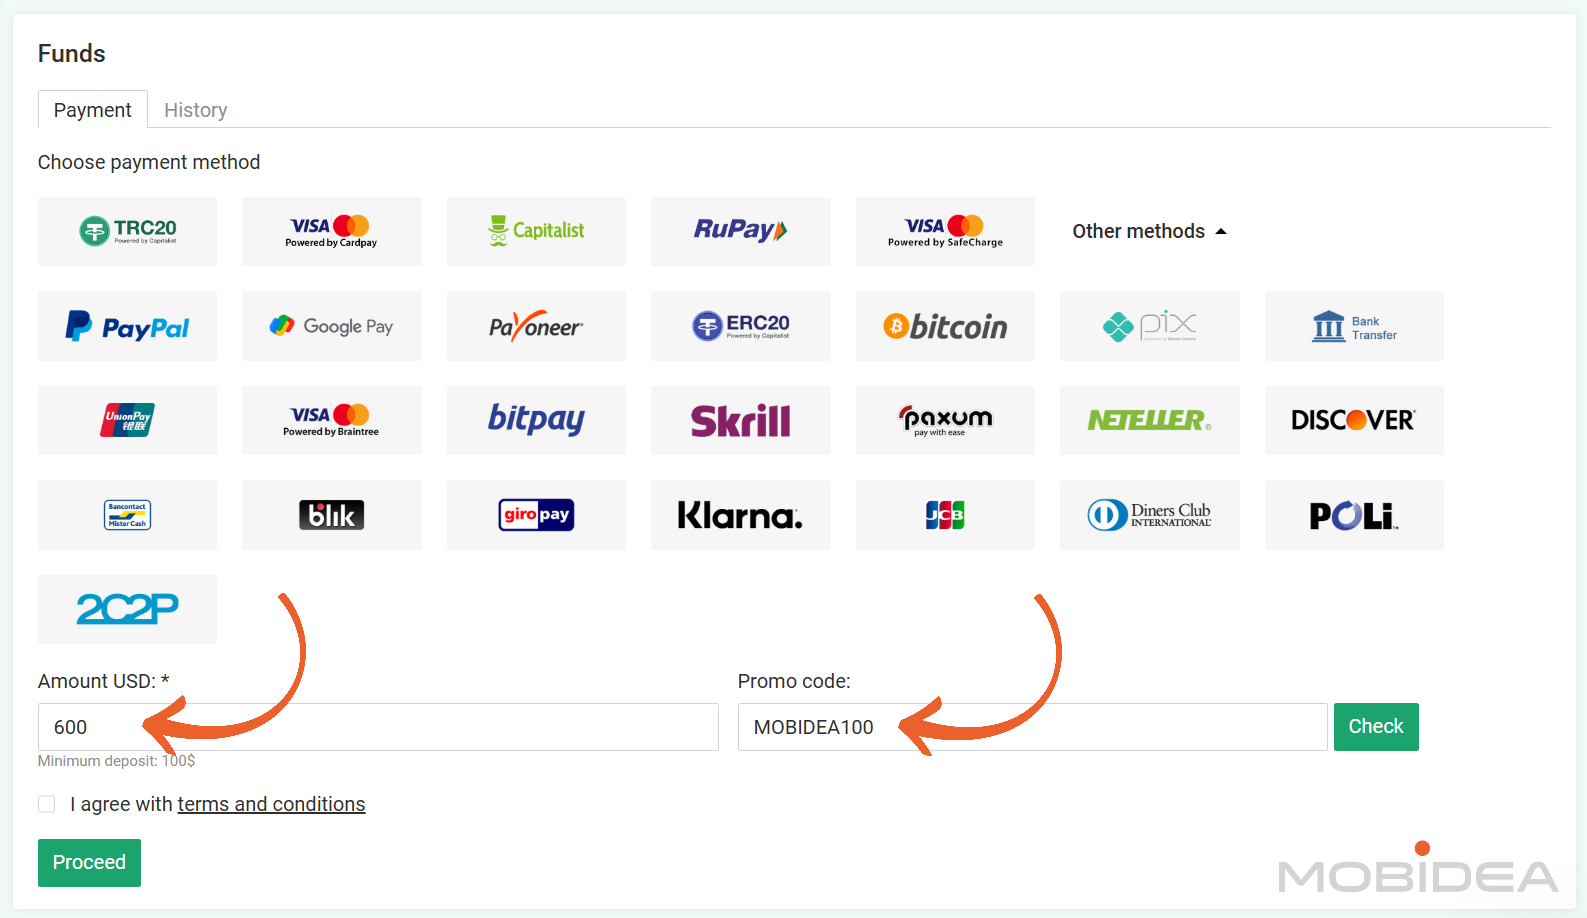
Select your preferred payment method and enter the deposit amount.
Most payment processors transfer funds instantly, while bank wires may take 1-3 business days.
EvaDav requires maintaining a minimum balance of $20 at all times to keep campaigns running.
If the balance drops below $20, active campaigns pause automatically until you add more funds.
Keep this in mind when setting daily budgets to avoid unexpected pauses.
If you’re planning on working as an Evadav publisher as well, you can use your earnings to advertise, too!
Any earnings from publisher activities can be transferred directly to the advertiser balance once they reach $100.
This is a nice touch for those running both sides of the business.
Creating Your First Campaign
Click “Campaigns” in the sidebar, then click the green “+” button or the “Create Campaign” button.
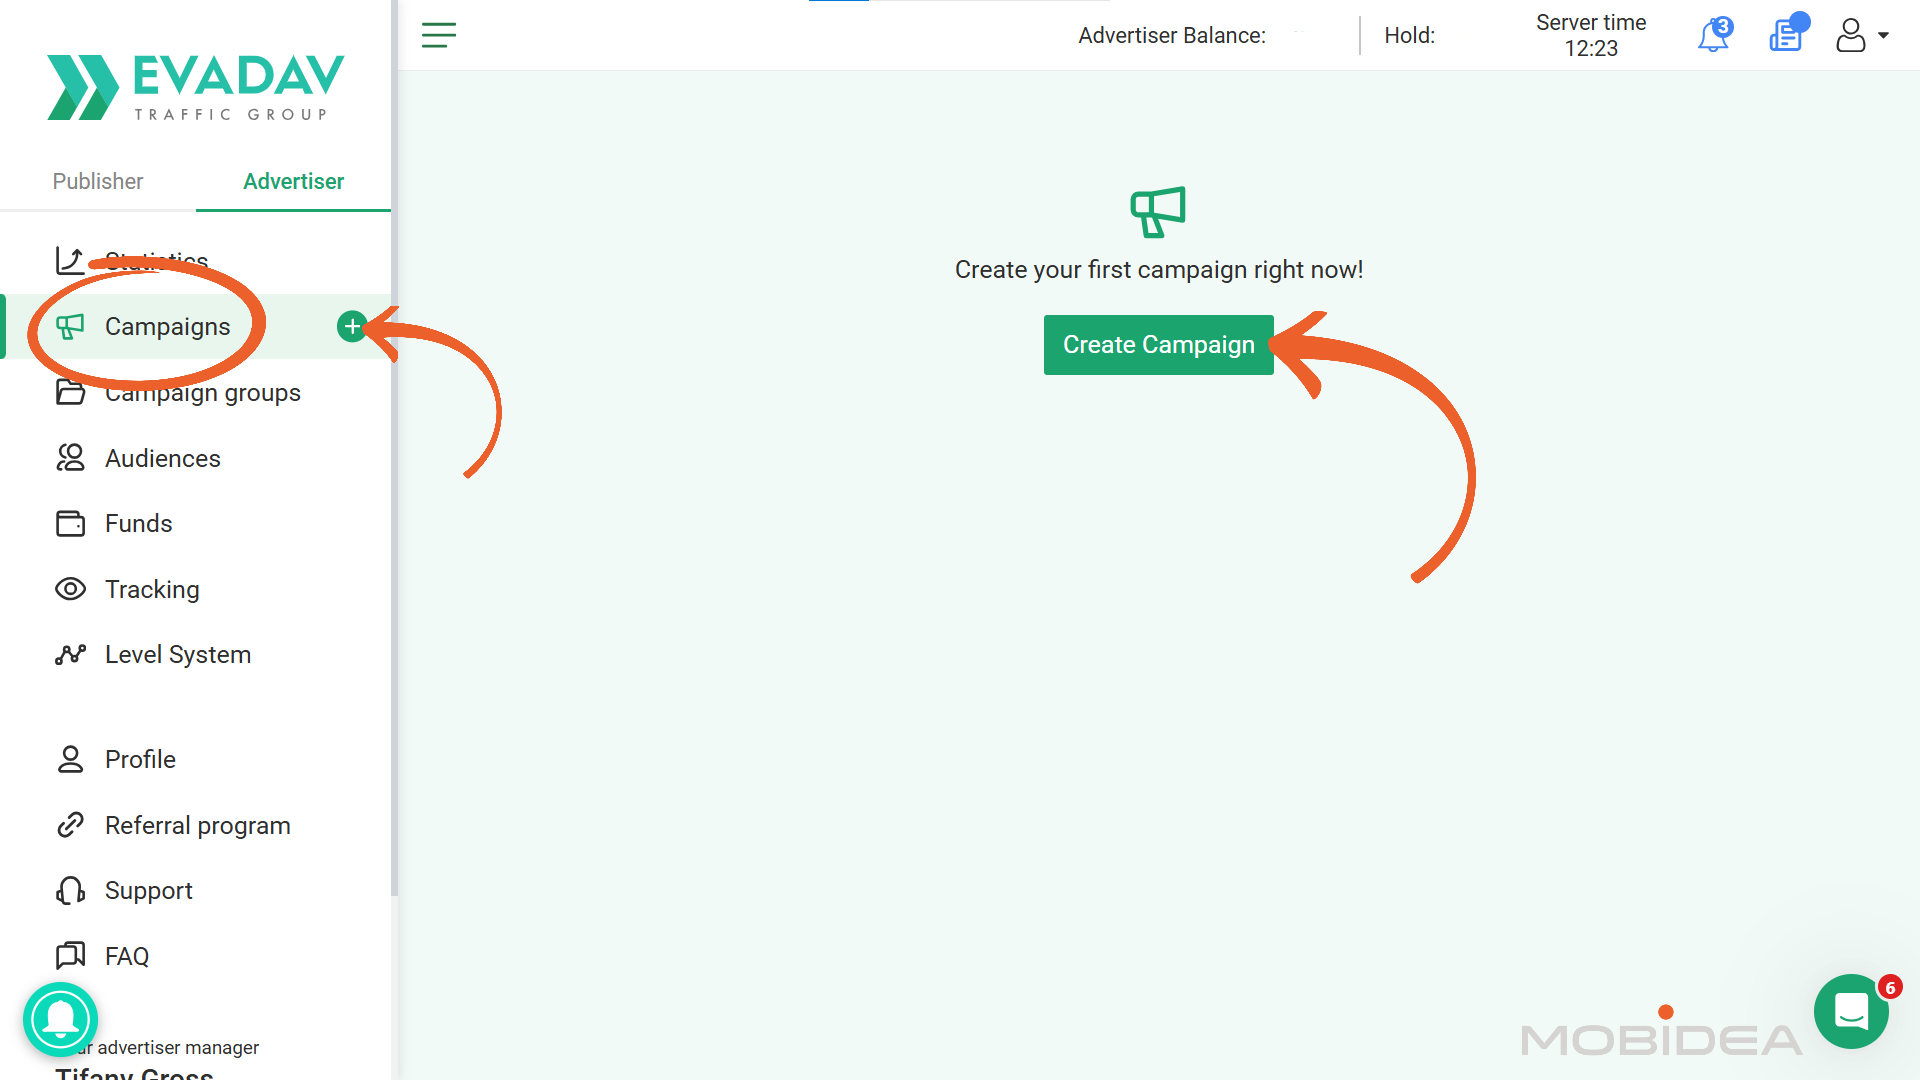
The interface opens a single-page campaign creation form.
Step 1: Basic Campaign Settings
Enter a descriptive name for internal tracking.
Clear naming conventions help when managing multiple campaigns.
We recommend something like “Native-Dating-US-Test1” or “Push-Sweeps-Tier1”, rather than generic names like “Campaign 1”.
Select the advertising format for this campaign:
- Push notifications
- InPage (in-page push)
- Popunder
- NativeAds
Each format has different creative requirements and targeting options.
The interface adjusts based on your selection.
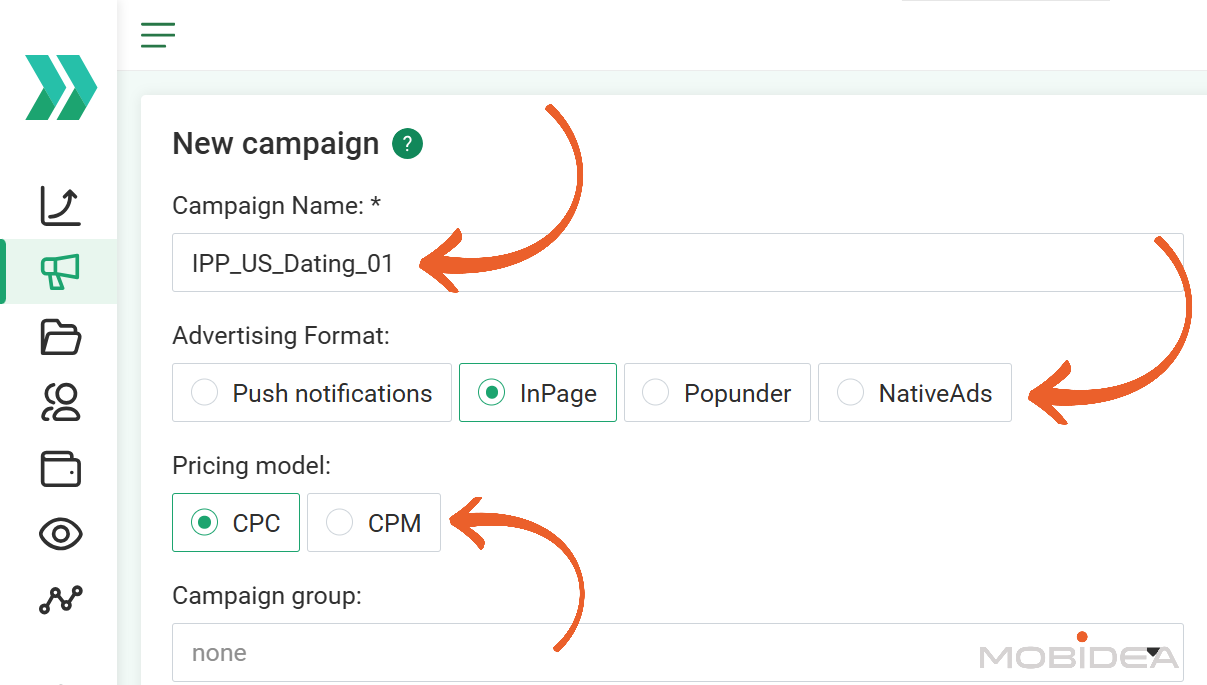
Choose between CPC (Cost Per Click) or CPM (Cost Per Mille).
If you choose popunder, you’ll have CPM or Smart CPM.
I usually start with CPC for testing.
Once I identify winning sources, I duplicate the campaign with CPM pricing to potentially reduce costs.
Campaign Group
There’s the option to assign the campaign to a group for easier organization and aggregate reporting.
Like if you’re planning on having separate campaigns for desktop and mobile, you can create a Campaign Group for easy assessment.
Or if you’re testing multiple offers in the same vertical, grouping them helps analyze overall vertical performance.
Groups can be created on the fly or selected from existing groups.
Step 2: Target URL and Tracking
Paste the landing page or affiliate tracking link where traffic will be sent.
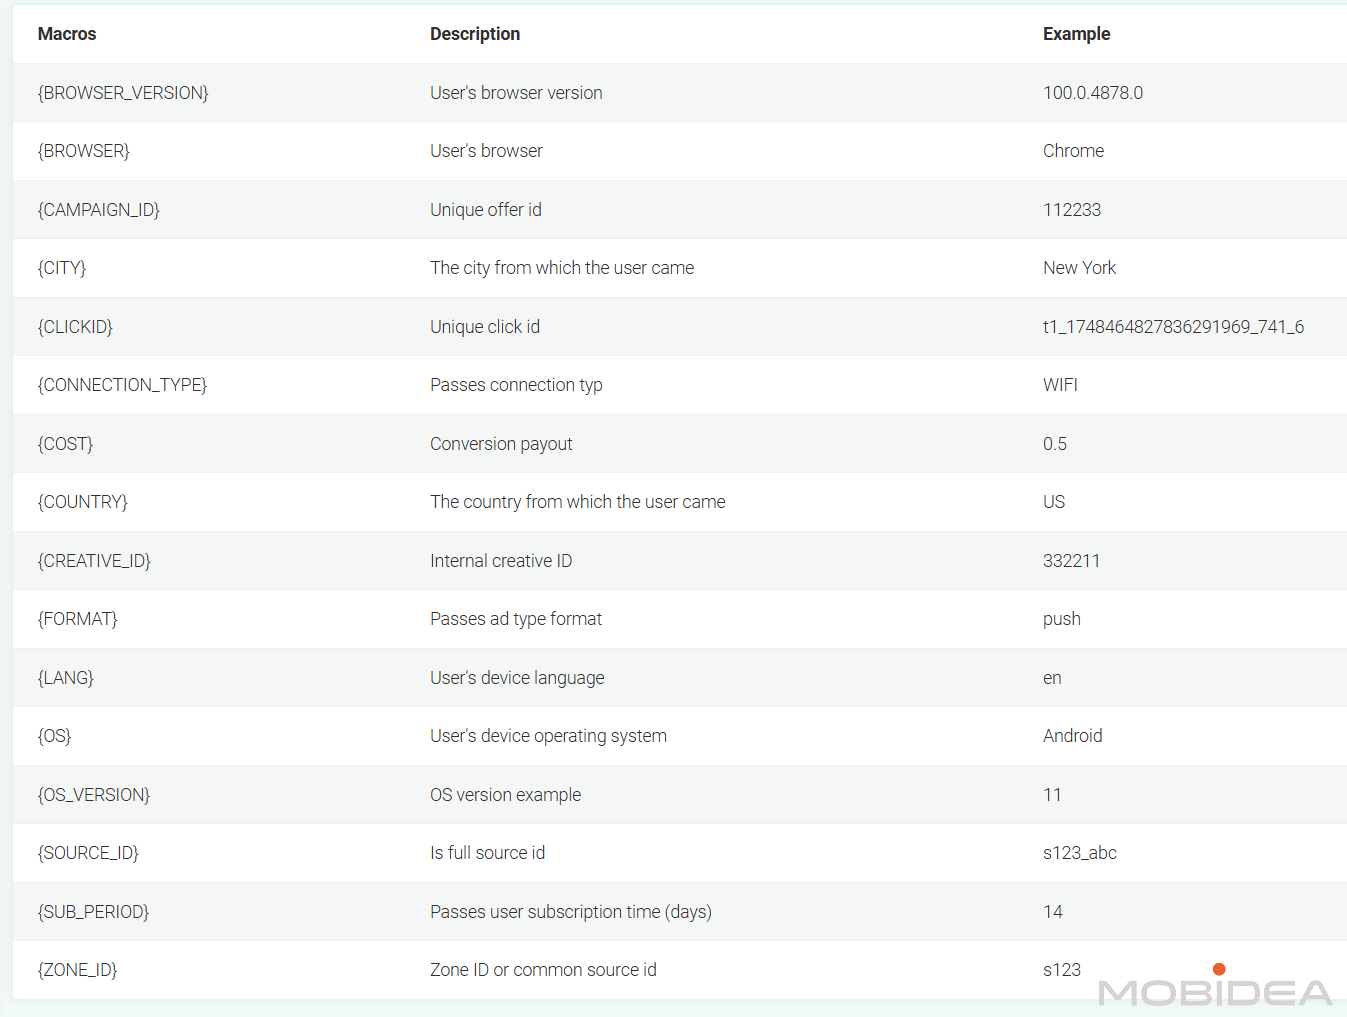
You’ll find the list of macros you can add to your tracking link. These can be inserted into the URL to pass data to tracking platforms:
Available macros include: {ZONE_ID}, {SOURCE_ID}, {CAMPAIGN_ID}, {CREATIVE_ID}, {COST}, {COUNTRY}, {CITY}, {BROWSER}, {BROWSER_VERSION}, {CLICKID}, {FORMAT}, {OS}, {OS_VERSION}, {LANG}, {CONNECTION_TYPE}
For example, a complete tracking URL might look like: https://tracker.com/click?cid={CLICKID}&cost={COST}&country={COUNTRY}&source={SOURCE_ID}
This can be made easier by using a tracking platform that integrates with Evadav.
Most affiliate trackers already have Evadav in their list, like Voluum, Bemob, ClickFlare, and so on.
This ensures all parameters pass correctly from the start.
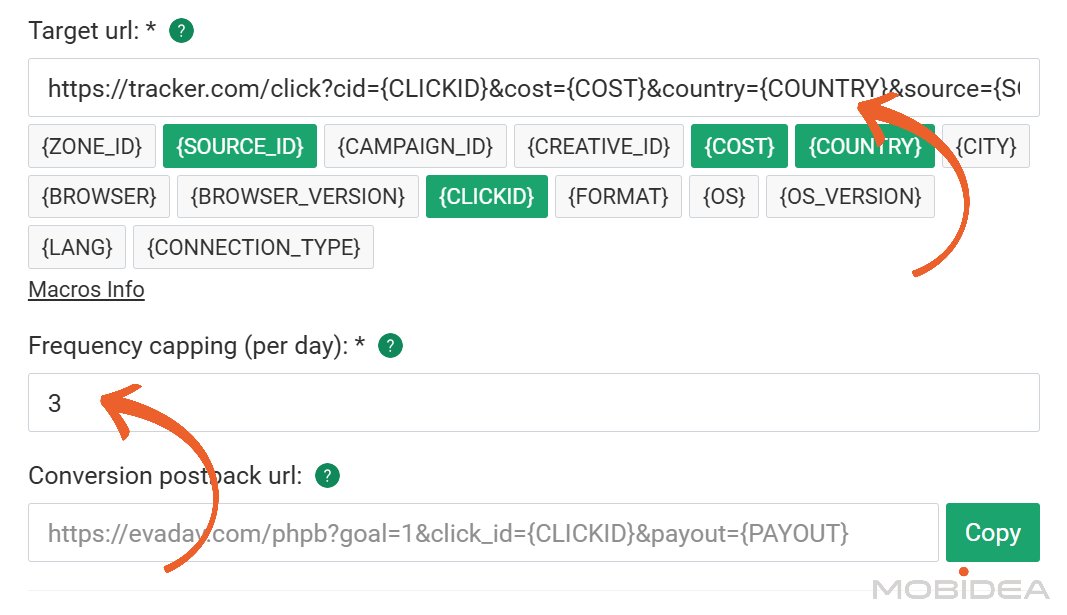
Next, set how many times ads show to the same user per day.
Default is typically 3 times per day.
Lower frequency reduces ad fatigue but limits reach to each user.
For testing, stick with the default. You can adjust this later based on performance data.
Conversion Postback URL
The platform automatically generates a postback URL for conversion tracking: https://evadav.com/phpb?goal=1&click_id={CLICKID}&payout={PAYOUT}
Copy this URL and add it to the affiliate network or tracking platform.
Replace {CLICKID} and {PAYOUT} with the appropriate macros from your tracking system.
Setting this up correctly from the start enables conversion-based optimization later, which is crucial for profitability.
Optional Step: Automatic Rules
If you already have specific metrics that you follow when optimizing your campaigns, you can set up automatic rules.
This minimizes routine effort, such as pausing zones reaching a thousand impressions but having zero conversions, and so on.
You can create a rule based on SourceID or ZoneID.
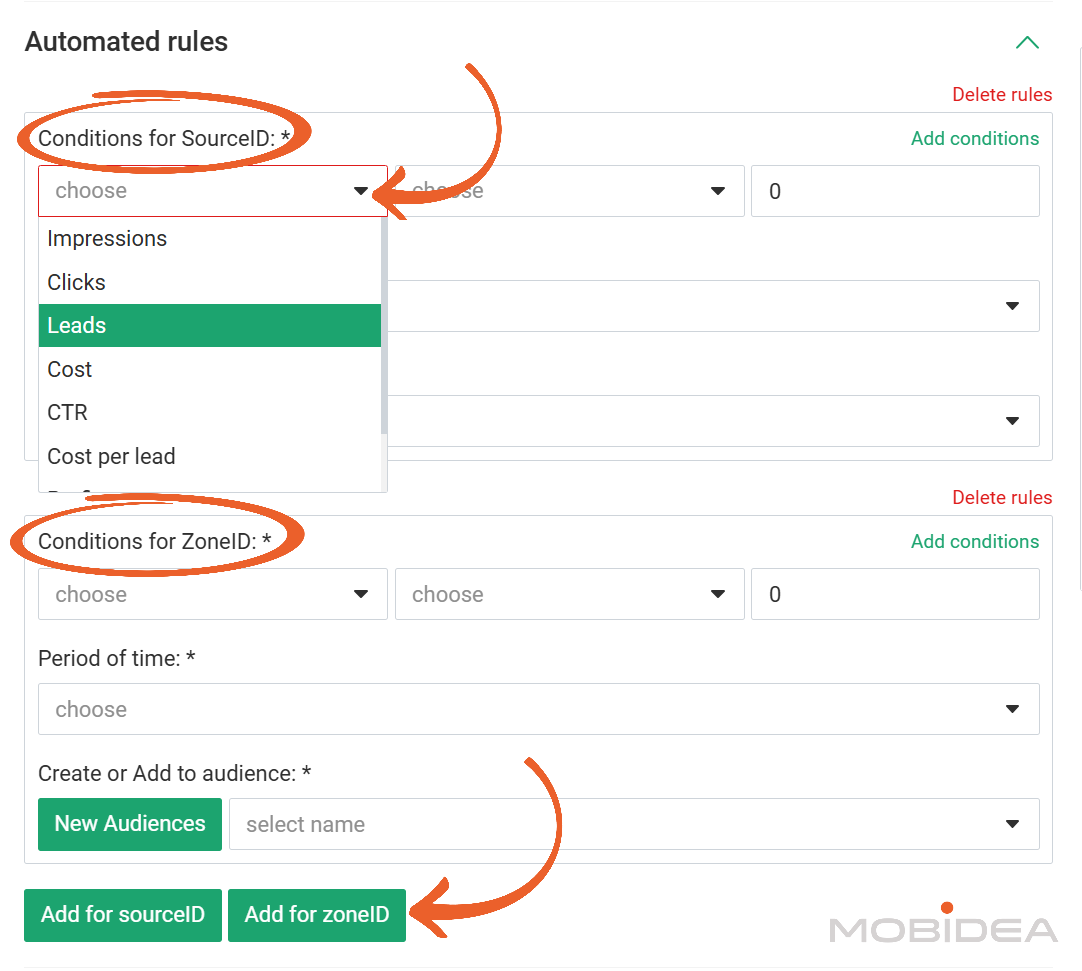
There’s no limit to how many rules you can create, but as always, be careful.
You might end up blocking more traffic than you actually prefer!
Step 3: Creative Upload
The creative section expands based on the selected ad format.
For Popunder:
No creative upload needed as the full landing page displays.
The tracking link you added in Target URL is your creative.
For Native Ads:
- Title (up to 80 characters)
- Description field
- Image upload (minimum 492×328 pixels recommended)
A note about GIF files appears, indicating GIF support requires manager assistance.
If you want to use GIFs, reach out to your account manager.
For Push Notifications:
- Title (up to 30 characters)
- Description (up to 45 characters)
- Icon image (192×192 pixels)
- Main image (360×240 pixels)
For In-Page Push:
Same specifications as classic push notifications.
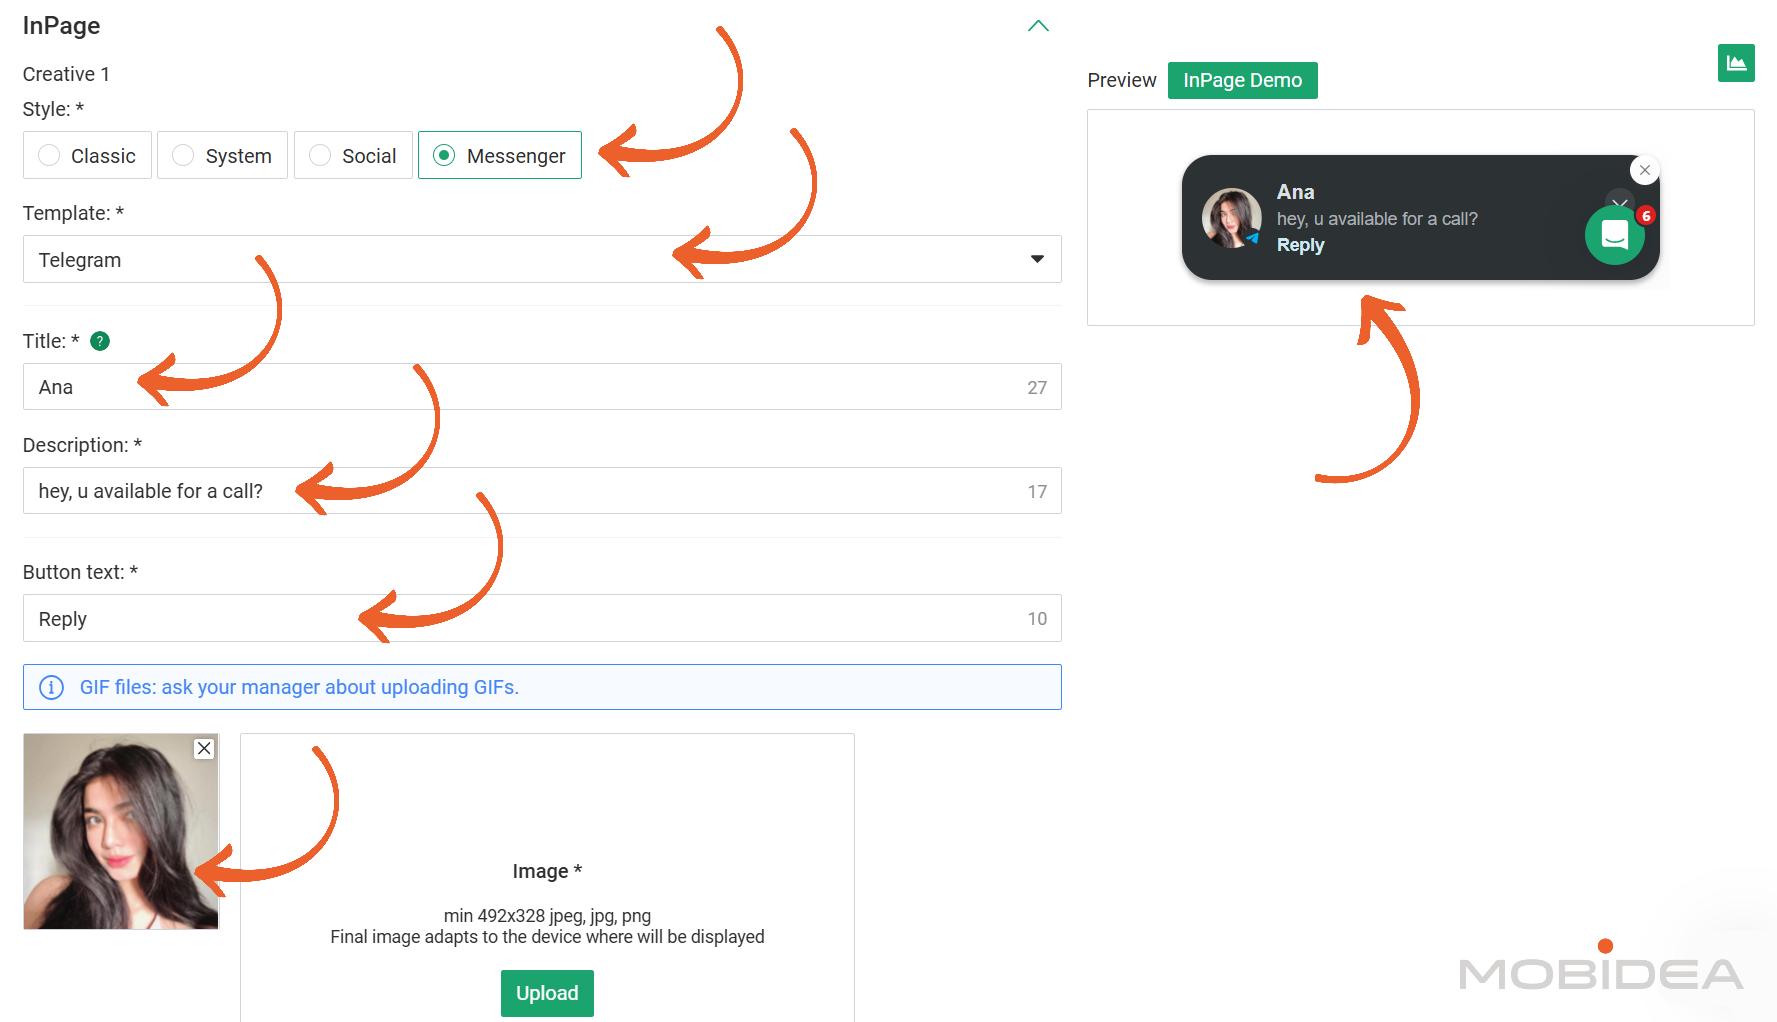
However, what I like most about Evadav’s in-page push is that it offers different messaging styles.
These are:
- Classic – looks like the classic push notification
- System – looks like a system message. You have four options here: macOS, Windows, iOS, and Android. For best results, choose the system message that matches your target device.
- Social – looks like a message from social media platforms
- Messenger – looks like a message from messaging platforms such as Telegram, Whatsapp, WeChat, Viber, Discord
You can see a preview of your creatives on the right side of the screen.
Here’s what it looks like:
You can add multiple creatives for split testing, though the limit depends on your account status.
We recommend uploading at least 3-5 different creatives to identify winners quickly.
You also have the option to add a different target URL per creative, should you wish.
Even if you think you have the perfect creative, test variations.
Small changes often produce dramatically different results.
Even small changes in wording or images can dramatically affect performance.
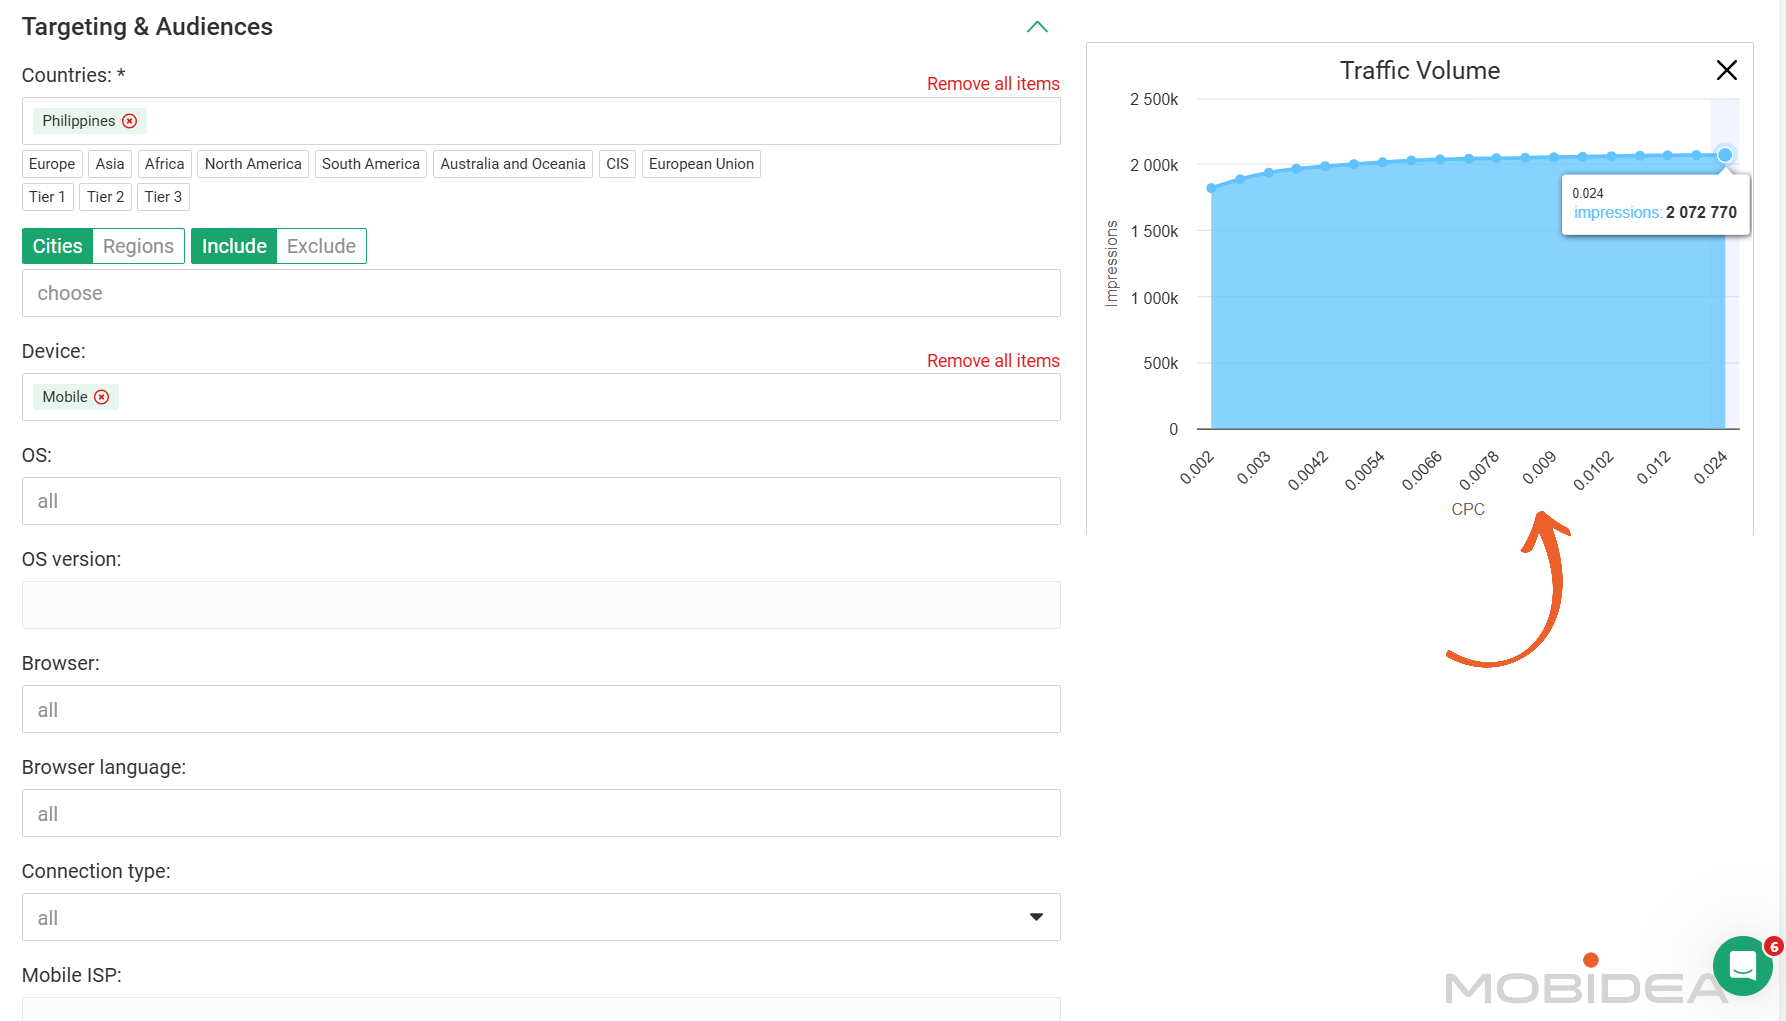
Step 4: Targeting & Audiences
This section contains all targeting parameters that we’ve already discussed in the features section.
The interface shows a “Traffic Volume” panel on the right side that updates based on targeting selections, so make sure you choose at least your country targets for this to show up.
Step 5: Bid Settings
The Bid section shows available bidding options based on the selected pricing model.
Max Bid
For CPC campaigns, enter the maximum cost per click willing to pay. For CPM campaigns, enter the maximum cost per thousand impressions.
The platform may display recommended bid ranges based on current market competition for the selected targeting.
Step 6: Budget and Schedule
Use this section to set the schedule when your ad appears to users.
Most campaigns can run 24/7 initially. Dayparting can be tested later once you have performance data.
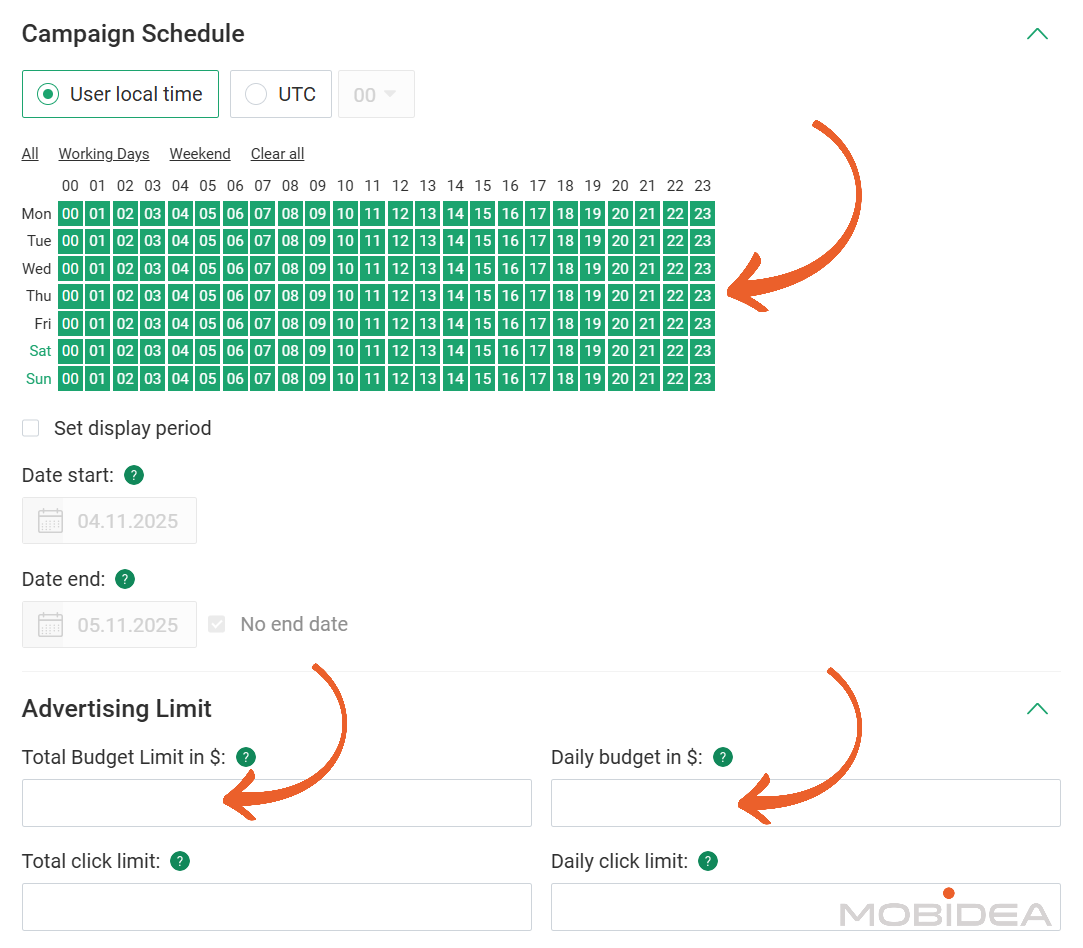
Set spending or click limits:
- Total Budget Limit – Maximum amount the campaign can spend before automatically pausing.
This acts as a safety net to prevent overspending during testing.
- Total Click Limit – Maximum amount of clicks your campaign receives before it stops receiving traffic.
- Daily Budget – Maximum daily spending limit.
- Daily Click Limit – Max daily click limit.
The platform paces campaigns throughout the day to prevent budget exhaustion in the first few hours.
However, I recommend only filling up either the budget limit or just click limit, not both.
For testing, we recommend starting with $30-$50 daily budgets.
This limits risk while gathering enough data to make optimization decisions.
You can scale budgets once you identify profitable sources.
Alternatively, you can set click limits instead of budget amounts (total click limit and daily click limit).
Budget limits are generally more useful for controlling spending.
Step 7: Review and Submit
After completing all required fields, scroll to the bottom and click “Create Campaign” or “Save Campaign.”
Moderation Process
Campaigns enter a moderation queue where the EvaDav team reviews creatives and settings for policy compliance.
The moderation team operates 24/7, including weekends.
Typical approval times range from 5 to 20 minutes.
Fast moderation allows launching multiple campaigns in quick succession.
In our experience, most campaigns get approved quickly as long as creatives meet quality standards and don’t make misleading claims.
If a campaign is rejected, you’ll receive an email notification that explains the reason why, with specific guidance on how you can get it approved.
You’ll also see the “rejected” tag on your campaign.
Common rejection reasons include:
- Misleading claims in creatives
- Poor image quality
- Prohibited content
- Copyright violations
After making required changes, resubmit the campaign for another review.
The moderation team is generally helpful and specific about what needs to change.
Campaign Status
Once approved, campaigns show “Active” status and begin receiving traffic immediately (assuming sufficient account balance).
Traffic delivery starts within minutes of approval for most GEOs and formats.
Watch your stats for the first hour to ensure traffic is flowing as expected.
Viewing Statistics and Reports
The Statistics page serves as the primary analysis tool for campaign performance.
Accessing it from the left sidebar brings up a comprehensive reporting interface with multiple filtering and breakdown options.
Report Filtering Options
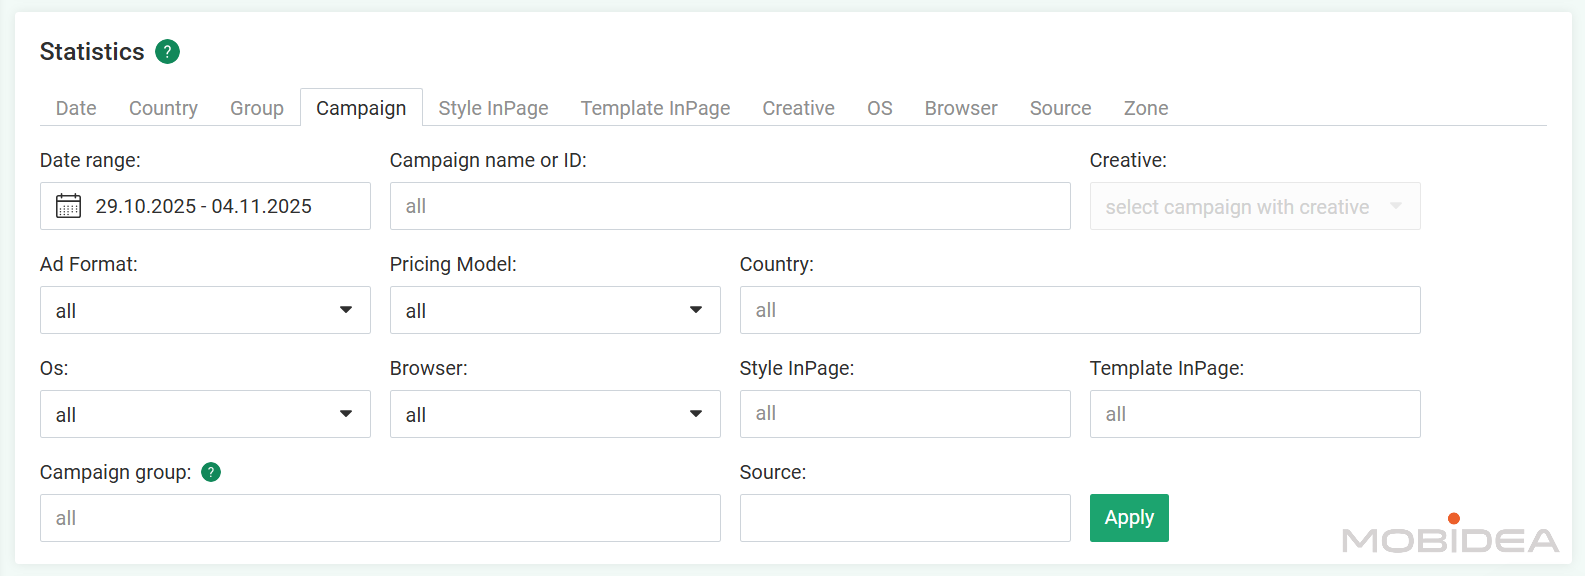
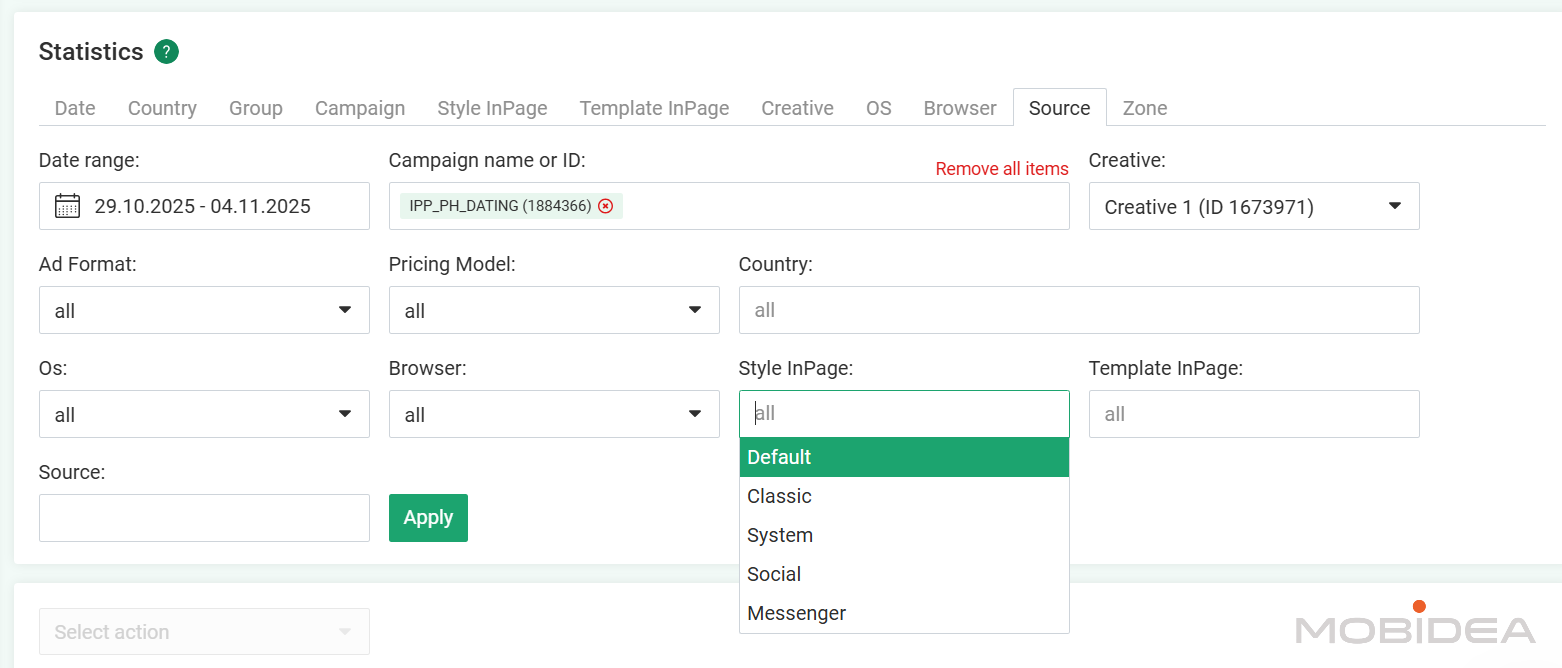
The Statistics page provides extensive filtering controls at the top of the interface:
Date Range Selection
A calendar picker allows selecting specific date ranges for analysis.
This helps compare performance across different time periods or focus on specific campaign phases.
During testing, we usually look at yesterday’s data to make optimization decisions.
Campaign Filters
- Campaign name or ID search
- Ad format filter (push, in-page, native, popunder)
- Pricing model filter (CPC, CPM, Smart CPM)
- Creative selection (filter by specific ad creatives)
Geographic and Technical Filters
- Country selection
- Operating system filter
- Browser filter
- Style InPage and Template InPage options (for in-page push variations)
Source Filters
- Campaign group selection
- Source ID filtering
- Zone ID filtering
After setting desired filters, click the “Apply” button to generate the report.
Report Breakdown Tabs
The Statistics page offers multiple tabs for different data breakdowns: Date, Country, Group, Campaign, Style InPage, Template InPage, Creative, OS, Browser, Source, and Zone.
Switching between tabs provides different perspectives on the same data, making it easy to identify patterns and optimization opportunities.
The Source and Zone tabs are where the real optimization magic happens.
Performance Metrics Displayed
The statistics table shows comprehensive metrics:
Basic Metrics
- Date
- Impressions
- Clicks
- CTR (Click-through rate)
- CPC (Cost per click)
- Cost (Total spending)
Conversion Metrics
- Leads1 (Primary conversion events)
- CPL1 (Cost per lead for primary conversions)
- Leads2 (Secondary conversion events)
- CPL2 (Cost per lead for secondary conversions)
Profitability Metrics
- Payout
- Profit
- ROI
The conversion and profitability metrics require proper postback setup to display data.
Without conversion tracking configured, these columns remain empty.
This is why setting up tracking correctly from the start matters so much.
Each metric column header includes sorting arrows, allowing quick identification of top and bottom performers by any metric.
Click the spending column to see where your budget is going, or sort by ROI to identify your most profitable sources.
Data Update Frequency
Statistics refresh every 15 minutes, providing near real-time campaign performance visibility.
For active campaigns with significant traffic, this frequent updating helps catch issues or capitalize on winning combinations quickly.
You don’t need to constantly refresh the page; the data updates automatically.
Exporting Reports
While not immediately visible in the standard view, the platform typically offers export functionality for downloading statistical data.
Exported reports can be analyzed in spreadsheet software for deeper analysis or record-keeping.
Best Practices for First Campaigns in Evadav
- Start Broad, Then Narrow
Launch campaigns with minimal targeting restrictions initially. This generates data faster and prevents missing unexpected high performers.
For example, start with all browser languages selected rather than limiting to just the landing page language.
You might be surprised which segments convert well.
- Test Multiple Creatives
Upload the maximum 5 creatives per campaign.
Push notification performance varies significantly based on titles, descriptions, and images. Split testing identifies winners quickly.
- Set Conservative Budgets Initially
Start with daily budgets of $30 to $50 for testing.
Yes, you can have a lower budget, but if you’re using push ads, it’s possible to go over your budget.
This daily budget recommendation limits risk while gathering optimization data.
Increase your budgets after identifying profitable sources.
It’s better to test slowly and scale winners than to blow through the budget on unoptimized campaigns.
- Monitor Subscription Age Performance
For push campaigns, test different subscription age ranges.
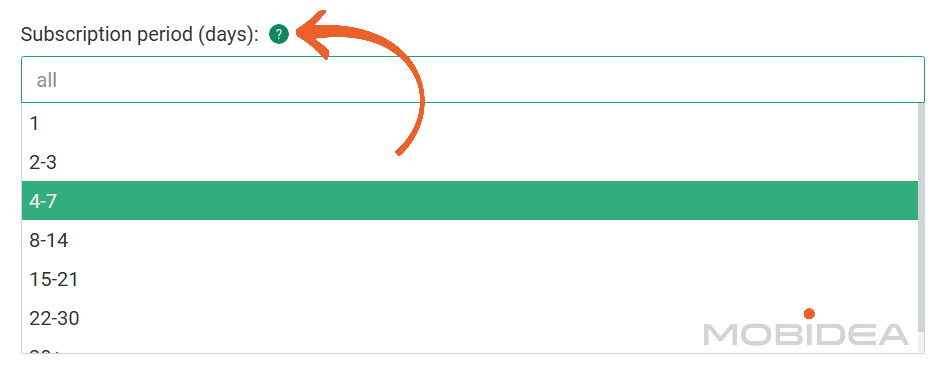
Sometimes older subscribers convert better despite lower CTR, resulting in better ROI.
Don’t assume fresher is always better.
- Use External Tracking
While EvaDav provides solid internal statistics, using external tracking platforms (Voluum, Binom, BeMob) provides more detailed analysis and better optimization capabilities.
The investment in a tracker pays for itself through better optimization.
- Wait for Sufficient Data
Let campaigns run until they reach at least 1,000-2,000 clicks before aggressive optimization.
Pausing sources too early based on limited data can eliminate potentially profitable traffic.
Give sources enough volume to show their true performance.
- Regular Optimization Intervals
Review campaign performance daily during the testing phase. Once campaigns stabilize, optimization can shift to every 2-3 days.
Constant adjustments prevent sources from accumulating enough data for accurate assessment.
Set a schedule and stick to it rather than checking stats every hour.
Or once you have specific optimization metrics, you can set-up auto rules.
How to Earn Money with EvaDav
Getting started as a publisher is straightforward.
Here’s the practical walkthrough.
Registration and Dashboard Access
Visit EvaDav’s publisher page and complete the simple signup form—email, password, basic contact info.
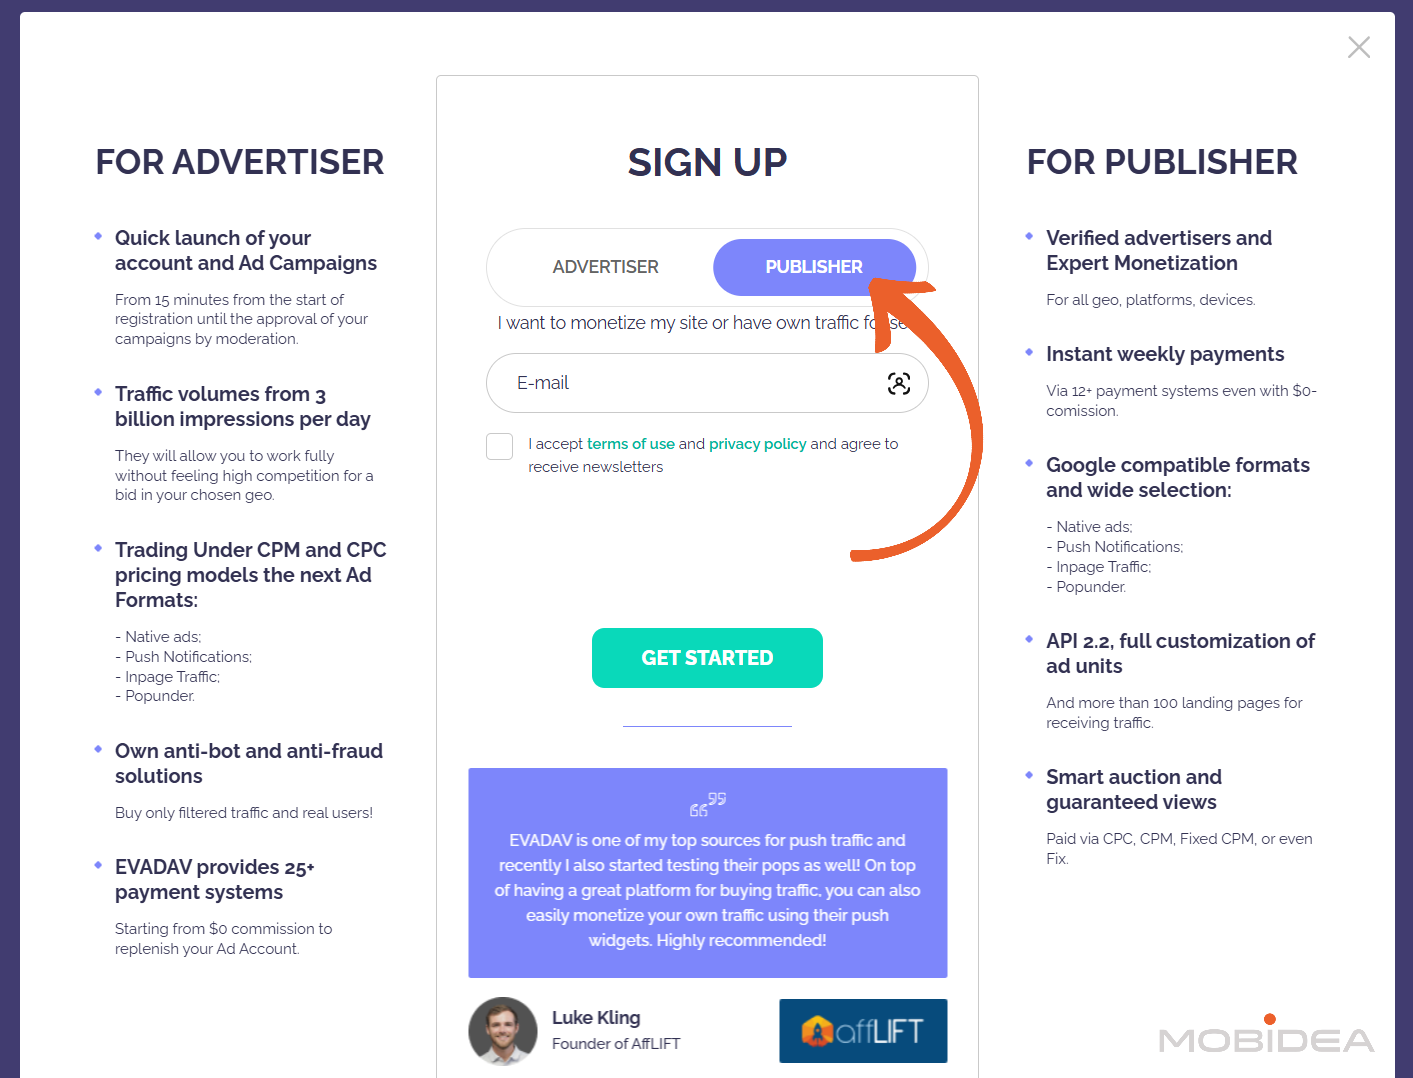
After email verification, dashboard access is immediate. No lengthy approval process for account creation.
The unified dashboard serves both advertisers and publishers.
Toggle between views using tabs at the top. The main publisher view shows earnings, impressions, clicks, and CPM/CPC rates.
Payment Setup
Before creating ad zones, email [email protected] from your registered address with subject “Adding personal account information.”
Include your name, payment method preference, and payment details.
EvaDav only processes USD payments.
Creating Streams and Widgets
Streams are folders containing multiple ad widgets.
Create a stream, give it a name like “Main Blog – Header Ads,” and configure basic settings.
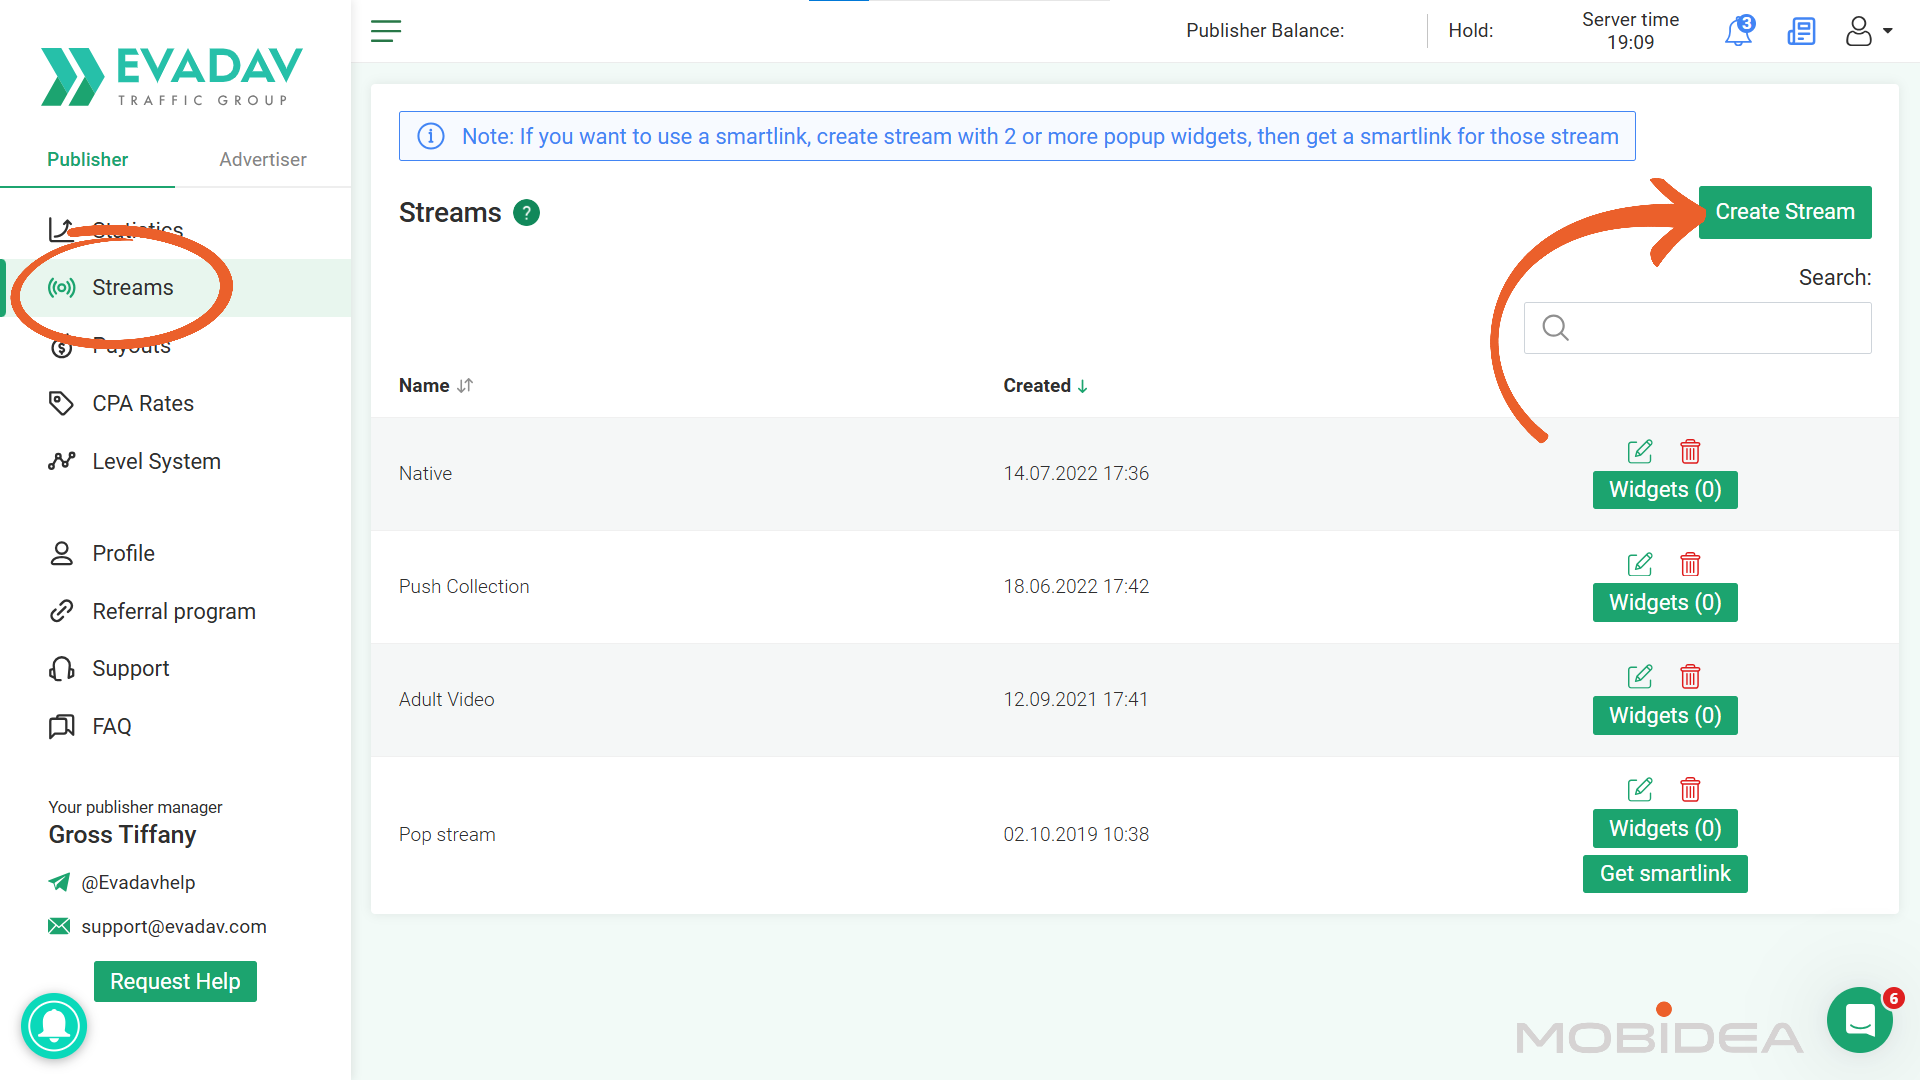
Within each stream, you have three tabs.
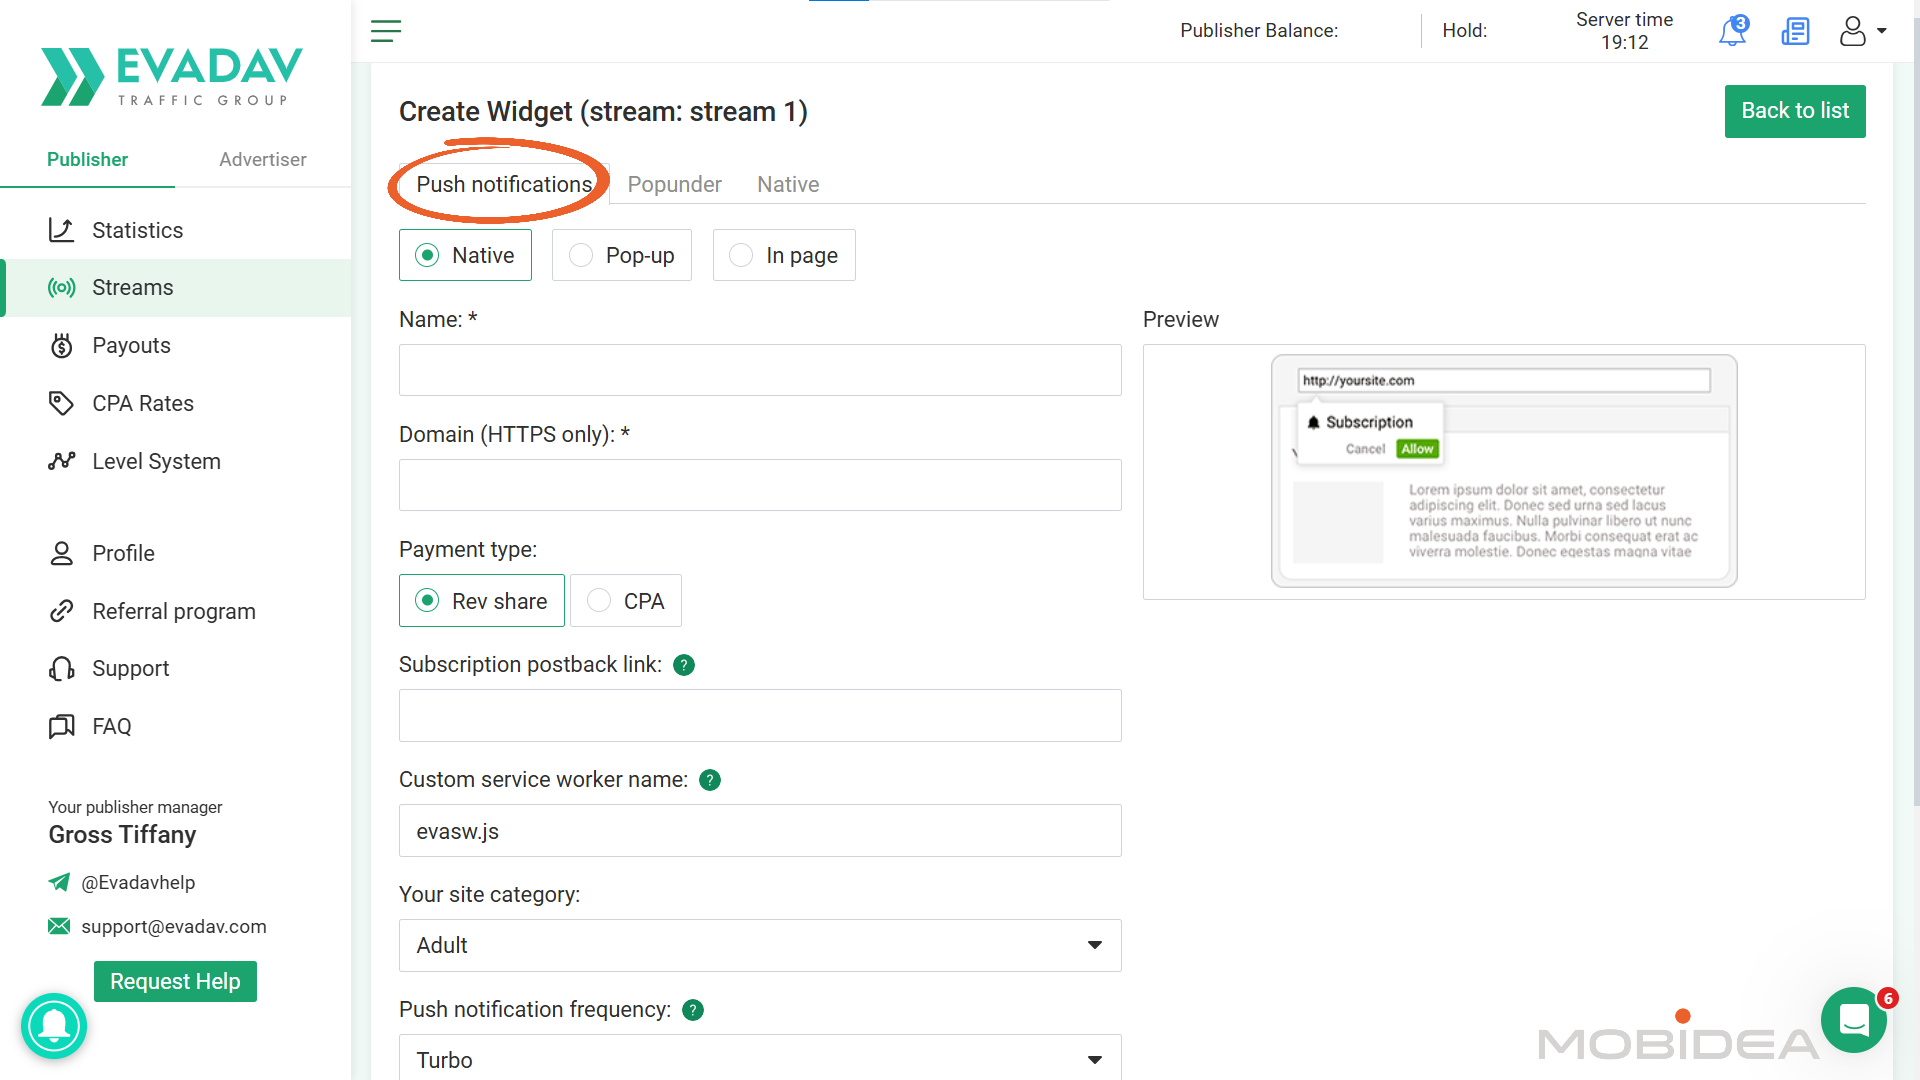
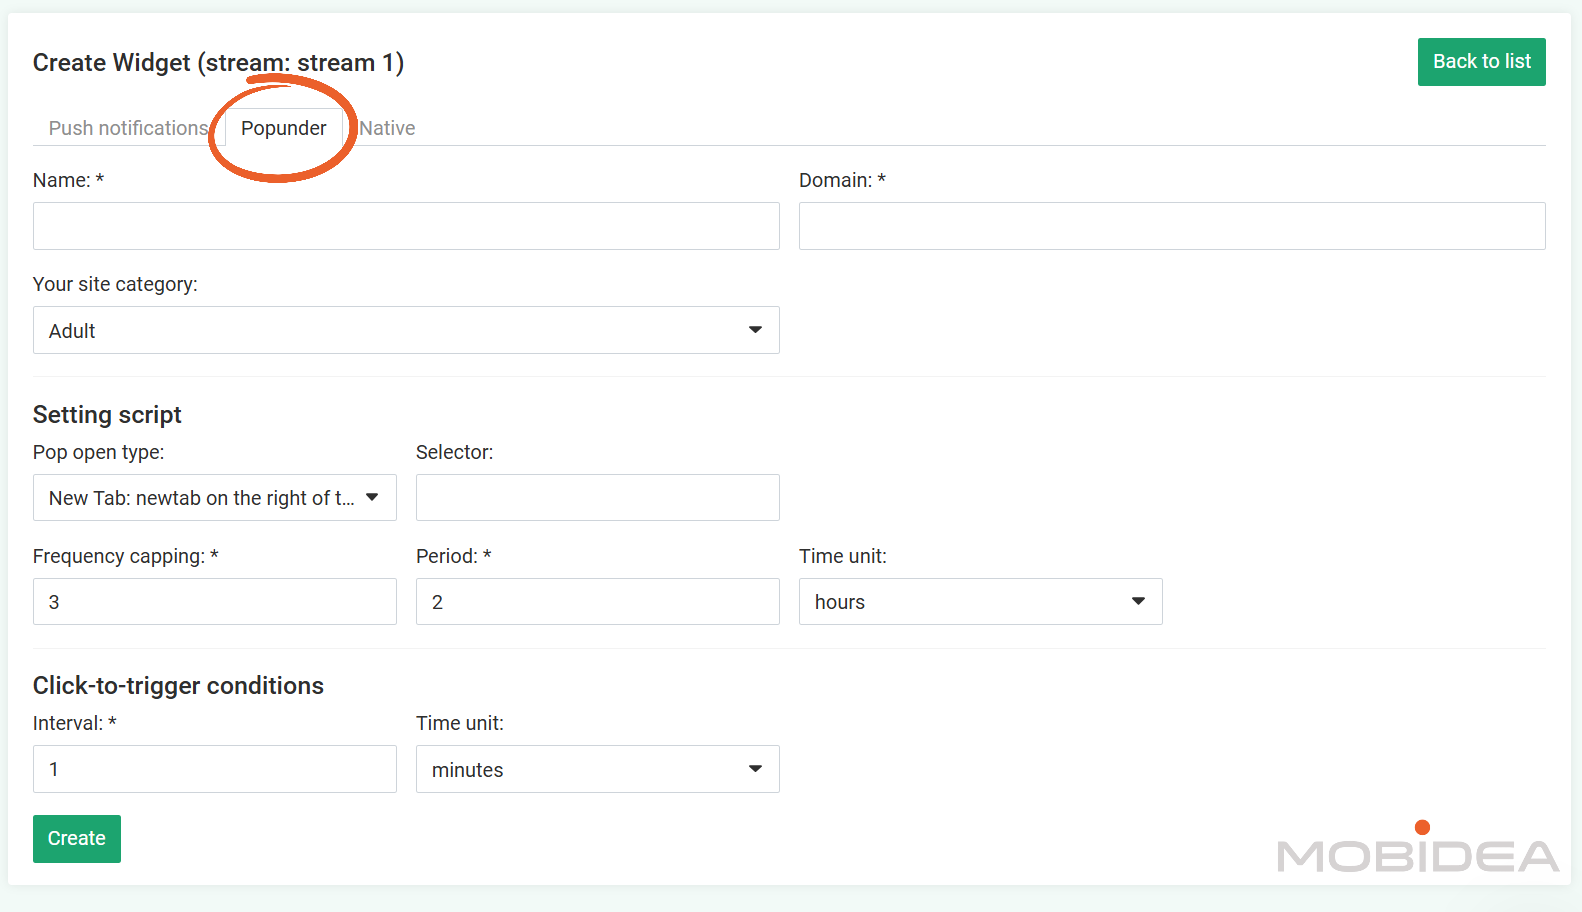
These tabs are the traffic that you plan on sending to Evadav: Push notifications, popunders, and native advertising.
Each ad format has its own settings and configuration.
Here’s for push traffic:
Here’s for popunders:
And finally, here’s for native advertising:
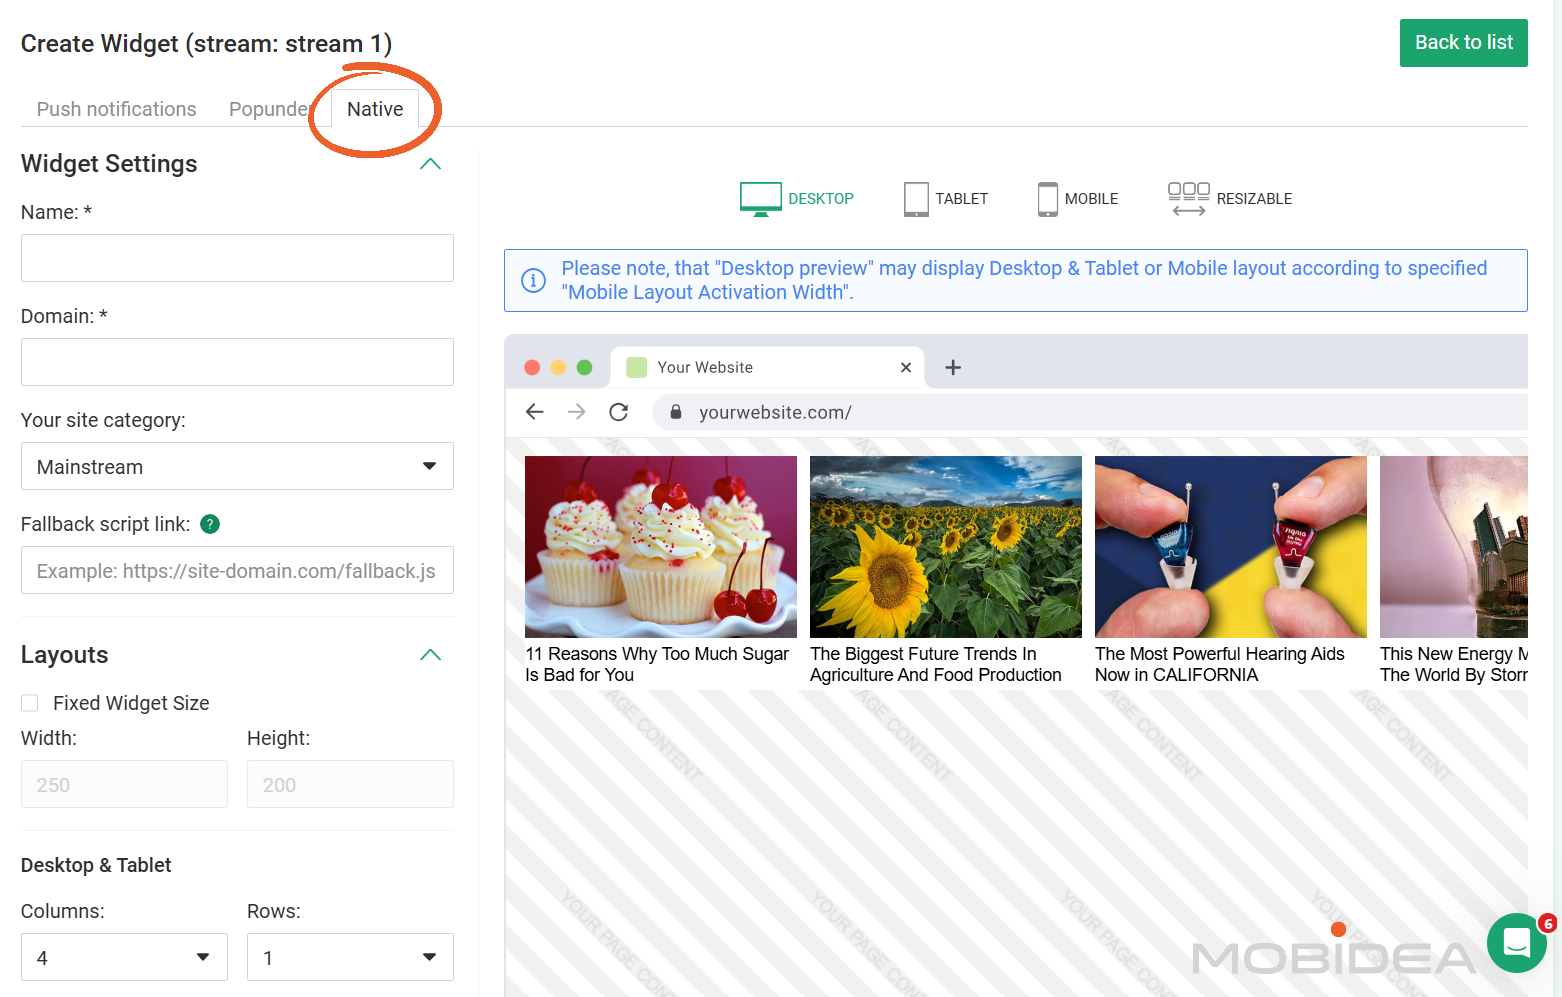
After configuration, EvaDav generates installation code.
Add it to your site’s header, footer, or specific placement locations.
Moderation and Going Live
Widgets enter moderation after code installation.
The team reviews sites to ensure quality standards.
Approval typically takes a few hours to one business day.
Once approved, ads display immediately.
Performance Monitoring
Statistics update every 15 minutes. Access detailed reports showing performance by country, device, browser, and placement.
Key optimization tips:
- Test multiple formats to see what generates best revenue
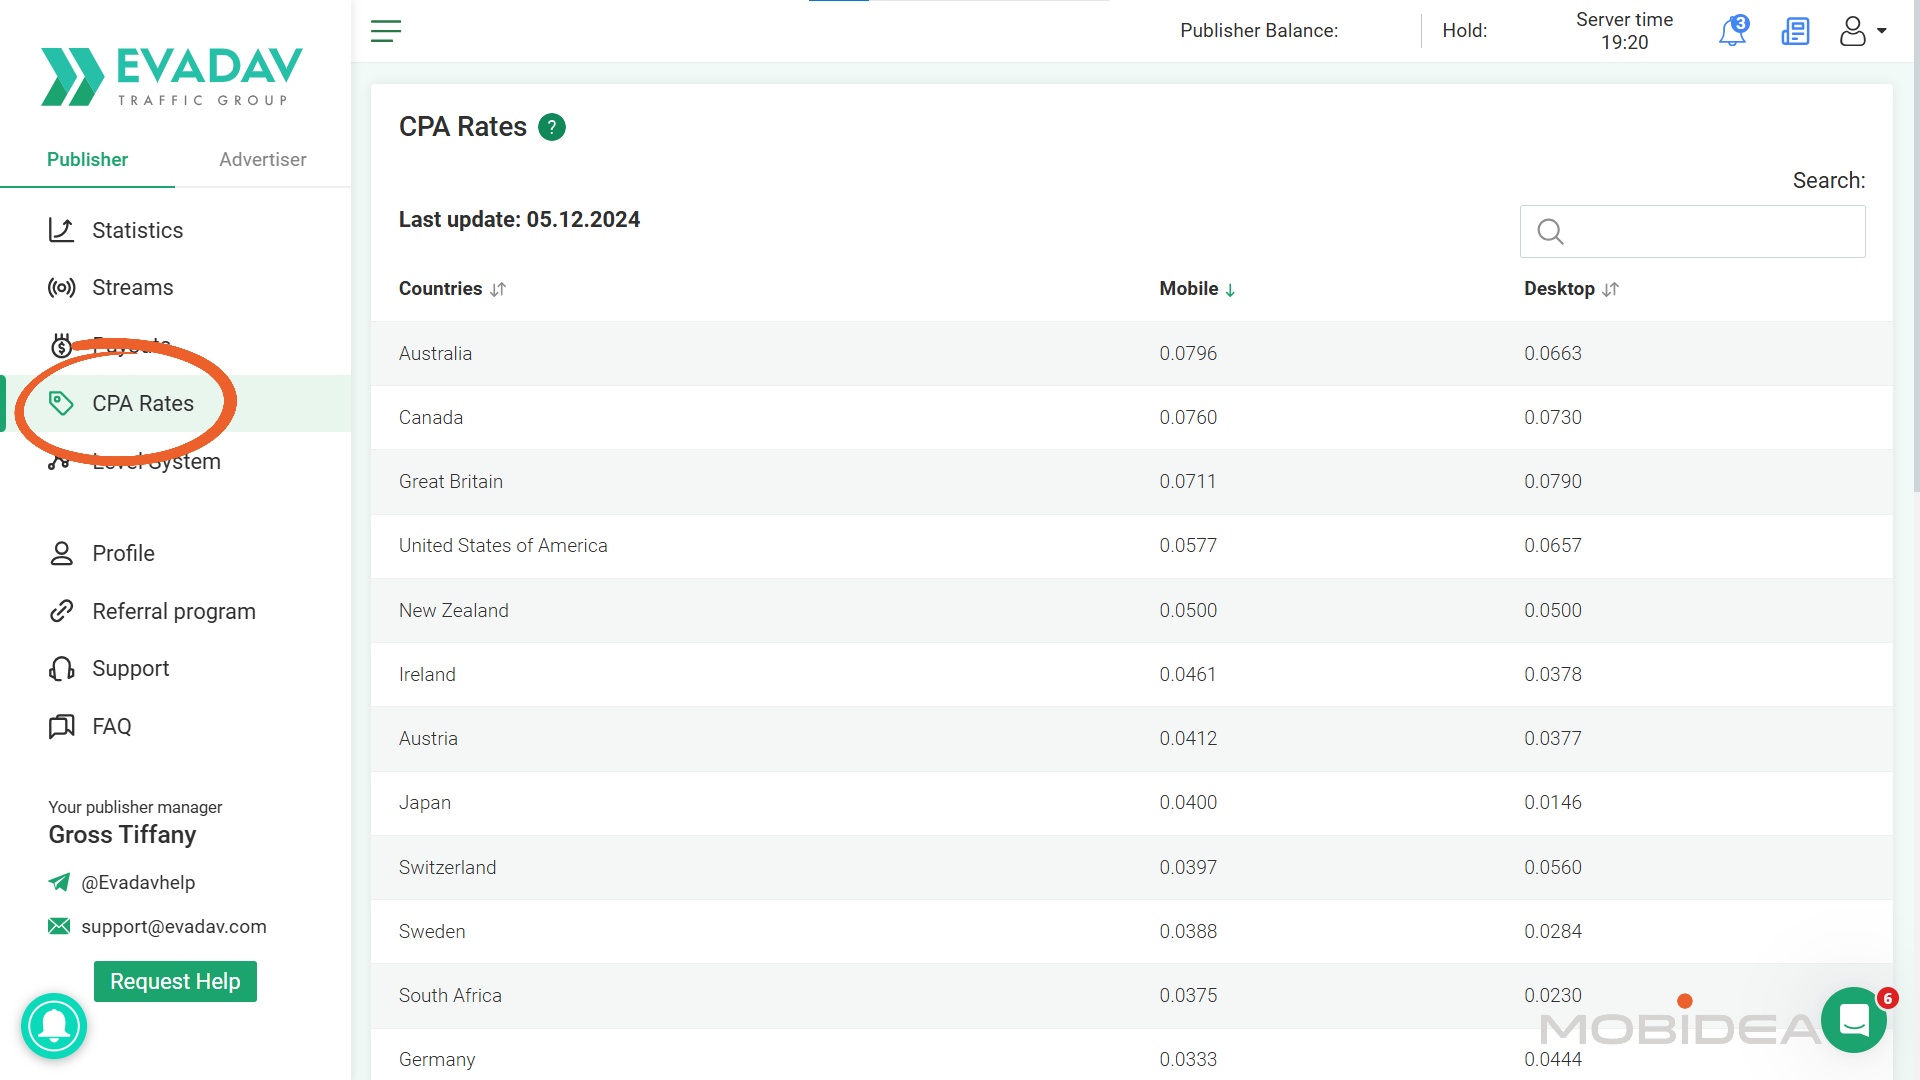
- Watch CPA rates by country—some geos pay significantly more
- Monitor CTR; low rates might indicate poor placement
- Use SubIDs to track which traffic sources earn most
- Don’t over-monetize; balance revenue with user experience
Getting Paid
Once balance reaches $100, withdrawals process automatically every Tuesday.
No manual requests needed.
Referral earnings follow the same schedule and minimum threshold.
If issues arise, support responds quickly via live chat or email with specific optimization suggestions.
EvaDav Review Verdict
EvaDav is worth advertising in, plain and simple!
The platform has been operating since 2018, serving billions of impressions daily, and consistently delivering results for advertisers across Dating, Gambling, Nutra, E-commerce, and other verticals.
The $100 minimum deposit makes it a low-risk test, and the interface won’t waste your time with unnecessary complexity.
The bottom line is that every traffic source performs differently depending on your offer, creative, and targeting.
The only way to know if EvaDav works for your campaigns is to run them.
Ready to test?
That’s extra traffic to test with—start your campaigns today.
EvaDav Review FAQs
Is EvaDav worth advertising on?
Yes, it’s worth a test.
You get four ad formats across 250+ countries with a $100 minimum deposit, though you can’t target by device manufacturer or model.
Is EvaDav legit?
Yes. It has operated since 2018 as part of the Evadav Traffic Group, and publishers get paid automatically every Tuesday.
What is the minimum deposit in EvaDav, and how do I fund my account?
The minimum deposit is $100, and you can pay by card, PayPal, Skrill, Bitcoin, or bank wire, among others.
Do you have an EvaDav coupon code?
Yes, Mobidea Academy has two exclusive EvaDav promo codes:
For deposits of $300, get a $50 bonus with the promo code mobidea50.
For deposits of $600, get a $100 bonus with the promo code mobidea100.
Which bidding models does EvaDav support?
Push, In-Page, and Native run on CPC or CPM, while popunders run on CPM or Smart CPM.
You can’t switch models mid-campaign, so duplicate the campaign to test the other one.
How long does campaign approval take?
Typically 5 to 20 minutes, and moderation runs 24/7, weekends included.
If your campaign is rejected, you get an email explaining why so you can fix it and resubmit.
How much should I spend on my first test campaign?
I’d start with $20 to $50 per day and 3 to 5 creatives.
But the minimum daily budget per campaign is $10.
How do publishers get paid on EvaDav?
Payouts run automatically every Tuesday once you hit $100, with no minimum traffic required.
New publishers start on RevShare, while CPA deals are negotiated privately.


Discover why TrafficStars is a leading adult ad network, offering high-quality traffic, scalable ad placements, and advanced optimization tools for affiliate marketers.

It's finally time for you to read, analyze, explore and dive into this updated Clickadu Review in order to become a dope affiliate master!

Check our PlugRush review and get to know everything you'll need to succeed with this platform. We created a campaign from scratch on PlugRush so you can follow all the steps.